|
|
 |
|
|
British 1st Armoured Division, France 1940
 |
British 1st Armoured Division, France 1940
by Jonathan Forsey
The British 1st Armoured Division had its origins as a ‘Mobile Division’ formed in October 1937. From its inception, the division was a tank-heavy formation designed for cavalry-style exploitation, rapid attacks, mobile operations on a fluid battlefield and reconnaissance in force.
The division contained both cruiser and light tanks. These were capable or rapid exploitation, but lightly armoured (for the most part) and unsuited to taking on well-supported defences, or tackling the better-supported German Panzer divisions head on. It was, however, the only armoured division available to throw into the maelstrom that was the Battle for France.
Learn more about the British Armoured Regiment here...
|
By the time the division arrived in France, the battle was well under way and not going well for the Allies. The opportunity to co-ordinate the division’s potentially powerful armoured mobility with other supporting British formations was not available. Without this support, and with further fragmented deployment under hastily arranged command structures, the division was not able to live up to its full potential. Had the division been at full strength and properly supported, the courage of its men could doubtless have been put to more productive use, particularly by way of large scale counterattack to sever the heads of advancing German panzer formations and plunging their rear areas into chaos.
|
 |
The Division
The division under the command of Major-General Roger Evans comprised two Armoured Brigades. The 2nd, under Brigadier R. L. McCreery contained the 2nd Queen’s Bays, 9th Queen’s Royal Lancers and 10th Royal Hussars (the so called ‘Light’ Brigade).
The 3rd ‘Heavy’ Brigade, under Brigadier J.G. Crocker comprised 2nd, 3rd and 5th Battalions of The Royal Tank Regiment (‘R Tanks’).
The regiments of both brigades were similarly organized, being battalion strength. In theory, each had a regimental HQ of cruiser tanks and Vickers light tanks and three company-sized squadrons, each with an HQ of cruiser and close-support (‘CS’) cruiser tanks and two platoon-sized troops of Cruiser tanks and two of Vickers light tanks.
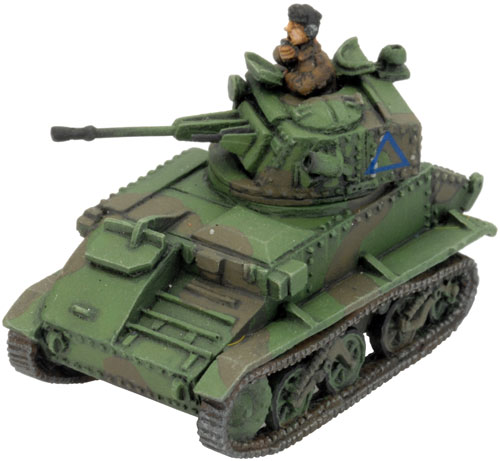
The cruiser tanks were a mixture of A9 Cruiser Mk I, A10 Cruiser Mk II, A13 Cruiser Mk III, and A13 Mk II Cruiser Mk IV types.
|
The A9 Cruiser Mk I had a useful top speed of 25 miles per hour and a roomy turret, with room for three crew, but also featured two awkward and cramped machine gun turrets in the front hull and armour only 14mm thick at best.
Right: The A9 Cruiser Mk I miniature.
Learn how to assemble the British Armoured Regiment here...
|

|

|
The A10 Cruiser Mk II developed the A9 design and did away with the awkward sub-turrets and increased the frontal armour to a more useful 30mm, but at the expense of speed, managing 16 miles per hour. It was sometimes referred to as a “heavy cruiser”, having some attributes of the slow and heavily armoured infantry tanks.
Left: The A10 Cruiser Mk II miniature. |
The A13 Cruiser Mk III featured revised suspension, could reach speeds of 30 miles per hour, but again was hampered by the flaw of weak armour of 14mm at best.
Right: The A13 Cruiser Mk III miniature.
Learn what colours to paint Cruiser tanks here...
|

|
 |
The A13 Mk II Cruiser Mk IV type represented a significant improvement, keeping the 30 miles per hour top speed, but increasing the armour to 30mm maximum.
Left: The A13 Mk II Cruiser Mk IV miniature. |
All of the above types were armed with the 2pdr, which had a very useful anti-tank ability by 1940 standards, but lacked any high explosive capability to deal with enemy anti-tank guns. The CS versions of the cruiser tanks substituted a 3.7in howitzer for the 2pdr, (designed to fire smoke rounds only), as a means of screening advancing tanks from enemy fire.
Both the Light Mk VI B and less common Light Mk VI C were used in large numbers, for the lack of an alternative being used as front line tanks. Small vehicles, armed with a heavy machine gun (15mm BESA in the case of the Mk VI C) and a crew of 3, they were fast with a top speed of 35 miles per hour, but vulnerable with armour only 14mm thick.
Right: The Tank Mk VI C miniature.
|
|
At full strength, the division totalled 9,442 all
ranks and boasted over 250 tanks (though 110 of these were light tanks
and a further 24 the CS type). This represented considerable armoured
strength, if properly used.
Actual organisations as far as known:
|
| 2 R Tanks |
A, B Squadrons |
| RHQ: 1x A10 + 2x A9 (+ 3x Light Mk VI C) |
SHQ: 2x A13 + 2x A9CS |
| A, B, C Squadrons |
Two troops of A13, two troops of Light Mk VI B |
| SHQ: 2x A9 CS |
C Sqn |
| Two troops of A13, two troops of Light Mk VI C |
SHQ: 3x A13 |
| 5 R Tanks |
One troop of A13, two troops of Light Mk VI B |
| RHQ: 3x A10 + 1x A9 (+ 5x Light Mk VI B) |
10th Hussars |
| A, B, C Squadrons |
RHQ: 1x A10 + 2x A9 (+2x Light Mk VI C) |
| SHQ: 2x A13 + 2x A9CS |
A, B, C Squadrons |
| Two troops of A13, two troops of Light Mk VI B |
SHQ: 2x A9CS |
| Queen’s Bays |
One troop of A13, two troops of Light Mk VI C |
| RHQ: 3x A10 + 1x A9 (+2x Light VI C) |
|
|
 |
|
In addition
to the armoured regiments, the division contained the 1st Support
Group under Brigadier F.E. Morgan. This had two battalions of infantry, known
as motor battalions—2nd Battalion, King’s Royal Rifle Corps, and 1st
Battalion, The Rifle Brigade—and the 101st Light Anti-aircraft and
Anti-tank Regiment with two batteries of 12 2 pdr anti-tank guns and two light anti-aircraft
batteries, and a squadron of engineers.
The anti-aircraft batteries were each meant to have 12 40mm AA Guns, but
were deployed to France with Lewis light machine guns in their stead. The division had no organic artillery component.
It was not
only the tanks that were untested—the division’s new BESA machine guns were
also unfamiliar, many newly arrived in their packing cases. Teething troubles,
mechanical unreliability and lack of logistical support were to be a constant
headache to the division during its deployment. The division had few spares, no
bridging equipment and an incomplete and unreliable radio network. As events transpired, it was unable to make
good these deficiencies from Corps support.
|
 |
To War
Notwithstanding these shortcomings, the deteriorating situation in France meant that the 1st Armoured Division had to be shipped off to France. The precarious situation of the British Expeditionary Force, already falling back toward the channel and trapped north of the Somme meant that the division was dispatched to Cherbourg in Normandy. Belgium had surrendered on 12 May, and French and British forces had been forced into a retreat, defensive lines rapidly outflanked and German forces already pushing for the coast along the north bank of the Somme, cutting off the option of retreat to the South for allied forces north of the river unless vital crossing points could be retaken.
Already isolated from the majority of British forces by virtue of this deployment, worse was to come. Evans was shorn of his divisional motor battalions and 3rd R Tanks from the outset, these having been dispatched, along with the divisional support group, to assist in the defence of Calais. Furthermore, his armoured brigades were not able to be landed at the same time, so were sent in two waves. At no stage was Evans to even have the luxury of having his entire division in the same place. Instead of acting as a concentrated reserve, a role for which it had trained; it was broken up and used piecemeal to respond to pressing crisis points as they emerged.
|
 |
Objective - The Somme Crossings
First to arrive in Normandy on 22 May was the Light (2nd) Brigade. While Evans was organizing this force, the Heavy Brigade was still crossing the channel. Notwithstanding this dispersal, Evans was ordered to capture and hold no fewer than four key bridgeheads across the Somme in the area of Abbeville in order to link up with the retreating BEF to the north. Unfortunately, German forces had already reached Abbeville on 20 May. Evans could not wait to consolidate what forces he had.
As the division had lost its organic infantry, Evans was allocated three companies of the 4th Border Regiment to assist him, by way of partial compensation. There was little time for reconnaissance and as a result, 9th Lancers and 10th Hussars and the unfamiliar men of the Borders found themselves engaging German forces soon after detraining, having rushed to the front. They had no time to prepare and were tackling unknown enemy strength and a major water obstacle, but true to their traditions did not hesitate to throw themselves into their unenviable task.
Such French reports as were available advised that the area near the river was thinly held by light advance German forces lacking anti-tank equipment. In fact, the Somme crossings Evans had been tasked with taking were well held by German infantry, shoring up the flanks of the advancing Panzer formations. The collapse of French forces north of the river and the speed of the German advance meant that neither Evans nor his allies had any accurate information as to the enemy dispositions.
|
 |
Tally ho!
In fact, German forces were in no mood to withdraw and Evans was soon to find the extent to which his orders were hopelessly unrealistic. On 24 May a company of the 4th Borders and a troop of the Queen’s Bays did manage to cross the Somme at Drueil, though the tanks could not cross and the infantry were forced to withdraw in the face of fierce resistance.
Another company ran into a German ambush in woods northwest of Amiens. The supporting troop from the Queen’s Bays promptly engaged the ambushers with their light tanks and enabled the Border’s survivors to beat a retreat.
In a third fight, Viscount Erleigh’s 2 Troop of the Queen’s Bays endeavoured to outflank the German forces holding up a third company, but promised support failed to materialize and the force was again forced to retreat. Whilst Erleigh earned a Military Cross for his efforts, it became clear that the Germans were present in some numbers and would take a full-scale assault to dislodge. The German hold on the Somme was to prove secure.
The French Commander in Chief of all allied forces, General Weygand, hit upon a plan for the BEF forces to advance South and French forces south of the river to advance north to trap the German forces around the Somme. The plan was for the division to be joined by 51st Highland Division, after the former had forced and secured the Somme crossings.
In anticipation, the division was placed under the command of the French 7th Army. Unfortunately for the division, General Weygand chose it to be the spearhead of this attack, a task for which it was given little support and for which its predominantly light, fast armour was ill-suited without support. Evans protested to General Altmayer, his immediate superior, to no avail.
The assault kicked off on 27 May, the delay having allowed the defenders time to dig in. The division’s front stretched from Abbeville (target of 2nd Brigade) to St.Valéry-sur-Somme on the coast (3rd Brigade).
|
 |
The 2nd Brigade, still expecting only light resistance, launched their assault into a maelstrom of fire. 10th Hussars, (who did not receive radio reports of a delayed start because of the wireless problems that plagued the division), attacked in isolation ahead of its fellow regiments and lost two thirds of its strength within minutes. The Bays, attacking to the left of the Hussars were also mauled by the German gunners. Like their Crimean namesake, the Light Brigade had charged into the valley of the guns, at terrible cost. In a lesson the British were to re-learn at great cost in the Western Desert, frontal attacks by armour, particularly light armour, on well handled and dug in anti-tank defences were a recipe for disaster.
The Heavy Brigade made better ground, with 2nd R Tanks reaching Minnay. The tanks then had to halt, waiting for promised French infantry support that never materialized. 5th R Tanks reached the heights overlooking their objective of St.Valéry-sur-Somme, but again had little support from French forces, so the tankers were unable to consolidate their gains. Without infantry to hold it, the territory gained had to be given up in the face of pressure, another lesson that had to be re-learned at great cost in later campaigns. Had the division still had its support group available, the outcome of these assaults may well have been different.
As it was, the division had lost over 100 tanks, to little overall purpose, having valiantly pressed home unsupported attacks and then being forces to withdraw, giving up gains that had been made at great cost.
|
 |
On 28 May, the frustrated tankers of the division
were relieved by French armour under General De Gaulle, which, better
supported, was able to force, but not exploit, fragile bridgeheads over
the river. De Gaulle too was hampered by a lack of effective infantry
support and was unable to break through. Had De Gaulle’s men been able
to attack in conjunction with 1st Armoured Division and had there been
further infantry and artillery support, again the outcome may have been
different.
The division was down to 65 Cruisers and a similar number of Vickers
Tanks in running order. These worn tanks of the exhausted crews of 3rd
Brigade and the runners from the harder hit 2nd Brigade were sent in a
composite formation support of 51st Highland Division. The remainder of
2nd Brigade scrounged for spares near Rouen and rebuilt as best it
could.
While the division was regrouping, the drama of Dunkirk was unfolding to
the north, with BEF and French troops being evacuated from the
beaches. With the remnants of these forces having being evacuated, the
Panzer Divisions were now at liberty, their flanks secure, to turn their
attention to remaining areas of resistance, including the division’s
positions in Normandy.
Under relentless pressure from the German offensive, French defensive
plans were rendered obsolete and the command system started to fall
apart. This impacted on the division, still under French command. Evans
waited in vain for orders, eventually travelling to seek out General
Altmayer. Altmeyer instructed the division to hurl its remaining
strength (now fewer than 80 running tanks) into the teeth of the German
assault. No sooner than these orders were given, they were altered by
General Weygand himself, who directed Evans to focus his counter-attack
south of Rouen.
|
 |
Notwithstanding the plans for counter-attack, by 8 June it was apparent
that French defences had collapsed and rather than attack south of
Rouen, a retreat across the Seine was necessary to avoid encirclement.
2nd Brigade crossed the Seine at Pont de l’Arche after some anxious
moments with their allies, who at first seemed inclined to contest the
withdrawal.
3rd Brigade and the composite regiment from 2nd Brigade freed from their
secondment to 51st Highland Division and spared the plight of that
formation, also had to find their way across the Seine. To do so, they
had to sprint more than 120 miles in the space of one day, negotiating
routes choked with refugees and disorganized French units.
The division regrouped on 9 June, but was in a state of perpetual
withdrawal in the face of heavy pressure. 2nd Brigade and the composite
regiment withdrew to Le Mans, while Brigadier Crocker’s 3rd Brigade
refitted as best it could in the front line. |
 |
Evacuation
Crocker’s men covered an area of front line of approximately 5 miles in length between Barc and Barquet. Defensive preparations were abruptly halted by news of an imminent French armistice. Crocker ignored French orders (still being under French command) to move inland, instead obeying orders direct from British HQ to make all speed to Cherbourg for evacuation. 3rd Brigade did this, arriving at the channel port by evening on 17 June, loading on to the waiting ships and leaving as soon as possible. The Brigade’s evacuation was just two days ahead of the arrival in the port of German forces under General Erwin Rommel, whose arrival had been delayed by the valiant stand of the 51st Highland Division. The escape was very much a ‘close run thing’.
2nd Brigade raced to a different port for its evacuation, namely Brest in Brittany. At this stage, the unit only had 15 tanks, which had been loaded on rail for Brest, but never arrived. The remaining men of the 2nd Brigade arrived back in England without their much needed tanks.
That any men made the evacuation at all was a minor miracle considering the disastrous and compromised nature of their deployment, yet Major General Evans was relieved of his command as a result.
|

|
Calais
Meanwhile, what of the men of 1st Armoured Division in Calais? 3rd R
Tanks, together with 229th Anti-tank battery, Royal Artillery and the
Queen Victoria Rifles (‘QVR’), (a territorial motorcycle reconnaissance
unit) arrived on May 22. As a result of the sort of errors which were
proving all too common for the Allies in the campaign for France, QVR
were deployed without their motorcycles and 3rd R Tanks without the
necessary radios for their Cruiser tanks, or even the chance to test
fire their weapons.
Notwithstanding these issues, 3rd R Tanks were sent toward Boulogne,
with part of the regiment detached to escort a supply column destined
for the BEF. The main body of the regiment fought a sharp action with
the Panzers of the 1st Panzer Division during the afternoon, losing
about half of their available tanks near Guînes.
The escorted supply column also tangled with roving German battle
groups with some success, the escorting tanks destroying some of the
German armour in the process. The column turned back, but the escort
armour pushed on to Gravelines, before falling foul of stronger German
forces the following day.
As these actions were taking place, 30th Motor Brigade troops had
been arriving in Calais, 2nd Battalion, King’s Royal Rifle Corps and 1st
Battalion, Rifle Brigade, though without most of their vehicles and
heavy equipment, which had remained on board their transports, plus the
remainder of the support group. These men, under Brigadier Claude
Nicholson, arrived just in time to assume defence of the port, initially
against the men of Generalmajor Ferdinand Schaal’s 10th Panzer
Division. |
 |
The physical defences of Calais, with an imposing Citadel at their centre, had been eroded over time due to neglect and the needs of modern living, penetrated by railway lines and in places overrun and overlooked by ever growing suburbs. It became apparent to Nicholson that whilst his British units and the French who fought alongside them could delay the enemy, the port could not really be defended.
The German assault with heavy Luftwaffe support steadily pushed in the outlying defenders, who fought hard and threw back repeated assaults, despite the odds stacked against them. Whilst some wounded were evacuated in small craft, the general evacuation order the men were waiting for did not arrive on May 25, the last time when it could usefully have been given. The sacrifice of the defenders became a symbol of resistance, Foreign Minister Anthony Eden announcing that ‘The eyes of the Empire are on the defence of Calais’.
‘Eyes’ could not substitute for reinforcement and the staunch defence could not last. On 26 May, the German forces renewed the assault with artillery and air bombardment, Schaal’s men forcing the bridges over a canal which formed a key part of the city centre defences in the face of stiff resistance. The noose tightened and the order ‘every man for himself’ was issued too late to enable many of the rifles and others to escape. The Rifle Brigade fought its heroic last stand around Bastion No.1. Nicholson surrendered the Citadel at 4pm, after 3 days of fierce fighting. The majority of the defenders were captured, but some (including some from 3rd R Tanks) made their way to the Dunkirk perimeter via Gravelines, whilst others were snatched from jetties within Calais Harbour itself.
The efforts of Nicholson’s men did tie down a Panzer Division during a critical period and the tenacity of their defence was noted by Generaloberst Heinz Guderian himself, but it is questionable whether their sacrifice enabled the evacuation from Dunkirk to proceed in the manner that it did. The loss of a Brigade of well trained and highly motivated troops who may otherwise have been saved had they been withdrawn a day earlier is hard to comprehend.
Overall, the experience of 1st Armoured Division in France was frustrating and perilous. By the time of its deployment, the division was facing a collapsing front and its dispersal as a cohesive formation before even a shot was fired. Added to that was an awkward, cumbersome command structure and relations with its allies which were strained from the outset because of the tremendous pressure the allies were under given the successes of the German assault. Some valuable lessons were learned, but at great cost. Above all, however, the bravery of the men of the division was never in doubt.
~ Jonathan. |
Want To Know More About Blitzkrieg?
Over the past few months we have added a massive range of articles
about Blitzkrieg to the website, to make it easier for people to find a
specific article we have put together this handy place.
Find out more about Blitzkrieg and Early-war here...
|
Last Updated On Wednesday, March 9, 2011 by Blake at Battlefront
|
|
|