|
|
 |
|
|
The Battle Of Smolensk
 |
The Battle Of Smolensk:
An Early-war Battlereport
with Wayne Turner & Casey Davies
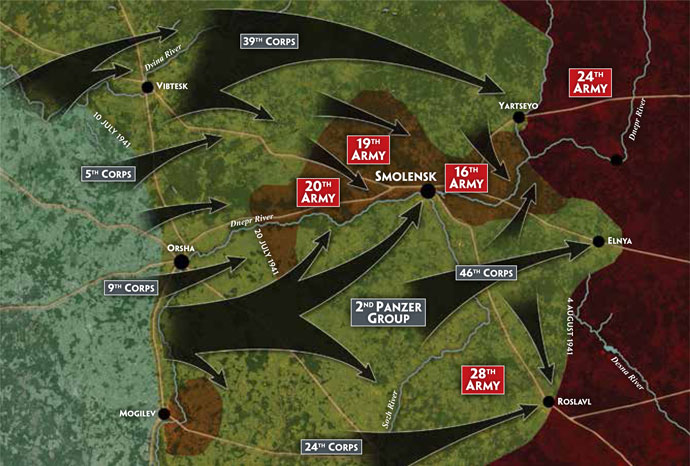
The battle for Smolensk began on 10 July 1941 when the German 2nd Panzer Group crossed Dnepr River and ran into the shattered Soviet 13th Army who had just escaped from the Minsk Pocket. The Germans made quick work of the four exhausted rifle divisions that made up the 13th Army. By 13 July the 2nd Panzer Group had passed Mogilev where they encircled two corps who continued to resist the Germans until 26 July. However, they could not stop the German advance. By the evening of 13 July the Germans' leading divisions were within 18 km (11 miles) of Smolensk, smashing their way through the recently arrived Soviet 19th Army.
|
The Soviets were quick to react and the high command ordered an immediate counter-offensive to drive the Germans back to the Dnepr River. A series of counter-attacks hit the right flank of the 2nd Panzer Group, but Guderian, commanding the group, refused to be distracted by these disjointed attacks and pushed on toward Smolensk. 29. Infanteriedivision (Motorised) led the advance from Orsha to Smolensk closely followed by the 17. Panzerdivision and 18. Panzerdivision (with over 400 tanks between them). To the north, Hoth’s 3rd Panzer Group also pushed towards Smolensk. However, the 3rd Panzer Group advanced too far to the northeast to link up in time with the led elements of the 2nd Panzer Group for the assault on Smolensk. The two panzer groups finally linked up on 26 July east of Smolensk.
Soviet resistance continued and they managed to keep open a narrow corridor to the east through which allowed the remnants of the defending forces to escape. Throughout this period the Soviet kept up counter-attacks from the north, south and east and casualties were high on both sides. |
 |
Due to the ferocity of the Soviet counter-attack the German rethought their strategy of tank the direct route to Moscow, and instead turned their attention towards the south and the seemingly vulnerable Ukraine.
Throughout the advance and battles for Smolensk the armoured troops of both side clashed in the north, south and east.
The following battle report represent a clash typical of these clashes.
We decided a good way of representing the battles in and around Smolensk was to play a Breakthrough Mission with our forces. The Soviets are attempting to either escape encirclement or to open a corridor
for trapped troops to escape through.
With that in mind we had the Soviets as the attacker and the Germans as defenders. Casey commanded the Soviets and Wayne commanded the Germans.
Both forces would have reserves, the defenders Mobile Reserves and the attacker Delayed Reserves. For this mission both forces reserves were variable depending on the composition of the force and the players own decisions. As Wayne could have only the one mobile unit on the table at the start of the game, he decided to dismount his Kradschützen Platoon and field them as infantry. This meant he had most of his force on table, with only his Panzer II Platoon in Reserves.
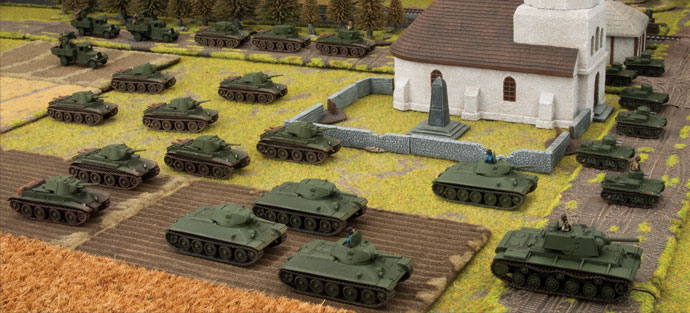
Casey, on the other hand, could choose to have between one and half his platoons in Delay Reserves. He decided to commit three platoons to Delayed Reserves due to the excellent position his reserves would come on the table, right behind the two objectives. He placed his Anti-aircraft Machine-gun Platoon, Scout Tankovy Company and Light Tankovy Company in Delayed Reserves. |
| Casey's Soviet Tankovy Batalon (from page 56 of Barbarossa) |
 |
| Soviet Tankovy Batalon (Confident Conscript) |
| Headquarters |
|
| Tankovy Batalon HQ |
|
| with one T-34 obr 1940. |
215 points |
| Combat Platoons |
|
| Tankovy Company |
|
| with three T-34 obr 1940. |
645 points |
| Light Tankovy Company |
|
| with eight BT-7. |
370 points |
| Weapons Companies |
|
| Anti-aircraft Machine-gun Platoon |
|
| with three Quad Maxim on truck. |
55 points |
| Scout Tank Company |
|
| with six T-38. |
115 points |
| Self-propelled Gun Battery |
|
| with three BT-7A with AA MGs. |
95 points |
| Support Platoon |
|
KV Tankovy Company
|
|
| with one KV-1 obr 1939. |
255 points |
| Total Points: |
1750 points |
|
| Wayne's Leichte Panzerkompanie (from page 12 of Barbarossa) |
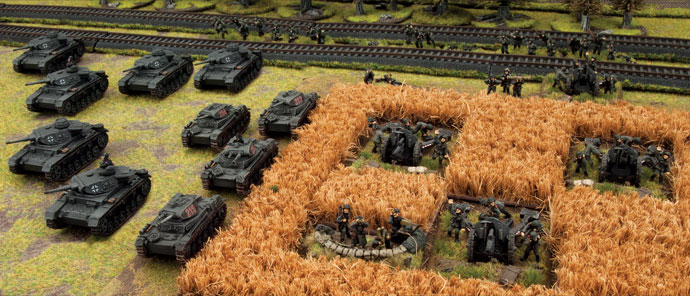 |
| Leichte Panzerkompanie (Confident Veteran) |
| Headquarters |
|
| Leichte Panzerkompanie HQ |
|
| with two Panzer III G. |
305 points |
| Combat Platoons |
|
| Panzer III Platoon |
|
| with four Panzer III G. |
615 points |
Panzer II Platoon
|
|
| with four Panzer II C (late). |
225 points |
Support Platoons
|
|
| Light Artillery Battery |
|
| with four 10.5cm leFH18 with trucks. |
365 points |
| Kradschützen Platoon (Dismounted) |
|
| with Command MG team, four MG teams, one Light Mortar team, & one Anti-tank Rifle team. |
235 points |
| Total Points: |
1745 points |
|
| Deployment (Mission: Breakthrough) |
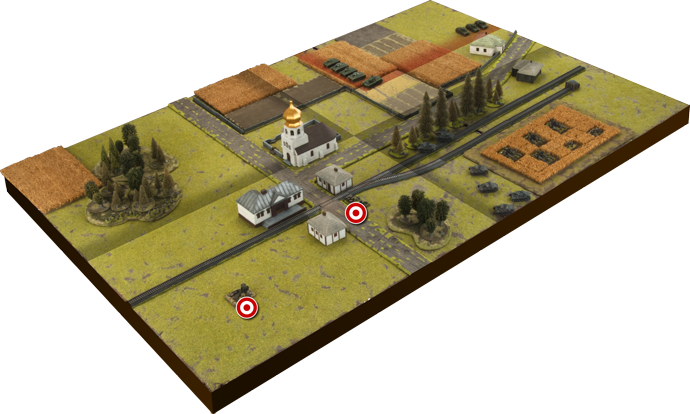 |
| Opening Moves: Turn One, Two, and Three |
| Soviet Turns One to Three: Casey |
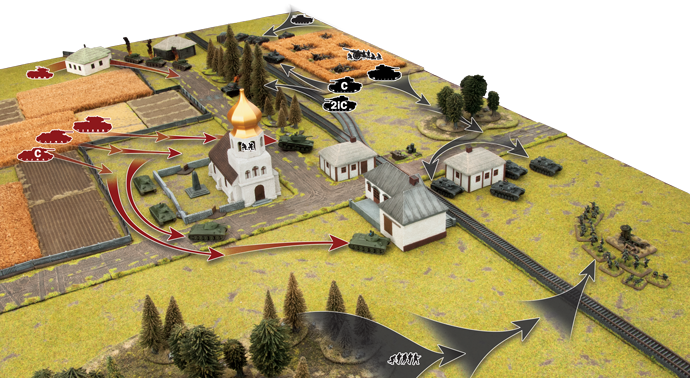
My plan was simple really. All of my heavy armour was going to advance as fast as possible towards the objectives, and try to whittle Wayne’s armour down a little bit before my more lightly armoured vehicles came on from reserve.
My BT-7A artillery tanks’ job was to go after Wayne’s 10.5cm artillery battery, as it’s the biggest threat to my T-34 and KV-1 tanks.
Due to the Hen and Chicks special rule on the first turn I need 7’s to hit, but luckily in his turn Wayne gave me some better targets to shoot at, and I was able to destroy his 2iC Panzer III needing 6’s.
Unfortunately that was the only damage I was able to cause in the first 3 turns. When they could shoot, The BT-7As split their fire between the artillery and the Panzer II tanks and only manage to bail one tank, even with the rerolled misses from Volley Fire. |
 |
| German Turns One to Three: Wayne |
My plan for the first turn was to tie-up the Soviet tanks with my HQ Panzer III tanks and the artillery while the Kradschützen and Panzer III Platoons made a dash for the objectives.
With that in mind the infantry and tanks moved towards the objective sector, while my HQ tanks pushed into the tree line along the railway tracks to fire on the T-34 tanks, only managing to bail out one T-34, for the loss of the 2iC.
Casey had cunningly spread out his T-34 tanks enough so I could only include one tank at a time under the 10.5cm Artillery battery’s template. I was able to hit the tanks easily enough, but Casey passed all the top armour saves. I also failed to make any Storm Troopers moves, which would have be handy for continuing my advance and avoiding return fire from the T-34 tanks.
Luckily I managed to get my Panzer II tanks from Reserves in the second turn to reinforce the artillery flank. They only manage to bail out one BT-7A on the turn they arrive, but obliterate the BT-7A’s in the third turn with help from the Company Command Panzer II who I extract from the tree line to and add his firepower to dealing with the Artillery tanks. |
| Turn Four |
 |
| Soviet Turn Four: Casey |
I was a bit disappointed that my BT-7A artillery tanks were destroyed without causing any significant casualties, however they achieved their main job which was to force Wayne to bring his reserves on far away from the objectives.
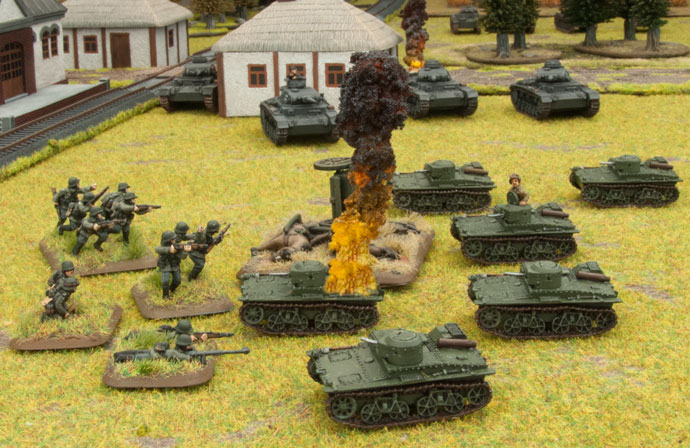
I received the first of my reserves this turn and decided to bring on my T-38 scout tank platoon to deal with the Kradschutzen before they have a chance to dig-in. I chose them over the BT-7 tanks as the rest of my tanks weren’t in a position to take advantage of the added firepower.
The rest of my tanks continued to manoeuvre into better firing positions for next turn, with the KV-1 parking on one of the objectives and scoring a Panzer III kill.
The Scout tanks opened up with their machine-guns, destroying three infantry teams with their eighteen shots. Pressing the attack they launch an assault, not realising how thin their armour is. One tank is bailed out and another destroyed from the defensive fire.
Wayne’s next turn is going to hurt! |
 |
| German Turn Four: Wayne |
With Casey’s first reserves arriving pressure is really on around the objectives. Luckily I have until Turn 6 to firm up my defence of the Objectives. The excellent firepower of my Kradschützen Platoon saw off the assault attempt by the Scout Tankovy Company, but has reduced their number down to just four teams from the original seven. However, out of adversity rises opportunity, they unpin and with one T-38 destroyed and another bailed out, they decided to shoot at the scout tanks. Between them and the Panzer III Platoon they destroy three T-38 and bail out two more. With the no active tanks the Kradschützen assault the Soviet tanks and knock-out the bailed out tanks.
Meanwhile, the Panzer II Platoon doubles towards the objectives, putting them as some risk from fire from the KV-1. The CnC also move towards the other flank. The artillery switch target again and manage to drop a barrage on the T-34 tanks on the road next to the Church, thanks to the observer positioned in the bell tower. They destroy one T-34 and bail out another. The CnC misses his shot at the T-34s.
A good turn with another platoon destroyed and one dangerous T-34 eliminated. |
 |
 |
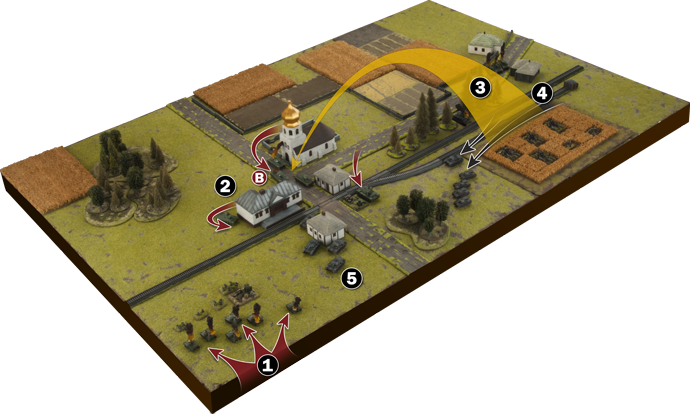
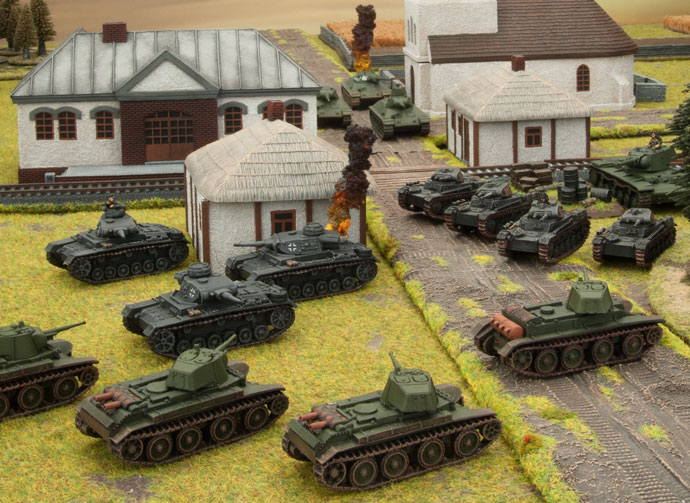
T-38 Scout tanks arrive and destroy 3 Kradschutzen teams. They launch an assault, but get shot off. |
 |
The T-34’s and KV-1 move into better firing positions and destroy one Panzer III. |
 |
The artillery fires a bombardment on the T-34 platoon, destroying one tank and bailing out another. |
 |
The Panzer II platoon doubles towards the objectives. |
 |
The Panzer III platoon and Kradschutzen destroy 3 T-38 tanks and Bail another. The Kradschutzen then successfully assault the two remaining bailed out Scout tanks. |
 |
Represents a Bailed Out Soviet tank. |
|
 |
| Soviet Turn Five: Casey |
With my heavies in prime shooting spots, my BT-7 tanks arrive from reserve.
My whole army now opened fire on the German armour.
I only need fours to hit for the six shots from the KV-1 and T-34’s, and need fives to hit from the eight BT-7’s.
I rolled a total of four hits, which Wayne proceeded to roll like a demon with 6’s for all his saves bar one, which only resulted in the Panzer III becoming bailed out.
Now a good turn of shooting from Wayne will really put me on the back foot. |
 |
| German Turn Five: Wayne |
No sooner is one threat seen off, another arrives. Casey brings on his BT-7 Light Tank Company. These will be somewhat tougher to handle than the T-38 light tanks. But thanks to some good armour saves, many of them sixes, the shooting only bailed one of my Panzer III tanks.
My Kradschützen Platoon, having played their part in the battle, decide to din-in on the objective. With the KV-1 heavy tank now parked on the village objective I move my Panzer II Platoon to contest the objective. I move my company command tank to fire on the recently arrived BT-7 tanks. I then concentrate the firepower of the Kradschützen Platoon, Panzer III Platoon and HQ on the BT-7 tanks and bail out 6 of the eight, but fail to make any of my firepower tests. So though only two BT-7 tanks are operational, they are not bothered and I don’t even force a morale check. The artillery repeat their bombardment on the T-34 tanks, but do no further damage. My shooting was good, but could have done with a little more luck with my firepower tests. |
 |
 |
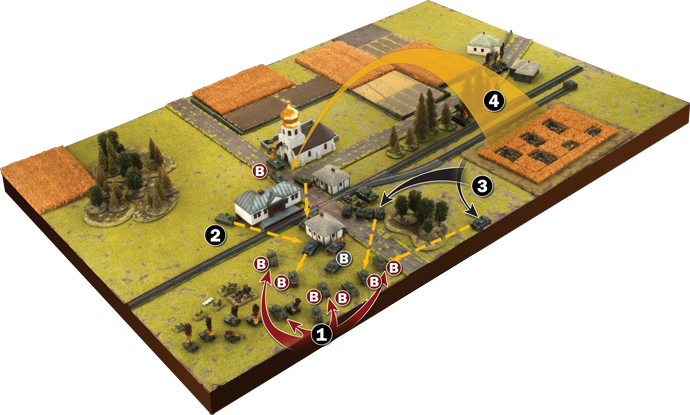
BT-7 tanks arrive, but their shooting is ineffective. |
 |
T-34 and KV-1 tanks open fire, but are also ineffective. |
 |
The Panzer IIs and Company Command Panzer III manoeuvre to better firing positions. Wayne’s tanks Bail
Out 6 tanks, destroying none. |
 |
Wayne’s 10.5cm artillery battery fires a repeat bombardment on the T-34 tanks, causing one tank to Bail Out. |
 |
Represents a Bailed Out Soviet tank. |
 |
Represents a Bailed Out German tank. |
|
While I was very lucky that no BT-7s got destroyed last turn, only one was brave enough to get back in his tank. Not knowing how many tanks will survive another turn of shooting, I decided it was time to get more aggressive. My Battalion commander made his way across the railroad and assaulted the Kradschutzen and drove them off the objective.
I automatically received my last reserves in the form of the Quad Maksim trucks, but they failed to do any damage to the German infantry.
The remaining operational T-34, KV-1 and BT-7 tanks open fire and manage to destroy a Panzer II and a Panzer III tank. The Panzer III platoon promptly fail their Motivation Test and flee. |
 |
The last of Casey’s reserves arrived in his turn, but I did have some luck with Casey only unbailing one BT-7 tank. Unfortunately, I lost my Panzer III Platoon to good Soviet fire and bad morale, and my Kradschützen Platoon was pushed off the objective by Casey’s HQ T-34 tank.
I fail to unpin my Kradschützen Platoon, which means I have to rush my Panzer II Platoon over to contest the objective, while my command Panzer III had to move to contest the objective held by the KV-1 heavy tank. It wasn’t all bad news, as the shooting from my Kradschützen Platoon destroys all three anti-aircraft trucks and my artillery knocks out another T-34 tank. Casey promptly fail their Platoon Morale Check and they flee the battlefield. However,with four Soviet platoons destroyed and two alive my victory rides on Casey’s Company Morale Check. |
 |
 |
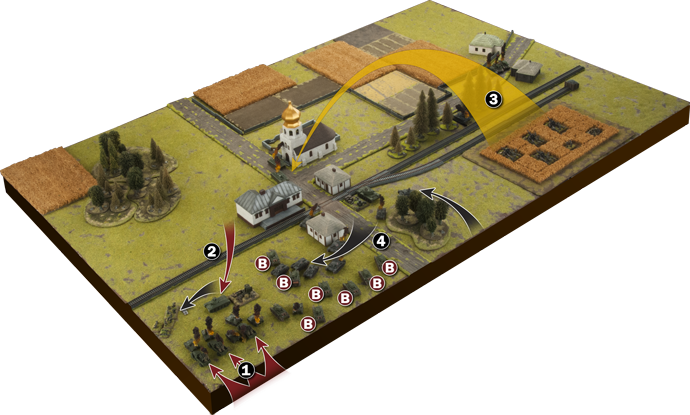
The Anti-aircraft Machine-gun Platoon arrives, but fails to do any more damage to the Kradschutzen platoon. |
 |
The Company Command T-34 assaults the Kradschutzen off the objective, but doesn’t cause any casualties. |
 |
Wayne’s 10.5cm artillery battery fires a repeat bombardment on the T-34 tanks destroying one. The last T-34 leaves the battlefield. |
 |
The Panzer II tanks move to contest the closest objective and bail out more BT-7s, no kills on the BT-7 platoon yet. |
 |
Represents a Bailed Out Soviet tank. |
|
| Soviet Turn Seven: Casey |
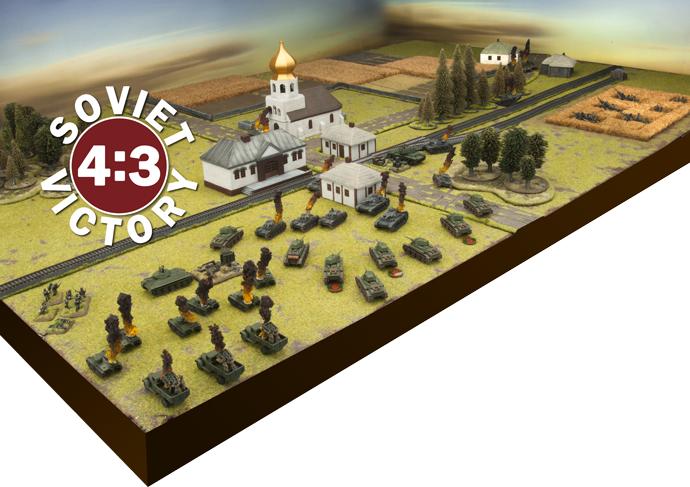
With the destruction of four out of six platoons, the game now hinged on a Confident Company Morale Check, which I passed.
My remaining forces stayed stationary to maximise my firepower, as I needed to destroy Wayne’s army before I needed to take another morale check. The Battalion Commander in his T-34 opened up on the Kradschutzen with machine-guns, destroying one team and forcing a Platoon Morale Check, which they fail.
The four active BT-7 light tanks manage to knock out another two Panzer II tanks, forcing them to take a Platoon Morale Check, which they also fail.
The KV-1 then took on Wayne’s Company commander and put a round straight through the turret and destroyed him.
At the start of his turn Wayne fails his Company Morale. |
 |
| Wayne’s Afterthoughts |
Casey’s Afterthoughts |
It was a close game, and I think I did OK considering my force wasn’t optimised to deal with the T-34 and KV-1 tanks. Instead of taking some 8.8cm FlaK36 heavy antiaircraft guns, I relied on my artillery to deal with them. I only had a small chance of knocking out the T-34 tanks with my Panzer III G tanks with their anti-tank 7 rated gun, but I think they were better employed against Casey’s light tanks and tankettes. The KV-1 heavy tank on the other hand was a tough nut to crack. I had a go in a couple
of turns with my artillery, but anti-tank 4 is not quite enough to waste too many rounds dropping bombardments on single tank.
Luckily, they are expensive so you wont be facing too many of them. I think the trick is to treat them like Tigers in Mid-war or Kingtigers in Late-war and just ignore them and concentrate on the rest of the Army. It almost worked for me, I just needed to start forcing Company Morale tests a turn or too earlier.
~ Wayne. |
Wow, KVs and T-34s are tough in Early-war! I’m too use to playing T-34 tanks in Mid-war and Late-war where they are good, but not super tanks.
While the T-34s did get destroyed during the game, it did require Wayne to direct his Artillery away from more fragile units. I think I could have gotten away with being much more aggressive with the T-34s, but like I say, I’m used to T-34s dying much more easily.
I think there was some extreme luck involved in the game. I was unlucky to have my T-38s get shot off their assault, but I think Wayne was more unlucky not to destroy any BT-7 tanks when they came on. I think that was the point of no return for him as the weight of fire tipped too far in my favour.
All in all it was a much closer game than I thought it would be.
~ Casey. |
Last Updated On Monday, July 22, 2024 by Wayne at Battlefront
|
|
|