|
|
 |
|
|
Mortain Campaign
 |
Mortain and the 30th Infantry Division “Old Hickory”
By Derek Body
This is a four mission linked campaign that can be used to represent some of the battles fought between the American 30th Infantry Division and the German forces of Operation Lüttich (7-11 August 1944). This is not an Axis of Attack campaign, but the order that the games are played is important. Players should tally their Victory Points for each game to determine the overall winner. |
30th Infantry Division
The 30th Infantry Division was created just before the outbreak of the First World War with troops from North and South Carolina, Tennessee and Georgia states. They became known as “Old Hickory” in honour of General Andrew Jackson who fought in the War of 1812 against the British and later became the 7th US President. The 30th Infantry Division was one of the first National Guard divisions called into federal service and their Southern spirit persisted with units tracing their history to the Civil war. In the late 1930s the US infantry divisions changed from being a square division (with four regiments) to a triangle division with three. The 30th Infantry consisted of 117th, 119th and 120th Infantry Regiments, with the 118th Infantry Regiment removed to garrison Iceland. |
|
The division was soon flooded by draftees from across the country during the early 1940s, so only a small cadre of original Carolina National Guard remained.
Overseas Deployment
After extensive training at home the 30th Infantry Division were deployed to England in February 1944. Here they were joined by the 823rd Tank Destroyer Battalion, which became a permanent attachment to the division. After D-Day they were landed on Omaha beach as a follow up division and began their first overseas campaign by heading towards the Vire canal. They were then drawn into the bloodbath of St-Lô, which was finally captured on July 18th after sustaining an estimated 40% casualties for the entire division.
|
 |
|
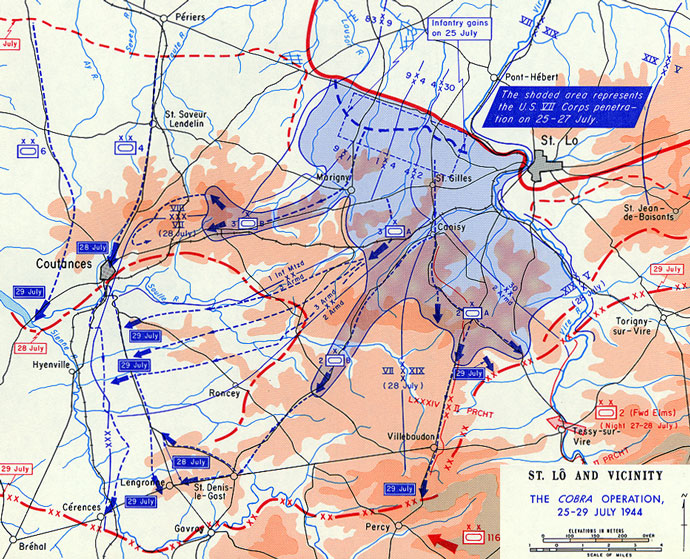
Operation Cobra
The Normandy breakout campaign was the next major engagement for the 30th Infantry Division. This involved three infantry divisions taking the initial ground and two armoured and one motorised infantry division exploiting the breach. The decision was made to use battle tested units and included the 4th, 9th and 30th Infantry divisions. The initial start date was 24 July and would involve a massive carpet bombing attack by the USAAF.
Unfortunately overcast conditions caused a postponement, but a few squadrons were not recalled. These proceeded to bomb through the clouds perpendicular to the line of advance. Many bombs fell short onto the waiting US infantry and scores of casualties were caused on the 120th Infantry Regiment.
|
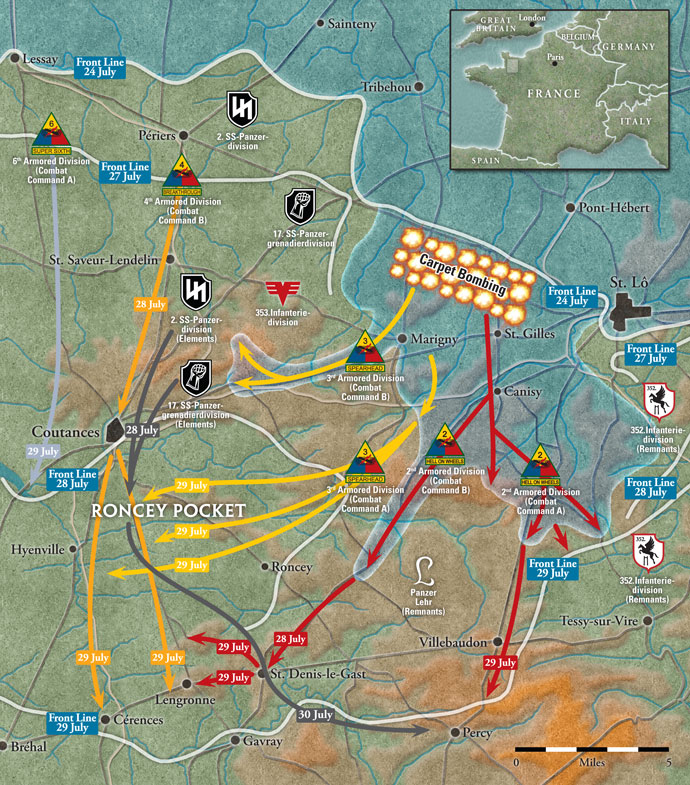 |
The next day the troops had been reorganised and pulled back from the original start line to provide a greater safety margin from the bombing. Yet again it was found that bombs were being dropped onto the Allied positions as the drifting smoke made accurate targeting impossible. Despite the bombing of friendly troops the German defenders suffered worse and the attack by the infantry was successful. On 26 July the 2nd Armored Division “Hell on Wheels” was able to pass through the 120th Infantry Regiment’s position and continue the breakthrough.
The 30th Infantry Division was then assigned to protect the eastern flank of the breakout towards Tessy. After 49 days of continuous contact with the enemy they were ready for a rest period. They boarded trucks that transported them south to the town of Mortain, arriving in the early afternoon of 6 August. Here they were to take over the positions of the 18th Infantry Regiment (1st Infantry Division) in the quiet sector.
|
|
Operation Lüttich
After surviving the briefcase bomb on 20 July, Hitler became even more mistrusting of the Wehrmacht High Command. No longer would he tolerate any insubordination, disagreement meant disloyalty and disloyalty meant death. He saw the American breakout as a vital opportunity to launch a counterattack that would sever the narrow Allied supply corridor. A surprise attack towards Avranches could cut off the spearheads that were pushing through into Britanny and out of the Bocage country “hedgerow hell”. Field Marshall von Kluge knew it was an unrealistic plan but could do little to oppose it. The general consensus was that the German armies must withdraw towards the Seine and establish a new defensive line. However a limited offensive could help to buy time for the other German forces to fall back. Several panzer divisions were withdrawn from their positions opposite the British and Canadians and these were replaced by newly arrived infantry formations.
The assembled forces for Operation Lüttich, (the German name for Liege) became the XLVII Panzer Korps and consisted of:
1. SS-Panzerdivision “Liebstandarte”
2. SS-Panzerdivision “Das Reich”
2. Panzerdivision
116. Panzerdivision
The 2. SS-Panzerdivision also had a battle group from the
17. SS-Panzergrenadierdivision “Götz von Berlichingen” attached.
The entire corps had less than 200 tanks, but were all seasoned veterans of earlier campaigns.
|
 |
| The plan was to strike with speed and surprise, but the tanks would be forced to use the limited road net because of the Bocage hedgerows. The attack was to take advantage of night to gain the element of surprise. Panzergrenadiers began to infiltrate into the town of Mortain from the south soon after 0100 hrs on 7 August. |
|
The 30th Infantry Division in FOW
“Old Hickory” is best represented as an American Rifle Company from D-Day: American. They will therefore be rated as Confident Trained Aggressive. During this campaign the men of the 30th Infantry Division proved to be very stubborn in defence and so they also use the Old Hickory command card giving them Last Stand 3+ and Rally 4+.
German Forces
The 1. SS-Panzerdivision “Liebstandarte”, 2. SS-Panzerdivision “Das Reich” and 17. SS-Panzergrenadierdivision “Götz von Berlichingen” use their Intelligence briefing from D-Day: Waffen-SS. The 2. Panzerdivision can be fielded using D-Day: German.
|
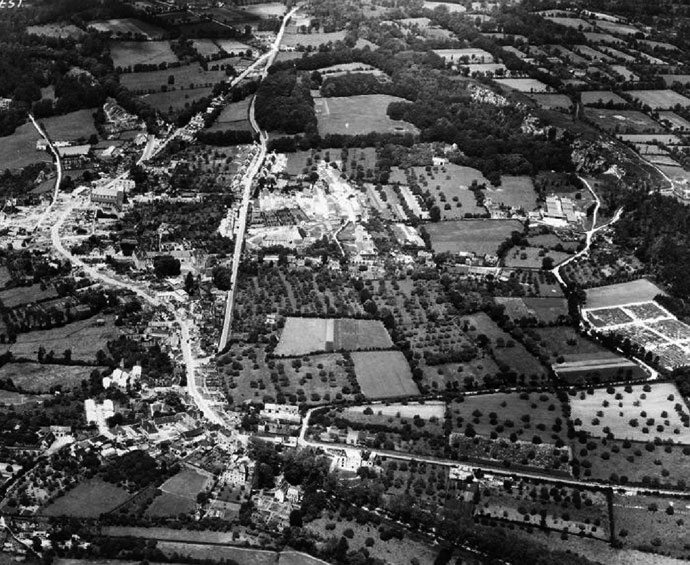 |
Campaign Overview
The four scenarios are based on some of the standard missions from the rulebook:
Mortain: Rearguard
St Barthelmy: Breakthrough
L’Abbaye Blanche: Breakthrough/No Retreat/Counterattack
Hill 314: Bridgehead
These games must be played in this order. The Americans are always the defender in these scenarios. If the Germans win both of the first two missions then they have the choice to do either a Breakthrough or No Retreat in the third game. Otherwise the Americans can choose to do either of these missions or a Counterattack. The last game “Hill 314” is worth double Victory Points to both sides. These are historically based scenarios and therefore are not intended to be points balanced. Players are free to modify the forces suggested as long as both players agree. |
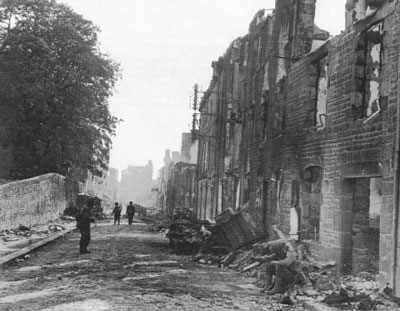 |
Scenario 1: Mortain
Situation Report (Night of 6/7 August)
The 30th Infantry Division has arrived in Mortain to take over the hasty defences of the 1st Infantry Division. There are few maps of the area available, but two dominant features are clearly evident. Hill 285 and Hill 314 on either side of Mortain both offer excellent observation of the surrounding area. The town itself has been largely spared of bombing and the citizens are in a jubilant mood. Troops are sent to occupy these vantage points and also to set up roadblocks in several key crossroads just north of Mortain. The relieved outfit says that there is little enemy activity and they are likely to be falling back to new defensive positions.
|
The men of the 2nd Battalion, 120th Infantry Regiment had been allocated Mortain and its approaches to defend and spent August 5 and 6 preparing defensive positions, laying the communications net and positioning roadblocks to the north and south of the town.
As night fell on 6 August the men of the 2nd Battalion suspected little of the gathering German forces deploying for the attack. It was not until the Deutschland Regiment of the 2. SS-Panzerdivision had taken several of the 2nd battalions roadblocks by surprise that the 30th Infantry Division’s command realised an attack was under-way. It was the early hours of 7 August 1944 and the battle for Mortain had started. |
Attacker’s Briefing
You will infiltrate into the town of Mortain in preparation for our armoured attack towards Avranches. You must overrun any roadblocks along the highway. Surprise is the key so you will be attacking at night. Supporting artillery fire will be limited to harassing the enemy and covering the noise of our tanks.
Defender’s Briefing
Mortain is remarkably different to the battered ruins you have already been through in Normandy. The French are making every effort to make you feel welcome. During the night the German’s also send their greetings as an air raid and some sporadic shelling start a few fires in town but this is nothing unusual. |
 |
|
Mission Special Rules
The mission is a standard Rearguard with the following additional rules:
Night Fighting: The game is played using the night fighting rules (see page 113 of the Flames Of War rulebook).
Bocage: All hedgerows will be treated as Bocage (see pages 78-79 of D-Day: British).
Surprise: All American units begin the game pinned down and any vehicles will be bailed out. In addition they may not deploy a Unit in Ambush as per the normal rules for Rearguard.
Burning Buildings: Randomly select two buildings to be set on fire before deployment. These buildings may not be entered by any team. In addition they will illuminate any team within 6"/15cm of the building. Any team within this area will not be treated as being concealed by the darkness.
Terrain Set Up
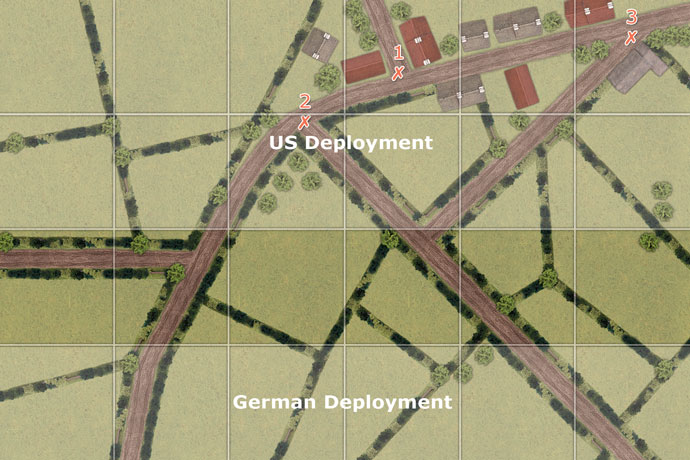
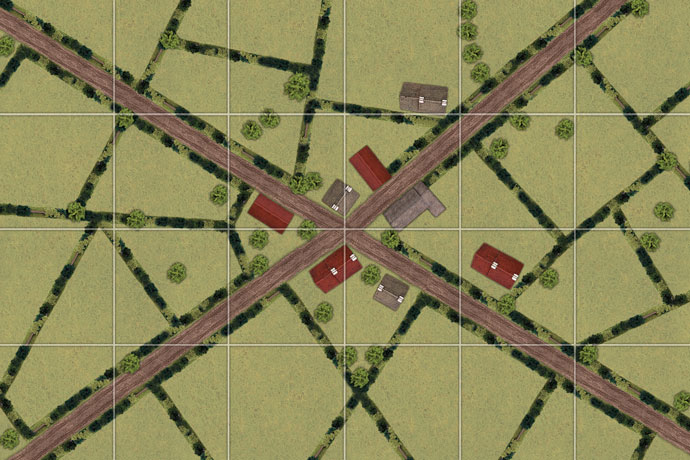
There should be two main roads that run through both deployment areas. Side roads can link these and houses can line both routes. The surrounding area should have bocage hedgerows.
The suggested scenario map also includes suggested objectives. These have been place on the intersections to represent the likely locations of the roadblocks.
|
|
Suggested Historical Forces
| Charlie Company, 120th Infantry Regiment |
Rifle Company (D-Day: American) |
| Lieutenant Albert Smith |
Company HQ (2x Thompson SMG team) |
1st Platoon, Charlie Company
|
Rifle Platoon
(10x M1 Garand rifle team, 1x Bazooka team) |
2nd Platoon, Charlie Company
|
Rifle Platoon
(10x M1 Garand rifle team, 1x Bazooka team) |
3rd Platoon, Charlie Company
|
Rifle Platoon
(10x M1 Garand rifle team, 1x Bazooka team) |
| 120th Infantry Regiment Anti-tank |
57mm Anti-tank Platoon (3x 57mm gun)
57mm Anti-tank Platoon (3x 57mm gun) |
| 823rd Tank Destroyer Battalion |
3-inch Tank Destroyer Platoon (4x 3-inch gun) |
| 2. SS-Panzergrenadier Regiment |
SS-Panzergrenadier Company (D-Day: Waffen-SS) |
| “Deutschland Kampfgruppe” |
SS-Panzergrenadier Company HQ (2x MP40 SMG team)
SS-Panzergrenadier Platoon
(7x MG42 team with Panzerfaust)
SS-Panzergrenadier Platoon
(7x MG42 team with Panzerfaust) |
| SS-Panzer Regiment 2 |
Panther SS-Tank Platoon (3x Panther)
Panzer IV SS-Tank Platoon (4x Panzer IV) |
|
Historical Outcome
The Germans successfully infiltrated into Mortain and overcame several anti-tank roadblocks before the Americans even knew they were under attack. Fighting broke out in the town, but the Americans were forced to fall back and some reached the forces on the hills. Isolated pockets of GIs, including the Battalion commander of the 2nd Battalion, 120th Infantry Regiment, remained in hiding in the town for several days before being captured. |
|
Scenario 2: St Bathelmy
Situation Report (Dawn 7 August)
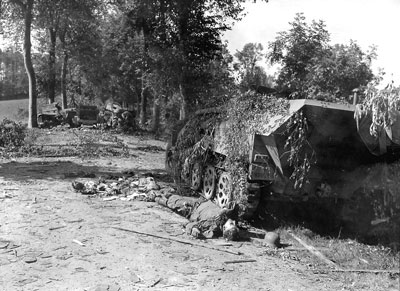
The 1st Battalion of the 117th Infantry Regiment have been assigned to the small crossroad village of St Barthelmy just north of Mortain. As darkness falls a platoon from the 823rd Tank Destroyer Battalion arrives to reinforce the defences. The night is relatively uneventful, but during the morning hours a thick fog has enveloped the area reducing visibility dramatically.
After some delay around Mortain elements of the 2. Panzerdivision and 1. SS-Panzerdivision were now available to attack through St. Barthelmy and continue the thrust on to Avranches. To the men of the 1st Battalion this did not come as a complete surprise, they had been warned by the local civilians.
|
 |
Attacker’s Briefing
You are leading your kampfgruppe of the 1. SS-Panzerdivision towards the small crossroads of St Barthelmy. The 2. Panzerdivision should have already passed through this area and moved westward. You are to link up with them. A thick fog is making visibility difficult but should last long enough to prevent any Jabo attack.
Defender’s Briefing
The locals say that the Germans may be up to something to the northeast. The newly arrived 3” guns are a timely addition to your force which doesn’t have many bazookas. As dawn breaks the unmistakable sound of tank tracks slowly approaching can be heard out of the fog… but where exactly are they? |
 |
Mission Special Rules
The mission is a standard Breakthrough with the following additional rules:
Bocage: All hedgerows will be treated as Bocage (see pages 78-79 of D-Day: British).
Fog of War: The game begins with the rules for Night Fighting (see page 113 of the Flames Of War rulebook) to represent the thick fog. At the start of the Defender’s third turn roll a die. On a 5+ the fog has lifted and normal visibility rules are used. Otherwise roll an extra die at the start of each player’s turn.
Two Companies: The German forces are divided into two separate companies to represent the two different kampfgruppes. The starting force belongs to the 1. SS-Panzerdivision and the flank force that arrives as Delayed Reserves is from the 2. Panzerdivision.
Terrain Set Up
A crossroads should be set up in the middle of the table with roads exiting from all four quarters. A few buildings can be placed near the crossroad. All roads are lined with bocage hedgerows and fields are in the surrounding area. |
|
Suggested Historical Forces
| 1st Battalion, 117th Infantry Regiment |
Rifle Company (D-Day: American) |
| Lt Col Robert E. Frankland |
Company HQ (2x Thompson SMG team) |
| Able Company |
Rifle Platoon
(10x M1 Garand rifle team, 1x Bazooka team) |
| Charlie Company |
Rifle Platoon
(10x M1 Garand rifle team, 1x Bazooka team) |
| 117th Infantry Regiment Anti-tank |
57mm Anti-tank Platoon (3x 57mm gun) |
| 823rd Tank Destroyer Battalion |
3-Inch Tank Destroyer Platoon (4x 3-inch gun) |
| Reserves: |
|
| Baker Company |
Rifle Platoon
(10x M1 Garand rifle team, 1x Bazooka team) |
| 823rd Tank Destroyer Battalion |
3-Inch Tank Destroyer Platoon (1x 3-inch gun) |
| 1. SS-Panzerdivision Kampfgruppe |
Panther SS-Tank Company (D-Day: Waffen-SS) |
| Kampfgruppe Kuhlmann |
Panther SS-Tank Company HQ (1x Panther)
Panther SS-Tank Platoon (3x Panther)
Armoured SS-Panzergrenadier Platoon
(7x MG42 with Panzerfaust) |
| Flank Force: |
|
2. Panzerdivision Kampfgruppe
|
Panzer IV Tank Company (D-Day: German) |
| Kampfgruppe Knittel |
Panzer IV Tank Company HQ (2x Panzer IV)
Panzer IV Tank Platoon (3x Panzer IV)
Panzer IV Tank Platoon (3x Panzer IV) |
|
Historical Outcome
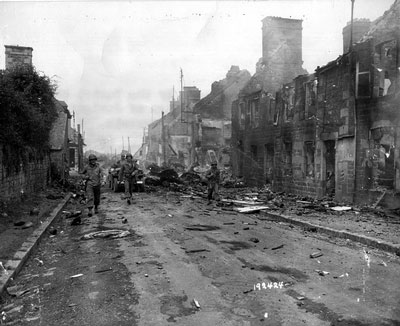
The 1. SS-Panzerdivision kampfgruppe that was scheduled to follow up the 2. Panzerdivision advance through St Barthelmy actually arrived first and was not expecting any opposition. Likewise the American forces were equally surprised as they were positioned to repel an attack from the northeast when tanks began to approach from the south. Several of the lead tanks were knocked out and caused delays and the fog made things more difficult for both sides. When the kampfgruppe of the 2. Panzerdivision arrived later they caused the American forces to withdraw, but they continued to harass the tanks as they moved westward. |
 |
Scenario 3: L’Abbaye Blanche
Situation Report (7 August, mid morning - afternoon)
The fog is not as thick near L’Abbaye Blanche (the White Abbey) between Mortain and St Barthelmy. A single platoon from Fox Company, 120th Infantry Regiment and a platoon of the 823rd Tank Destroyer Battalion have set up a roadblock to cover the north-south roads leading across the River Cance.
The men of F Company, 2nd Battalion, 120th Infantry Regiment and the gunners of 1st platoon, A Company, 823rd Tank Destroyer Battalion had no idea the gun fire they could hear from the east and south was more than just enemy harassing fire. But as the morning went on it became clear that a German attack was under-way.
|
|
The men of the L’Abbaye Blanch stayed alert and their preparedness was rewarded when a German column made an appearance slowly moving up a slope on the road to St Barthelmy to the road block’s front. The well-concealed 3” guns of the 823rd TD Battalion opened fire.
Attacker’s Briefing
Our forces have begun to breakthrough at several places along the front. You must link up with those elements to the north in St Barthelmy and support their drive westward. The fog is beginning to burn off…
Defender’s Briefing
You have limited defences available but this roadblock is a vital part of our defence. The enemy is sure to try and breakthrough this position so you must hold them off with everything you have.
Mission Special Rules
The mission played depends on the outcome of the first two battles. The following special rules will be used for all mission types:
Bocage: All hedgerows will be treated as Bocage (see pages 78-79 of D-Day: British).
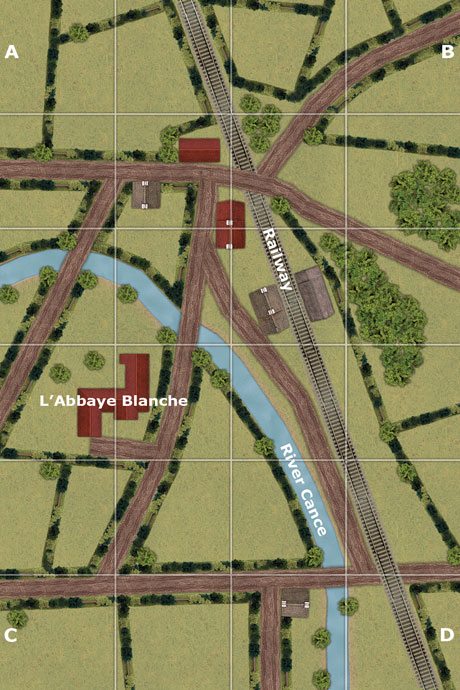
Railway tracks: The railway tracks are on a Low Enbankment (see page 43 of the Flames Of War rulebook).
River Cance: The river treated as Deep River (see page 43 of the Flames Of War rulebook).
Holy Ground: The Abbey may not be occupied by any force.
|
 |
|
Day of the Typhoon: The USAAF IX Tactical Air Force was primarily used to intercept the Luftwaffe that attempted to provide aerial cover for Operation Lüttich. Therefore the British Second Tactical Air Force was used in ground support missions. The Americans can therefore use air support from the British arsenal.
Terrain Set Up
The mission is played on the map shown above, which is based on an actual sketch of the area made by the defending troops. The map orientation will remain the same regardless of the mission played.
Breakthrough Mission Notes
The Defender must deploy in sectors A and D. However they can only deploy units behind the hedgerow in sector D, not in front of it. Their reserves must arrive in sector A.
The Attacker must deploy in sector C. Their delayed reserves will arrive in sector B but can use either road as their starting point.
No Retreat Notes
The Defenders must deploy in sectors A and B.
|
|
Suggested Historical Forces
| Fox Company, 120th Infantry Regiment |
Rifle Company (D-Day: American) |
| Lieutenant Tom Springfield (823rd TD Btn) |
Rifle Company HQ (2x Thompson SMG team) |
| 1st Platoon, Fox Company |
Rifle Platoon
(10x M1 Garand rifle team, 1x Bazooka team, 2x M1919 LMG) |
| Weapons Platoon, Fox Company |
Mortar Platoon (3x 60mm mortar) |
| 120th Infantry Regiment Anti-tank |
57mm Anti-tank Platoon (3x 57mm gun) |
| 823rd Tank Destroyer Battalion |
3-inch Tank Destroyer Platoon (4x 3-inch gun) |
| Field Fortifications |
2 Minefields |
| Reserves: |
|
| 2nd Platoon, Fox Company |
Rifle Platoon
(10x M1 Garand rifle team, 1x Bazooka team) |
| Stragglers from D, E, H and K Companies |
Rifle Platoon
(10x M1 Garand rifle team, 1x Bazooka team) |
| British Second Tactical Air Force |
British Typhoon Fighter-bomber Flight (D-Day: British) |
The 3-inch Tank Destroyer Platoon can be split into two separate Units with 2x 3-inch guns each at the discretion of the American player depending on the mission played. The two minefields can be placed anywhere in the Defender’s deployment zone.
| 2. SS-Panzergrenadier Regiment |
Armoured SS-Panzergrenadier Company (D-Day: Waffen-SS) |
| “Der Führer Kampfgruppe” |
Armoured SS-Panzergrenadier Company HQ
(2x MP40 SMG team, 1x Sd Kfz 251 (MG))
Armoured SS-Panzergrenadier Platoon
(5x MG42 team with Panzerfaust, 3x Sd Kfz 251 (MG))
Armoured SS-Panzergrenadier Platoon
(5x MG42 team with Panzerfaust, 3x Sd Kfz 251 (MG))
SS-Reconnaissance Platoon (5x MG42 team, 5x Sd Kfz 250 (MG))
StuG SS-Tank Platoon (4x StuG)
Panzer IV SS-Tank Platoon (4x Panzer IV) |
| Additional units for Breakthrough mission |
Armoured 7.5cm SS Gun Cannon Platoon
(2x Sd Kfz 251 (7.5cm))
SS-Panzergrenadier Platoon (7x MG42 team with Panzerfaust) |
| Additional unit for No Retreat mission |
15cm SS Nebelwerfer Battery (6x 15cm Nebelwerfer) |
|
Historical Outcome
The gunners of the 823rd Tank Destroyer Battalion had great success at ambushing the slow column of vehicles travelling northwards towards St Barthelmy. The Germans tried to outflank this force on several occasions, but were met with fierce small arms fire. Stragglers from other rifle companies arrived to bolster the defences and they held out over several days. |
|
Scenario 4: Hill 314
Situation Report (9 August, early evening)
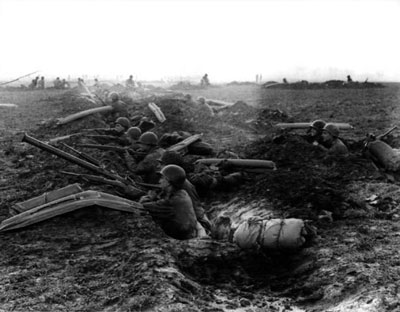
A handful of companies from the 120th Infantry Regiment have held the high ground for several days. Repeated German attacks have been repulsed. The fire support of the artillery is forcing the attackers back and playing havoc with their vehicle columns below.
Attacker’s Briefing
The stubborn Americans on the hill are close to breaking. We have intercepted their radio transmissions and they are low on ammunition and medical supplies. No relief force has been able to breakthrough our cordon to reach them. You must clear the heights so they can no longer observe our positions. Their artillery is causing severe damage to our road bound vehicles. We have offered them a generous ultimatum to surrender yet still they refuse.
|
 |
Defender’s Briefing
You are surrounded and cut off from the rest of your forces. The only thing that is keeping you alive seems to be the ring of fire from our own artillery. However the observers’ radio batteries are badly depleted. A supply drop is scheduled to be delivered soon but it looks to be too late to arrive before the next attack. The Germans have asked for our surrender, I think you know the answer to that one… |
 |
Mission Special Rules
This is a Bridgehead mission with the following additional rules:
Bocage: All hedgerows will be treated as Bocage (see pages 78-79 of D-Day: British).
Double Points: All Victory Points for this mission are doubled for both sides.
Hold until Relieved: All American units in reserve must remain off table for the entire game, only Infantry teams are deployed. Observers are deployed on the table and can fire Bombardment from Artillery Units that are off table.
Radio Batteries: All ranging in attempts for off board artillery are subject to this special rule which represents the dwindling radio batteries of the observers (Spotting Teams). All fire support missions from off table artillery must be called in by observers in the following manner. The Americans start with a pool of 9 dice that represents their radio batteries. At the start of their turn they can roll these dice to determine how many fire support missions they can call in. These will be successful on a roll of 5+. The number of successful rolls determines how many artillery bombardments can be used. For example: A player rolls 9 dice and gets 3, 4, 4, 6, 2, 5, 5, 1, 2. They have been successful three times and can call in three bombardments this turn. Repeat bombardments also require a successful roll. The number of dice decreases by one each turn to a minimum of 3.
Terrain Set Up
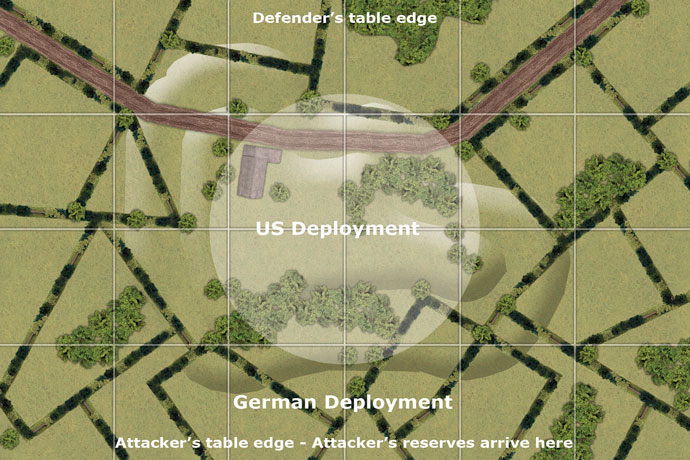
The defender’s deployment zone in the centre should be dominated by a hill which can be treated as Difficult terrain. There is a church near the summit. Bocage hedgerows surround the outside and there are forested regions as well. |
|
Suggested Historical Forces
| 2nd Battalion, 120th Infantry Regiment |
Rifle Company (D-Day: Americans |
| Captain Reynold Erichson |
Rifle Company HQ (2x Thompson SMG team) |
| Easy Company |
Rifle Platoon
(10x M1 Garand rifle team, 1x Bazooka team) |
| King Company (3rd Battalion) |
Rifle Platoon
(10x M1 Garand rifle team, 1x Bazooka team) |
| George Company |
Rifle Platoon
(10x M1 Garand rifle team, 1x Bazooka team) |
| How Company |
Mortar Platoon (2x 81mm Mortar)
M1917 Machine-gun Platoon (2x M1917 HMG) |
| Off Table Artillery (Reserve): |
|
| 230th Field Artillery Battalion |
105mm Field Artillery Battery (4x 105mm howitzer)
M12 155mm Artillery Battery (4x M12 (155mm)) |
| 119th Cannon Company |
105mm Cannon Platoon (6c 105mm light howitzer) |
| 743rd Tank Battalion |
M4 Sherman (105mm) Assault Gun Platoon
(4x Sherman (105mm)) |
| 17. SS-Panzergrenadier Regiment |
SS-Panzergrenadier Company (D-Day: Waffen-SS) |
| Kampfgruppe Fick |
SS-Panzergrenadier Company HQ (2x MP40 SMG team)
SS-Panzergrenadier Platoon
(7x MG42 team with Panzerfaust)
SS-Panzergrenadier Platoon
(7x MG42 team with Panzerfaust)
SS-Panzergrenadier Platoon
(7x MG42 team with Panzerfaust)
8cm SS-Mortar Platoon (4x 8cm mortar)
10.5cm SS-Artillery Battery (4x 10.5cm howitzer)
Panther SS-Tank Platoon (4x Panther) |
|
Historical Outcome
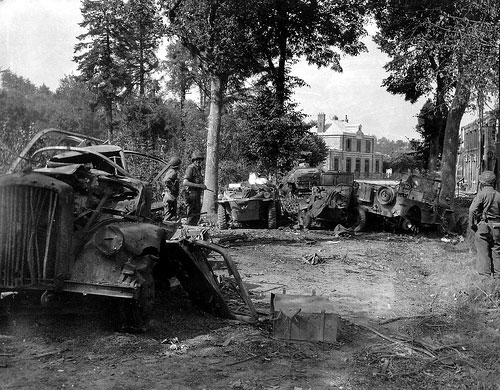
The defenders on Hill 314 held out for 5 days before the Germans withdrew on the night of 11 August. Equally tenacious defence on Hill 285 also repulsed all attacks. Some supplies to the besieged troops were delivered by air drop as well as experiments with shells fired by their own artillery containing medical supplies but only bandages survived the trip. Few of these actually reached the men, but it did lift their morale. They were finally relieved by the 35th Infantry Division on 12 August. The Germans were now in full retreat and would be very lucky to escape the closing trap that was to be known as the Falaise Pocket. |
 |
Mortain: The Aftermath
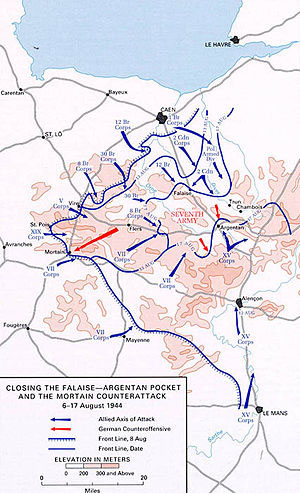
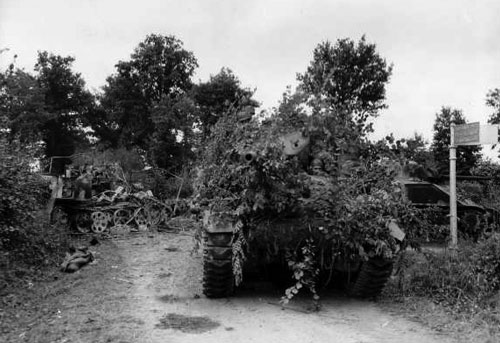
By 8 August the Allies learnt through Ultra intercepts that the Mortain offensive was ordered by Hitler himself. They were therefore confident that the Germans would continue to attack in that region. This presented General Omar Bradley with a unique opportunity to try an envelopment of the German armies. The 30th Infantry Division would in essence be left on their own to hold Mortain and allow the Germans to maintain their offensive. Meanwhile XV Corps would drive eastward towards Le Mans and then sharply northward towards Argentan. Mortain would in effect be the hinge for this wide sweeping manoeuvre. Meanwhile British, Canadian and Polish forces were pushing southwards past Caen towards Falaise where it was hoped the two Allied forces would link up and trap the German forces, and this was largely accomplished. |
 |
Beyond Mortain
The 30th Infantry Division’s next major action was breaching the much vaunted Siegfried line near the city of Aachen on 2 October 1944. In five days of heavy fighting they had broken through and began to encircle the city along with the 1st Infantry Division. Here they were counterattacked by their old foes the 1. SS, 2. Panzer and 116. Panzer divisions, but they again held their ground.
At the start of the Ardennes offensive the 30th Infantry Division was still deployed to the north of Aachen. They were quickly transported south, a move noted by German propaganda as “the fanatical 30th Infantry Division, Rossevelt’s SS troops, are rushing to the rescue of the First Army”.
|
They arrived near Malmédy and were soon to learn of the massacre of US prisoners that had recently taken place there. They once again faced the 1. SS-Panzerdivision near Stavelot and Stoumont as they defended the huge supply dumps that were the target of the German forces. In the ensuing fighting few of the Germans were able to escape as they were cut off from their lines of communication.
After a short period temporarily under British control the 30th Infantry Division rejoined the Ninth Army and was selected to be their first division to cross the Rhine River. This was accomplished with great efficiency and forced the 116. Panzerdivision to be committed to counter them. The press dubbed the 30th Infantry Division “The American Army’s workhorse division” during this period as it drove steadily into Germany until their reached the River Elbe.
Although the 30th Infantry Division was somewhat overshadowed by the exploits of other notable divisions the US Army’s official historian rated them the finest infantry division in the European theatre:
“It is the combined judgement of the approximately 35 historical officers who had worked on the records and in the field that the 30th merited this distinction. It is out findings that the 30th has been outstanding in three operations and we could consistently recommend it for citation on any of these occasions. It was further found that it had in no single instance performed discreditably or weakly… and in no single operation had it carried less than its share of the burden or looked bad when compared to the forces on its flanks. We were especially impressed with the fact that it consistently achieved results without undue wastage of its men”.
|
Last Updated On Tuesday, May 12, 2020 by Wayne at Battlefront
|
|
|