
|
| |
|
|
|
|
 |
|
|
Cordon & Search Mission
 |
Jay White's Cordon & Search Mission
The Cordon & Search mission uses the Hidden Positions, Spotting, Defensive Battle and Prepared Positions special rules.
Note: The Ambush special rules are not used in this mission.
Hidden Positions
A well dug in and prepared force can be difficult to spot for advancing troops until the shooting begins. If reconnaissance fails to locate all enemy positions the attacking force will be left with no choice but to advance into the suspected enemy areas and search for their positions, poised to strike once located.
The defending player does not deploy any platoons on the table. Instead the defender deploys numbered markers (golf tees work well as they are easy to see and you can mark numbers on the rounded section that holds the golf ball, pointy end sticking up) for each platoon in their company.
|
|
In addition to the markers for the defenders platoons the defender gets
a number of false markers (see table below) based on how many platoons
are in the company. If the defender plans on deploying teams outside of
command then the defender requires a marker for each team outside of
command.
The defender must number each marker and write down on a separate paper what number represents which platoon or team (if out of command).
|
 |
The defender deploys all markers on the table and can only deploy the models for the platoons they represent under the following circumstances:
• The platoon is spotted by the attacker (see Spotting rules).
• The platoon opens fire on the enemy or moves out of it’s position (deploy the platoon before resolving movement or firing).
Once spotted the defender must immediately deploy the platoon Command team centered on the marker and all remaining platoon teams with no teams outside of 6" of the marker (unless no space remains within the 6" radius) and not any closer to the enemy than the marker was located (unless you have no choice). Spotted platoons count as Dug In and Gone-to-Ground unless they have moved (lose both) or fired (lose Gone-to-Ground).
|
 |
Spotting
Spotting the enemy will not be easy and hopefully will occur before the advancing forces are fired upon. During the Attacker’s movement step any team that has line-of-Sight (if you could shoot it you can see it, normal rules apply for LOS. for example. friendly teams block LOS) to a hidden marker may attempt to spot the enemy in that position. The spotting team must take a Skill test:
• It successful the enemy platoon is spotted.
• It failed the enemy platoon remains hidden.
|
|
The skill test is modified as follows:
• + 1 to score needed to spot if the hidden platoon is in concealment (defender must ensure that all teams can fit within the feature providing concealment and if spotted must deploy all teams within concealment, this is in addition to the main deployment requirements).
• +1 to score needed to spot if the hidden platoon marker is over 16” away from the spotting team.
• -1 to score needed to spot if the spotting team is a Reconnaissance team (must have the ability to use the special recon rules).
Note: A score of 6 always succeeds.
Regardless of the success of the spotting attempt, the team that was used may not fire in the Shooting step or participate in an assault during the Assault step (the team may also not participate in a German Storm-Trooper move though the remaining teams in the platoon may). If the spotting team was a Company Command team then it cannot use the special Motivation test re-roll until it’s next turn (as they are to busy to rally troops while concentrating on finding the enemy).
Hidden enemy platoons are also spotted automatically if any of the attackers teams (not aircraft) come within 4” of the hidden marker.
|
Aircraft
Aircraft may attempt to spot a hidden platoon within Line of Sight by rolling a skill test (this is resolved once the aircraft is placed on the table and modifiers still apply) and if successful may continue its attack in the shooting step, otherwise it may not attack the hidden platoon.
Reconnaissance
Any attacking unit that uses the special recon move after deployment may also take a special round of spotting. Move the recon teams as normal then make the spotting rolls. This special spotting phase does not effect the platoons ability to do anything in the first turn (including more spotting).
|
 |
|
Defending recon platoons that use the special movement are placed on table as per the normal rules for hidden positions.
Artillery
Artillery and mortar teams may only fire smoke upon suspected enemy
positions until the enemy platoon is spotted. Use the hidden marker as
the centre point for the template.
Observers
Observers attached to hidden platoons that call in indirect fire do not
reveal the attached platoon but instead will reveal the firing battery
(as firing barrages is noisy business).
|
|
Platoon Markers
Defender’s Platoons
|
Number of Real Markers
|
Number of Fake Markers
|
1-4
|
1-4
|
1 |
5-8
|
5-8
|
2
|
9-12
|
9-12
|
3
|
+1-4
|
+1-4
|
+1
|
|
Your Orders
Attacker
Following fast advances after a victory you have come onto an enemy defensive position that your reconnaissance reported. You must find the enemy positions and destroy them.
Defender
You have fallen back into a defensive position and your scouts have reported in that the enemy is moving into the area. Hold your ground.
|
|
Preparing For Battle
1. Decide which players will attack or defend using the Defensive Battle special rule (Page 197 Flames Of War)
2. The Attacking player chooses the short table edge that they will deploy from.
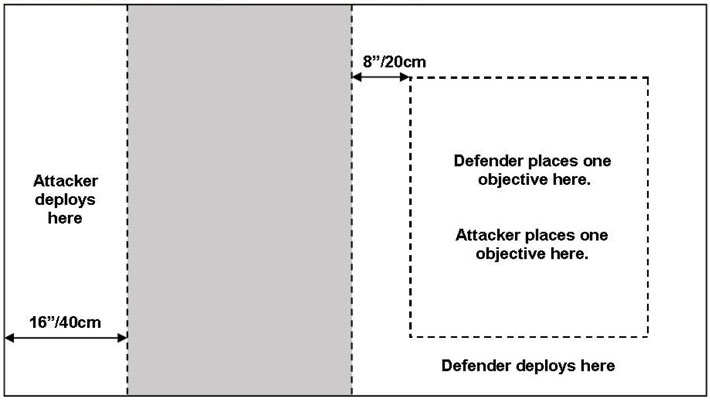
3. The defender places an objective at least 8”/20cm back from the centre line of the table and at least 8”/20cm from all table edges.
4. The attacker now places one objective in the same area but not within 8”/20cm of the other objective.
5. The defender now deploys all hidden platoon markers within the defender’s deployment area (teams start in Prepared Positions).
6. The attacker now deploys all platoons within 16”/40cm of the opposite table edge.
Beginning The Battle
1. The defending force begins the game in prepared positions, so their troops are dug in and gone to ground.
2. The attacking player takes the first turn.
|
 |
|
Ending the Battle
The battle continues until time is called or:
• The attacking player starts any turn from turn three holding either objective.
Deciding Who Won
The attacker wins if they hold any objective at the end of the game. The attacker has broken through the defensive lines and the remaining hidden platoons are now cut off and forced to surrender.
Otherwise the defending player wins. The defensive position has held and the enemy has been thrown back in disorder.
Use the Victory Points table on page 195 of Flames Of War to look up your Victory points based on the number of platoons that they winner lost during the battle.
|
Last Updated On Friday, May 9, 2008 by Wayne at Battlefront
|
|
|