|
|
 |
|
|
The Cavendish Road Tank Attack
 |
The Cavendish Road Tank Attack
Cassino, 19 March 1944
By Livio Cavallaro
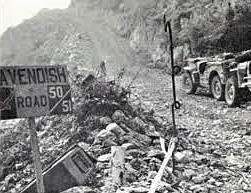
The Cavendish Road was a mule track from the village of Caira to the mountain area of Mount Castellone, just north of the Abbey. It was improved by Indian and New Zealand engineers so that it could be used by tanks, in accordance with a battle plan that envisaged a pincer attack on the Abbey itself. The intention was to launch the tank attack from Cavendish Road on 19th March, after an infantry assault led by Gurkha and British infantry starting from Hangman’s Hill against the western wall of the Abbey had started.
|
|
Due to a German counterattack on Castle Hill in the early hours of 19th March, the infantry assault was postponed and the tank attack was ordered to proceed as planned in the hope that the Germans would withdraw from the Abbey area.
|
 |
|
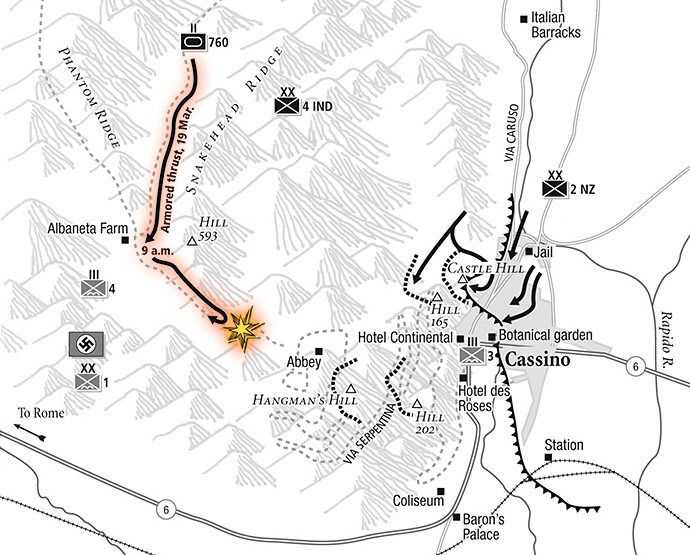
At 0630 the Allied tank column composed of 44 tanks and 3 dozers belonging to New Zealand, American and Indian units launched the attack. The German paratroopers from 4th Fallschirmjäger Regiment were taken completely by surprise. The tanks broke through the German lines at a “Bottleneck” between Snakeshead Ridge and Phantom Ridge and were able to pin down the defending Germans inside an medieval rural building known as Albaneta Farm.
Maneuvering deep into enemy lines, first some New Zealand tanks in the morning, and then some American tanks in the afternoon tried to push toward the Abbey, but both probes failed because of bad terrain and the resolute resistance by the German paratroopers.
|
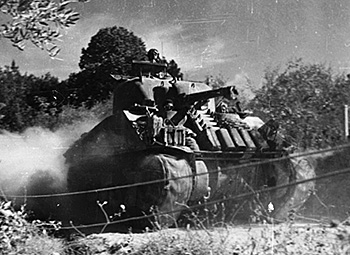 |
| Many tanks become stuck in the mud or lost their tracks on the stony ground, others were disabled by a combination of Panzerfausts, hasty sewn anti-tank mines, accurate sniping and mortar and artillery fire. At 1800 the attack was called off and the tanks withdrew. As a consequence, the infantry attack from Hangman’s Hill was canceled. The Allies failed because the tank formation, commanded by an artillery officer, had no infantry support. |
| Cavendish Road Tank Attack
The Cavendish Road Tank Attack scenario uses the Panzershreck Trap Teams, Anti-Tank Mine Ambush Team, and Tank Commander Shooter special rules.
|
| YOUR ORDERS
GERMAN
Your orders are to stop the Allied tank attack towards the Abbey and hold both Albaneta Farm and the Bottleneck.
ALLIES
Your orders are to break through the German lines then to advance towards the Abbey, keeping an open corridor toward it.
PREPARING FOR BATTLE
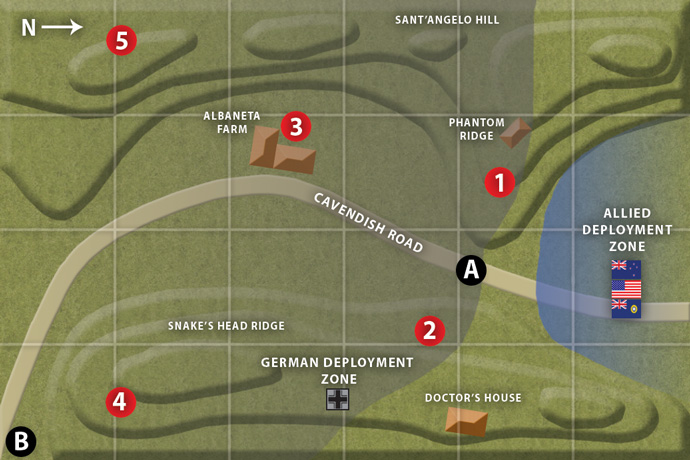
1. Set up the table as shown on the scenario map. The table is 48”/120cm by 72”/180cm. Because of heavy rain in the previous days, flat terrain is Difficult Going, except for the road. All hills are impassable to tanks.
|
 |
|
2. Place an objective at point A, the “Bottleneck”. The passage for the Allied tanks here is only 4”/10cm wide.
3. Starting with the German player, the players place Ranged In markers for all of their deployed (including in Ambush and the Off-table 25 pdrs) Artillery Units.
3. The German player deploys all their troops at the indicated points (see point number for each platoon in the German force table). There are no reserves.
4. The Allied player now deploys as manyUnits as they wish in the Allied Deployment Area. The remaining Units enter along the short table edge in the Allied player’s table half during any of the following turns.
|
|
BEGINNING THE BATTLE
The Allied player has the first turn.
ENDING THE GAME
The battle ends when:
- at the end of any turn the Allied player has at least three tank teams from any platoon off the table at point B and holds point A
- or at the end of Allied turn 8.
DECIDING WHO WON
The Allied player wins if:
- he gets at least three tank teams from any Unit off the table at point B (Allied Minor Victory);
- or the German force is forced to withdraw because of failed Formation Last Stand (Allied Stunning Victory).
The German player wins if:
- the Allied player gets fewer than three tanks off the table at point B at the end of the game (German Minor Victory);
- or the Allied force is forced to withdraw because of failed Formation Last Stand (German Stunning Victory).
If a player gets a Minor Victory and holds the objective at “A” as well, he increases his victory up to Major Victory).
|
Tank Commander Shooter Team
During the Allied tank attack, two New Zealand tank Commanders were killed by accurate small arms fire from the German paratroopers and the remaining crew withdrew the vehicle.
A Tank Commander Shooter team is a Fallschirmjäger Rifle team and is rated the same as the Unit it is attached to. If an Allied tank platoon is hit by a Tank Commander Shooter team, consider the target tank as an infantry team concealed and in bulletproof cover, even if it is in the open. If the required die rolls are successful, the target tank withdraws and is removed from the game (it is considered destroyed for the purposes of the game). At the same time, the Tank Commander Shooter team is immediately removed from the game. If the Allied tank is not destroyed, the Tank Commander Shooter team then continues the game.
|
Anti-Tank Mine Ambush Team
First Lieutenant Raimund Ekel was the Commander of the 14. Panzerjäger Kompanie, III Battalion, Fallschirmjäger Regiment 4. In the valley in front of Albaneta House he dared to chase on foot the American Stuart tank led by Sergeant L. R. Custer and to dig an anti-tank Teller mine just ahead of the moving vehicle. The tank stepped on the mine and was rendered immobile.
An Anti-Tank Mine Ambush Team is an infantry team. It is never deployed at the start of the game. Instead, during any German Shooting Step, the owning player may place the Anti-Tank Mine Ambush Team anywhere within 2”/5cm of one Allied tank on the table but within 12”/30cm from point (1) or (2). That tank immediately receives a hit from a mine with AT 4 and FP 1+ hiting the Tank team's Top Armour. Whatever the result of the mine explosion, the Anti-Tank Mine Ambush Team is immediately removed from the game.
|
Panzerschreck Trap Team
Corporal Kammermann Fallschirmjäger, of the 14. Panzerjäger Kompanie, moved stealthily and attacked the American Stuart tank led by Second Lieutenant J. A. Crews with his Panzershreck. He fired two rockets missing the target, with the third and last rocket he put the tank out of action.
A Panzerschreck Trap teams is an Infantry team and is rated Fearless Veteran Careful. They are armed with a Panzerschreck anti-tank launcher with Range 8”/20cm, ROF 1/1 (Slow Firing), Anti-tank 11, Firepower 5+, and Assault 4+.
Panzerschreck Ambush: Panzerschreck Trap teams are never deployed at the start of the game. Instead at the start of any Movement Step, the owning player may place the Panzerschreck Trap team within 12”/30cm from point (2) such that the Panzerschreck Trap team is not within 2”/5cm of any enemy team.
Well hidden: so long as a Panzerschreck Trap team remains where it was deployed it always counts as Concealed and in Bulletproof Cover even when it shoots. If a Panzerschreck Trap team moves for any reason, it no longer benefits from Well Hidden.
Fanatical Shreck-men: Panzerschreck Trap teams are Independent Teams. However, they may never join a platoon or other Independent Teams if targeted by shooting. Also, unlike normal Independent Teams, they may Change into Contact in the Assault Step.
|
|
Allied Tank Force
|
| Units are from D-Day: British and D-Day: American |
 |
Force HQ - Lieutenant Colonel J. F. Ayde (Commander Royal Artillery 4th Indian Division) |
Sherman DD Armoured Squadron HQ
(Page 35 D-Day: British)
2x Sherman (75mm) |
 |
C Squadron, 20th New Zealand Armored Battalion (Major P. A. Barton) |
Sherman DD Tank Platoon (3x Sherman (75mm)
(Page 35 D-Day: British)
Sherman DD Tank Platoon (3x Sherman (75mm)
(Page 35 D-Day: British)
|
 |
7th Indian Recce Squadron (Major M. L. Cruickshank) |
Sherman DD Tank Platoon Italy Tank Platoon with 3x Sherman (75mm) and 1x Stuart (37mm) (TB106)
(This unit does not have Scout or Spearhead)
(Page 35 & 43 D-Day: British)
|
 |
D Company, US 760th Tank Battalion (First Lieutenant H. J. Crowder) |
US Stuart Tank Platoon (with 5x M5 Stuart)
(Page 61 D-Day: American) |
 |
Assault Gun Platoon, US 760th Tank Battalion (Second Lieutenant V. E. Hipkiss) |
US M7 Priest Artillery Battery (with 3x M7 Priest (105mm)
(Page 84 D-Day: American) |
 |
Field Battery Royal Artillery (unknown unit) |
25 pdr Field Troop (with 4x 25pdr gun)
(Page 69 D-Day: British)
Universal Carrier OP Observation Post
Only the Observer is deployed on the table, the battery is assumed to be positioned just north of the Allied table side and can only shoot as Artillery measuring range that table edge.
|
|
|
 |
German III Battalion, 4 Fallschirmjäger-Regiment |
| Units are from D-Day: German |
| III Battalion, Fallschirmjäger Regiment 4 (Capt. H. Meyer) |
Fallschirmjäger Company HQ (2x MP40 SMG team with Panzerfaust, 1x Tank Commander Shooter team) (Point 3)
|
| 9. Fallschirmjäger Kompanie |
Fallschirmjäger Platoon (5x MG42 & K98 rifle team with Panzerfaust, 1x Tank Commander Shooter team, and 1x Panzerschreck Trap team) (Point 4) |
| 10. Fallschirmjäger Kompanie |
Fallschirmjäger Platoon (7x MG42 & K98 rifle team) (Point 1) |
| 11. Fallschirmjäger Kompanie |
Fallschirmjäger Platoon (7x MG42 & K98 rifle team) (Point 2) |
| 13. Fallschirmjäger Granatwerfer Kompanie |
Fallschirmjäger 8cm Mortar Platoon (4x 8cm mortar) (Point 5) |
| Lieutenant R. Ekel Fallschirmjäger team |
Fallschirmjäger Anti-Tank Mine Ambush team |
|
Last Updated On Friday, December 16, 2022 by Wayne at Battlefront
|
|
|