|
| |
|
|
|
|
 |
|
|
Assembling and Painting the Char B with Tom Wise
 |
Assembling and Painting the Char B
with Tom Wise
Many Flames Of War enthusiasts already know the name Tom Wise, but if you are new to Flames Of War, Tom is one of the more prolific collectors and painters of Flames Of War miniatures around. Not only is he an excellent painter but he is a highly respected member of the Flames Of War universe, donating his time to paint for competition prize support and sharing his work in the Gallery section of the forum in the form of his painting and assembling guides. We therefore decided to share the fruits of his labour with you, this week we take a look at his guide to assembling and painting the French Char B for Early-war.
To see more of his work, visit Tom's Painting here...
|
Step One
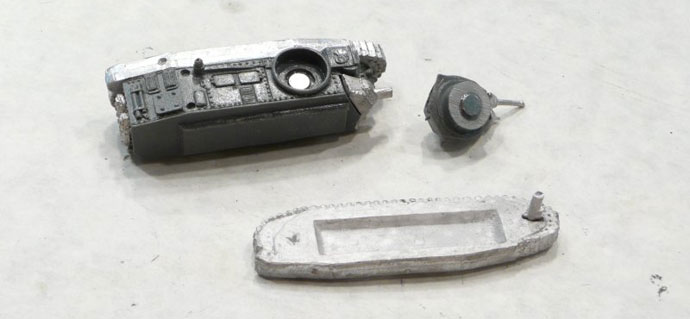
I begin by preparing the model by cleaning and removing any visable mold lines. (Optional) Since the hull already has a recess for a magnet I used some of the magnets that Battlefront provides in the their tank box sets and glue one into the hull and one onto the turret stub. You need to glue the 75mm gun to the hull and the front axle to the right side of the treads first before you glue the right tread to the hull. If you glue the right tread first you'll not be able to glue the gun and axle in place. You don't need the square box receptacle that goes on the rear hull when making an Early-war version of the Char B1. Next, glue the tow chain, left tread and gun into the turret.
Editor's Note: Here, Tom has used GE180 Flammwagen B-2(f) (Char B).
Learn more about the Flammwagen B-2(f) (Char B) here...
|
 |
Step Two
Glue the rear turret hatch onto the back of the turret and the right tread to the hull. Next, glue the hand rail to the hull, there are dipples on the treads where the hand rail aligns as well as holes in the hull. Next, glue the exhaust to the hull; if the right side of the exhaust sits too high so you might have to file down the stub so that it fits correctly.
|
Step One
I begin painting the vehicle with a base coat of Panther Yellow (FWP365), this may take several coats in order to archive proper coverage.
|
Step Two
Next, I mix 50/50 White (FWP301) and Panther Yellow (FWP365) together and dry brush this over the entire vehicle as a highlight.
|
Step Three
I use my Rapidograph Pen (or Technical Pen) and outlined the camo pattern that I wish to apply to the tank.
|
Step Four
On the left, I've painted Heer Green (FWP340) on the areas where I intend that colour to go. On the Right, I've painted Motherland Earth (FWP383) on the areas where I wanted it to go. Optionally, you can use Oxide Red (FWP382) in place of the Motherland Earth if you wanted to match the chestnut brown that was used on some Char B1's.
|
Step Five
Next, I mix 25% White (FWP301) in with 75% Motherland Earth (FWP383) and dry brush this over the base coat of Heer Green.
|
Step Six
This is followed by a mix of 25% White (FWP301) and 75% Motherland Earth (FWP383) and dry brushed over the base coat of Motherland Earth.
|
Step Seven
Following that, I go back over the edges of the camo pattern with my Rapidograph pen and define a hard black edge. After that I matt varnish the vehicle before continuing. The ink from the Rapidograph pen is water soluble and will run when you apply decal softener. The matt varnish will prevent this from happening.
|
Step Eight
I then go back over the tank and repaint the details including the muffler, MG's, tow chain and treads black. Note: Every now and again I get a bottle of Black that goes on with a gloss, but not to worry this will go away with the final matt varnish. |
|
Step Nine
On the left I have dry brushed Devil Red (FWP381) on the exposed parts of the muffler. On the right, I've mixed 50/50 of White (FWP301) and Devil Red (FWP381) and dry brushed that over the base coat of Devil Red to simulate a rusty muffler.
|
Step Ten
I then dry brushed Dark Gunmetal (FWP480) onto the treads, tow chain and MG.
|
Step Eleven
Finally, I added a limited amount of black lining on the major panels, applied decals and a final coat of matt varnish. Optionally, you could use either Dry Dust (FWP364) or a mix of the highlight colour of Panther Yellow mixed with White to add additional weathering. I chose not to do this as I didn't want to subdue the camo scheme too much. You could also apply a brown wash to bring out more of the detail if you like.
|
Below: With Brown Wash applied.
|
Here, I have applied a brown wash to tone done the Panther Yellow. Below: Before the wash.
|
Want To Know More About Blitzkrieg?
Over the past few months we have added a massive range of articles
about Blitzkrieg to the website, to make it easier for people to find a
specific article we have put together this handy place.
Find out more about Blitzkrieg and Early-war here...
|
|
|
|