|
|
|
|
Products mentioned in this Article
|
|
|
|
|
|
|
|
|
 |
|
|
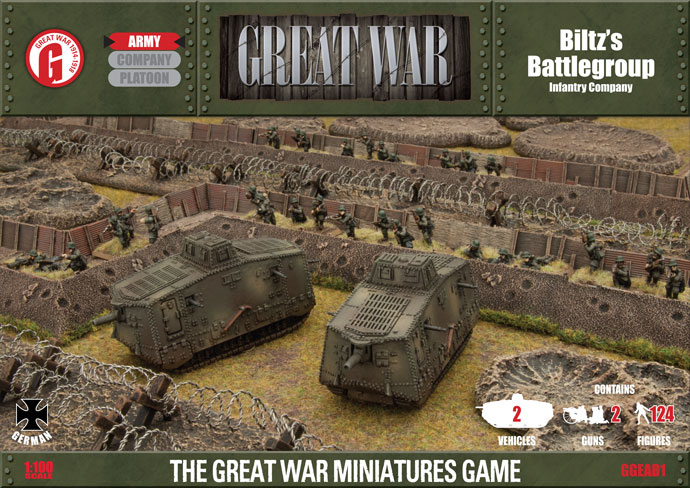 |
Assembling Biltz's Battlegroup
with Blake Coster
Years of combat have made your infantry a tough fighting force. The cutting edge of your attack is the imposing A7V panzer and Stoss
(shock) platoons. This tank is superior to British tanks in practically
every way. Mass them against a weak point in the enemy line and use its
overwhelming firepower to tear open a gap in Tommy’s trenches.
Learn more about Biltz's Battlegroup here... |
Great War
The Great War of 1914-18 was global in its reach. Yet this global
conflict would be decided by the mighty clashes upon the battlefields of
Europe.
Learn more about Great War here... |
 |
In this article, I'll demonstrate how to assemble
the contents of the German Great War box set Biltz's Battlegroup. So let's not waste anytime as there is a lot to cover!
But before we get too far ahead of ourselves, let's ensure
the contents of our Biltz's Battlegroup box set are all present and
correct. Biltz's Battlegroup contains the following: one
Infanteriekompanie HQ, two Infanterie Platoons, one Infanterie
Machine-gun Platoon, one Infantry Gun Platoon, one Panzer Platoon
(with decal sheet), and of course the 36-page Great War rules supplement itself. That's a lot of content; so let break it down unit by unit.
If you have
any problems or issues with the contents of your box set, please feel
free to contact our Customer Service team at: [email protected]
|
 |
The Officers
Description of Components
a. 1x Company Command officer figure.
b. 1x 2iC Command officer figure.
Assembling The Company Command Pistol Team
To
assemble the Company Command Pistol team, simply arrange the Company
Command Officer figure, one NCO Rifleman figure and one Rifleman figure on one of the Small
three-hole bases provided in the box set.
|
|
Assembling The 2iC Command Pistol Team
To
assemble the 2iC Command Pistol team, simply arrange the 2iC
Command Officer figure, one NCO Rifleman and one Rifleman figure on one of the Small
three-hole bases provided in the box set.
Note: Both Command Pistol teams can be upgraded to Command
SMG teams for +5 points per team. If you choose to do this simply
replace the NCO Rifleman figure with the NCO armed with a SMG (see the
image below for more details).
Right: An example of an assembled Command Pistol team.
|
 |

|
The NCOs
Description of Components
a. 2x NCO figures armed with SMGs.
b. 1x NCO Rifleman figure with hand pointing backwards.
c. 2x NCO Rifleman figures with hand pointing forward.
d. 1x Kneeling Rifleman NCO figure pointing.
Note: NCO figures are contained in Command teams as well as being spread out amongst to rest of the units. |
|
The Anti-Tank Rifle
Description of Components
a. 3x Prone Anti-tank Rifle figures.
Assembling The Anti-Tank Rifle Teams
The Infanteriekompanie HQ has the option to add an Anti-tank Section with up to three Anti-tank Rifle teams. To represent these teams correctly in Great War,
the first Anti-tank Rifle team need to contain one NCO Rifleman figure,
one Prone Anti-tank Rifle figure and one Rifleman figure.
|

|
The other two
Anti-tank Rifle teams contain one Prone Anti-tank Rifle figure and two
Rifleman figures.
Tip: Depending on the number of Anti-tank Rifle teams you're
planning on fielding, ensure that one of these teams includes an NCO
Rifleman figure. |
Below: An example of an assembled Anti-tank Rifle team with an NCO.
|
Below: An example of an assembled Anti-tank Rifle team without an NCO. |
 |
 |
| The Anti-tank Rifle teams are modelled on the Medium four-hole bases
included in the box set. Be sure to make use of the base plugs to fill two of the
figure holes on the bases in order to attach the Anti-tank Rifle figure
directly to the base.
|

|
The Granatenwerfer Mortar
Description of Components
a. 2x Kneeling Granatenwerfer loader figures.
b. 3x Reclined Rifleman figures.
c. 2x Granatenwerfer mortars.
Note: The extra Reclined Rifleman figure can be folded into your pool of Riflemen to be used as part of teams in your
Infanteriekompanie HQ. |
Assembling The Granatenwerfer Mortar Teams
The Infanteriekompanie HQ has the option to add a Werfer Section with up to two Greantenwerfer teams. To assemble these Granatenwerfer mortar teams, simply arrange one Granatenwerfer loader figure, one reclined Rifleman figure and one Granatenwerfer mortar on a Small three-hole base.
Right: An example of an assembled Granatenwerfer Mortar team.
|
 |
| Tip: Use one of the base plugs to fill the figure hole in order to attach the Reclined Rilfeman figure directly to the base. |
 |
The Sniper Team
Description of Components
a. 1x Prone Observer figure.
b. 1x Prone Sniper figure.
Assembling The Sniper Team
The Infanteriekompanie HQ
has the option to add a Sniper team for +60 points.
|
|
To assemble the
Sniper team simply arrange the Prone Observer figure and Prone Sniper
figure on the Small two-hole base.
Right: An example of an assembled Sniper team.
Tip: Use the base plugs to fill both
the figure holes on the Small two-hole base in order to attach the
Observer and Sniper figures directly to the base.
|
 |

|
The Flame-thrower Team
Description of Components
a. 3x Flame-thrower Number Two figures.
b. 3x Flame-thrower Gunner figures.
Assembling The Flame-thrower Teams
The Infanteriekompanie HQ has the option to add a Flame-thrower Section with up to three Flame-thrower teams.
|
To represent these teams correctly in Great War,
the first flame-thrower team need to contain one NCO Rifleman figure,
one Rifleman figure and the two-man flame-thrower team consisting of
the flame-thrower gunner figure and the Number Two figure. The other two
flame-thrower teams need to contain the two-man flame-thrower team and two Riflemen figures.
Tip: Depending on the number of Flame-thrower teams you're
planning on fielding, ensure that one of these teams includes an NCO
Rifleman figure.
The flame-thrower teams are modelled on the
Medium four-hole bases included in the box set.
|
Below: An example of an assembled Flame-thrower team with an NCO.
|
Below: An example of an assembled Flame-thrower team without an NCO. |
 |
 |
The Riflemen
Description of Components
a. 2x Prone Riflemen figures.
b. 4x Kneeling Riflemen figures.
c. 2x Leaning Riflemen figures.
d. 2x Advancing Riflemen figures.
e. 1x Aiming Rifleman figure.
|

|

|
The Bases
Description of Components
a. 1x Small two-hole base.
b. 4x Small three-hole bases.
c. 6x Medium four-hole bases.
d. 2x Base plug sprues.
|
The Officers & NCOs
Description of Components
a. 1x Officer figure with pistol.
b. 2x NCO figures armed with SMGs.
c. 1x NCO Rifleman figure with hand pointing backwards.
d. 1x NCO Rifleman figure with hand pointing forward.
e. 2x Kneeling Rifleman NCO figures pointing. |

|
 |
Assembling The Command Pistol Team
To
assemble the Command Pistol team, simply arrange the Officer figure,
one NCO Rifleman and one Rifleman figure on one of the Small
three-hole bases provided in the box set.
Left: An example of a assembled Command Pistol team.
Note: The Command team can be upgraded to Command
SMG teams for +5 points per team. If you choose to do this simply
replace the NCO Rifleman figure with the NCO armed with a SMG. |
 |
| Description of Components |
a. 2x Prone Riflemen figures.
b. 4x Kneeling Riflemen figures.
c. 4x Leaning Riflemen figures. |
d. 5x Advancing Riflemen A figures.
e. 4x Advancing Riflemen B figures.
f. 4x Aiming Rifleman figures. |
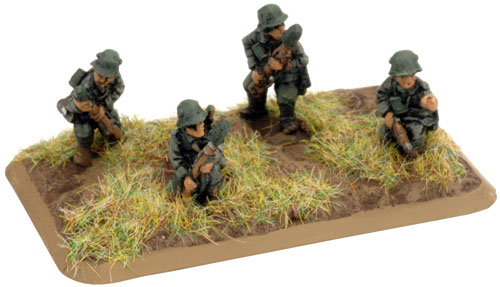
Assembling The Rifle Squad
An Infanterie Platoon consists of the HQ Section containing
the Command Pistol Team (which we've already covered), two Rifle Squads,
and two Machine-gun Squads. Each of these Rifle squad contains two
Rifle teams. The first Rifle team needs to contain one NCO figure and
three Riflemen figures. The second team simply contains four Riflemen
figures.
|
Below: An example of an assembled Rifle team with an NCO.
|
Below: An example of an assembled Rifle team without an NCO. |
 |

|
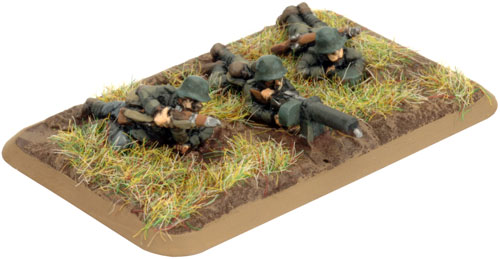
The Machine-gun Squad is made up of a Rifle team and a MG team. The
Rifle team consists of one NCO figure and three Riflemen figures and the
Machine-gun teams the two-man MG team (the prone gunner and loader
figures; see the examples below) and one rifleman figure.
The Rifle and MG teams are modelled on the Medium four-hole bases included in the box set.
|
 |
The MG Team
Description of Components
a. 2x Prone MG gunner figures.
b. 2x Prone MG loader figures.
Tip: Use the base plugs to fill the
figure holes on the base intended for use for the MG team in order to attach the prone MG gunner and loader figures directly to the base.
|
Below: An example of an assembled MG team with an NCO.
|
Below: An example of an assembled MG team without an NCO. |
 |
 |

|
The Rifle Grenade Team
Description of Components
a. 1x Rifle Grenade figure loading grenade.
b. 1x Kneeling Rifle Grenade figure.
c. 1x Standing Rifle Grenade figure.
Assembling The Rifle Grenade Team
An Infanterie Platoon can replace up to one Rifle team with a
Rifle Grenade team for +5 points.
|
To represent this team, simply arrange
the three Rifle Grenade figures and one NCO figure on a Medium
four-hole base.
Right: An example of an assembled Rifle Grenade team complete with NCO.
|
 |

|
The Bases
Description of Components
a. 1x Small three-hole base.
b. 9x Medium four-hole bases.
c. 1x Base plug sprue.
|
The Command Pistol Team
Description of Components
a. 1x Advancing Rifleman figure.
b. 1x NCO Rifleman figure pointing backwards.
c. 1x Officer figure with pistol pointing.
|
 |
 |
Assembling The Command Pistol Team
To
assemble the Command Pistol team, simply arrange the Officer figure,
the NCO Rifleman and the Rifleman figure on one of the Small
three-hole bases provided in the box set.
Left: An example of an assembled Command Pistol team.
|
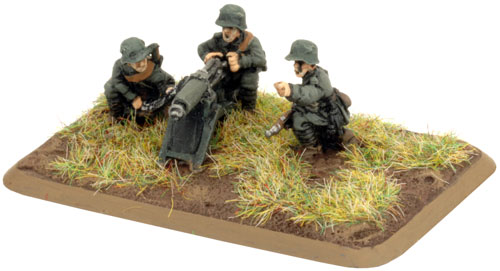
The Machine-gun Sections
Description of Components
a. 4x Kneeling HMG loader figures
b. 4x Kneeling HMG gunner figures.
c. 4x Maxim HMGs.
Assembling The Machine-gun Sections
The Infanterie Machine-gun Platoon contains a Command Pistol team (which I've already covered) and four Machine-gun sections. |

|
Two of the Machine-gun sections need to contain the two-man HMG crew
consisting of the kneeling gunner and loader as well as the Maxim HMG
itself and an NCO figure. The other two teams are made up of the same
two-man HMG crew and a Rifleman figure.
Tip: Use the base plugs to fill the
leftover figure hole on the base as each Maxim HMG team consists of only a three figures. |
| Below: An example of an assembled Maxim HMG team with an NCO. |
Below: An example of an assembled Maxim HMG team without an NCO. |
 |
 |
|

|
The NCO & Riflemen
Description of Components
a. 2x Kneeling NCO Riflemen figures pointing.
b. 1x Kneeling Riflemen figures.
c. 2x Prone Riflemen figures.
|
The Bases
Description of Components
a. 1x Small three-hole base.
b. 4x Medium four-hole bases.
c. 2x Base plug sprue. |
 |
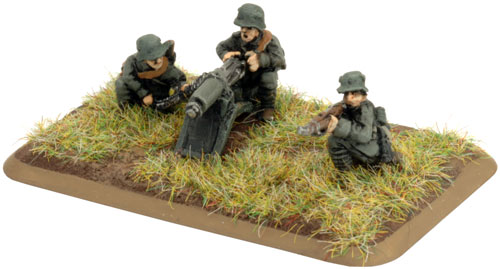
| Step 1. Begin by using the base plugs to fill the spare figure hole. |
Step 2. Position the gunner figure.
|
 |

|
 |
Step 3. Next, correctly position the Maxim HMG with the gunner.
|
Step 4. Finally, add the loader figure ensuring the ammunition belt is being feed from the right-hand side of the gun.
|
Below: The Maxim HMG ready for an NCO or Rifleman to complete the team.
|
 |
 |
 |
| Description of Components |
a. 4x A7V tracks.
b. 2x MG sprues.
c. 4x Rear mudguards.
d. 4x Front mudguards.
e. 4x Front cut-down mudguards.
|
f. 4x Rear cut-down mudguards.
g. 2x 5.7cm guns.
h. 4x Hull skirts.
i. 2x Resin A7V hulls.
|

|
WWI German Tank Decal Sheet
Description of Components
a. 1x WWI German Tank Decal sheet.
|
Assembling The A7V
|
|
Step 1. Begin assembling the A7V by attaching the tracks to the bottom of the resin hull.
Note: The word 'Front' and an arrow has been inscribed on the top of the track to add in the correct orientation.
|
Which end is the front of the A7V you may ask? Where is 5.7cm goes.
Below: The front of the A7V is where the 5.7cm gun attaches to the hull.
|
Below: The track attached to the left-hand side of the hull.
Tip: The tracks for the A7V are ambidextrous and therefore can be used on both sides of the vehicle.
|

|

|

|
| Tip: When referring to
left or right-hand side in regards to a Flames Of War miniature, the
orientation is determined as if looking at the vehicle from the rear. |
| Below: The track attached to the right-hand side of the hull. |
Step 2. Next, attach the hull skirts to the underside of the front and rear of the hull. Note the two holes in which the skirts attach.
|
 |
 |
 |
| Below: The front hull skirt attached to the resin hull. |
Below: The rear hull skirt attached to the resin hull. |
Step 3. Next, attach the mudguards to the hull of the A7V.
|
 |
 |
 |
Below: The locations on the A7V hull where the mudguards attach.
|
Below: The front mudguard attached to the hull.
|
Below: The rear mudguard attached to the hull. |
 |
 |

|
Below: The mudguards successfully attached to the left-hand side of the hull.
|
Below: The mudguards successfully attached to the right-hand side of the hull. |
 |
 |
Below: There is also an option to model the A7V with cut-down mudguards. A7V crews would cut-down the mudguards to prevent mud from building up underneath and damaging the tracks.
|
Below: An example of the cut-down mudguards on the A7V.
Note: Use either the all regular mudguards or all cut-down mudguards on your A7V models; not a mixture of the two. |

|
 |
Step 4. Next, attach the 5.7cm gun to the front of the hull.
|
Step 5. Finally, attach the machine-guns to the inside of the machine-gun ports located on the hull of the A7V. |
|
 |
 |
Below: The machine-gun ports of the rear of the A7V.
|
Below: The machine-gun ports of the left-hand side of the vehicle.
|
Below: The machine-guns attached to the left-hand side of the A7V.
|
 |
 |
 |
| Below: The machine-guns attached to the right-hand side of the A7V. |
Below: The machine-guns attached to the rear of the A7V. |
Below: With the machine-guns in place, the A7V is near fully-assembled.
|
 |
 |
 |
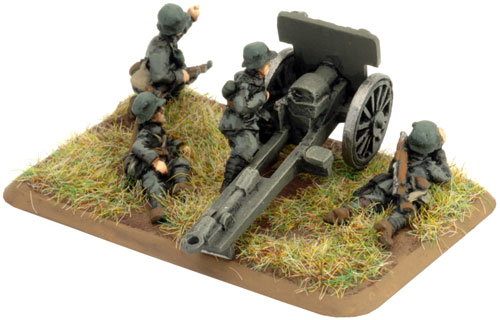
The 7.62cm Krupp Infantry Gun
|
 |
| Description of Components |
|
a. 2x Observer figures with binoculars.
b. 2x Standing loader figures.
c. 2x Kneeling gunner figures.
d. 2x Kneeling loader figures.
|
e. 2x 7.62cm Krupp infantry guns
f. 2x Gun shields
g. 4x Gun trail wheels.
h. 2x Medium bases.
|
| Assembling The 7.62 Krupp Infantry Gun |
| Step 1. Begin by attaching the wheels to each side of the gun trail. |
 |
 |
 |
| Step 2. Next, attach the gun shield by sliding it over the barrel. |
Below: With the gun shield in place, the 7.62cm Krupp infantry gun is now fully assembled.
|
 |
 |
 |
Assembling The 7.62cm Krupp Infantry Gun Crew
Each 7.62cm Krupp infantry gun is manned by a four-man crew. To represent an Infantry Gun Section in Great War
correctly, attach an assembled 7.62cm Krupp infantry gun to one of the
Medium bases included in the box set. Next, surround the gun with one
Observer figure, one Standing loader figure, one Kneeling gunner figures
and one Kneeling loader figure.
Right: An example of a 7.62cm Krupp infantry with crew.
|
 |
I hope you find this assembly guide useful when
it comes time to assemble your own Biltz's Battlegroup for Great War.
Till next time, happy modelling!
~ Blake. |
Last Updated On Thursday, August 14, 2014 by Blake at Battlefront
|
|
|