|
|
|
|
Products mentioned in this Article
--None--
|
|
|
|
|
|
|
|
|
 |
|
|
 |
Firestorm Caen: The General's Game
Playing The Firestorm Caen Campaign: Part One
Turns One to Three
with G. Jökull Gíslason and Brjánn Jónasson
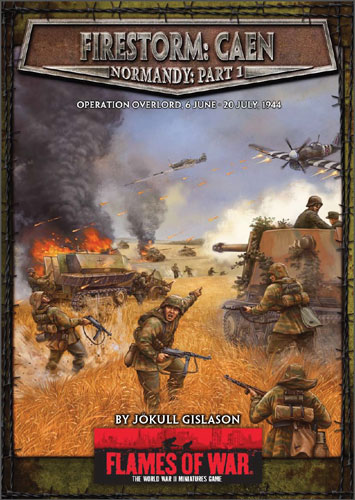
Well, Firestorm: Caen is out. Hopefully this will be the first instalment of several Normandy Firestorms; I have already started looking into the American landings. Firestorm is all about playing Flames Of War with a meaningful context. While a win or loss may be nice in a one off battle; in a campaign the results may be crucial. But there is another way to play the Firestorm, under the General's Game rules. For this you only need what is provided, the campaign map board; the Firestorm tokens; two dices and of course the rules. This is an excellent way to familiarise yourself with how the campaign plays before getting really stuck and playing any actual games of Flames Of War. I also recommend that for smaller groups that you roll off a few battles each turn using the General's Game rules and play the more important battles with your Flames Of War forces.
|
Firestorm: Caen
Firestorm: Caen focuses on the British and Canadian landings on Gold,
Juno and Sword beaches right up to Operation Goodwood. It is a
full-sized campaign but has special rules for smaller groups or even a
two-player option. There are five turns in all, each named after the
major operations for each time period; Neptune, Perch, Epsom, Charnwood
and Goodwood. Covering the period between 6 June to 20 July 1944.
Download Firestorm: Caen here... |
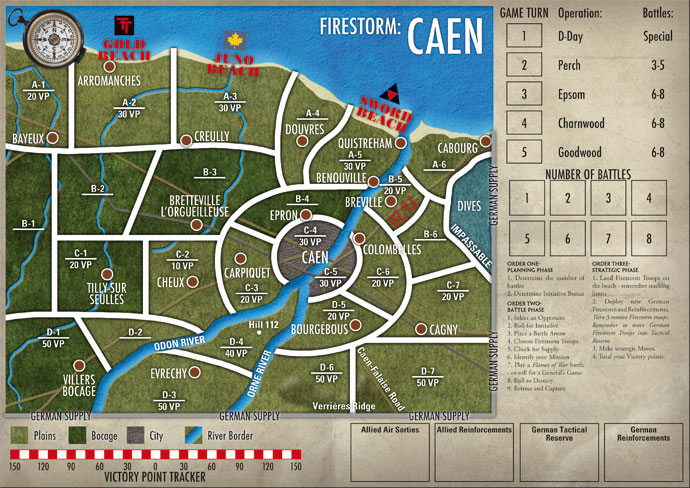 |
Firestorm: Caen is played over the course of five turns; with each turn designed to represent the actual fighting as much as possible within the confines of a Firestorm campaign. Canadian, British, German and French players should find the campaign of special interest; a considerable amount of research went into in order to create realistic representation of the actual events.
|
| Read Playing The Firestorm Caen Campaign: Part Two here... |
|
Preparing To Play
I recommend that you print out the Firestorm tokens and the campaign map (in colour if possible), preferably in the A3 / B3 scale. Then using glue stick, attach them to some good quality cardboard which can be found at any good hobby, stationary or art supplies store. Any effort you put into this process will add that extra polish to the campaign; improving the look and make it more fun to play.
|
| Read Jökull's Firestorm: Caen Walkthrough here... |
Initial Setup and Turn One
On page 14 of the
Firestorm: Caen rulebook you’ll find turn one entitled Operation Neptune
and the Airborne Landings. This turn starts with fixed battles and the
attacker simply rolling a die for each landing and compares it to the
appropriate table (Operation Tonga on page 14 for the Airborne Landings
and Operation Neptune on page 15 for the Beach Landings). Here you will
see the limitation of the General's Game as the roll of a single die can
be very fickle and result in some odd outcomes. For the General's Game
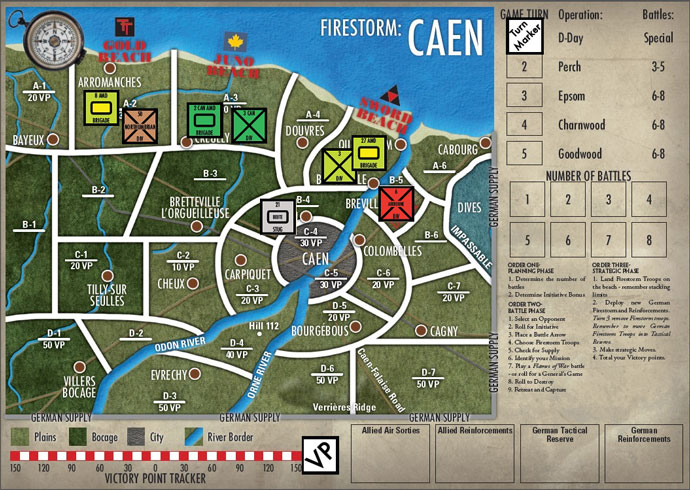
the outcomes can be seen in the image below. |
| Below: The results of turn one. |
 |
Operation Tonga
Die roll equalled 6 – Success, area captured and Airborne Firestorm Troops in place.
Operation Neptune
Sword Beach
Die roll equalled 3 – Beach Secure, infantry division in place but the Tank Brigade is destroyed and placed in reinforcements for turn two.
Juno Beach
Die roll equalled 5 – Good Progress, land both divisions and Tank Brigade and one further attack.
Gold Beach
Die roll equalled 2 – Frightful losses. Infantry in place but the Tank Brigade is captured!
Note that the Beach Landings are always successful, but a very successful landing means you get an extra attack while a bad landing will lose you troops.
Exploitation
Not the best outcome for the Allies; one Tank Brigade
captured awarding the Germans 10 Victory Points while another is delayed
for a full turn. But the outcome on Juno was promising and the Allies
attacked from A3 to B3 with the infantry. In the first turn the Germans
do not get any Firestorm Troops but do get +1 for the situation
modifiers for defending in bocage. The Canadian infantry is +2 in
bocage. The Allies roll 4 and the Axis 2 giving the Allies a 6 to 3 and
capture the area without any losses.
|
Battle Number
|
Intitiative Roll:
Allies First
|
Area Attacked:
From - Into |
Firestorm Unit &
Bonuses
|
Dice Roll:
Attacker First
|
Total
|
Result
|
| N/A |
N/A |
A3 - B3
|
Allies: Inf +2.
German: Bocage +1. |
4 / 2
|
6 / 3 |
Allies capture B3.
|
|
Attack Of The 21. Panzerdivison
Once the landings have been worked out the Germans get one counterattack using the 21. Panzerdivision. The Germans decide to attack Sword Beach.
|
Battle Number
|
Intitiative Roll:
Allies First
|
Area Attacked:
From - Into |
Firestorm Unit &
Bonuses
|
Dice Roll:
Attacker First
|
Total
|
Result
|
| N/A |
N/A |
B4 - A5
|
Allies: Inf +1; Naval Bombardment (Beach Defence) +2.
German: Beute StuG +2. |
3 / 4
|
6 / 6 |
Draw equals a defender win.
|
|
In case of a draw there is a chance both Firestorm Troops are destroyed on a 6 but neither side rolls a 6.
|
Strategic Phase
The Allies must first land their reserves on the beaches; then the Germans place their reinforcements. Then starting with the Germans the units may redeploy followed by the Allies. The Germans may place one Firestorm unit in Tactical Reserve for turn two and choose to place the 12. SS in Tactical Reserve.
Important: Firestorm Caen has stacking rules and you can only have three Firestorm units in each area at any time (except you may at the end of the turn have more than three while moving the Firestorm Troops about but you must end with the maximum of three per area.
So ends the Day of Days and as you will see turn one is very different from the following turns, but this is a day like no other.
|
Below: The end of turn one.
|
Turn Two: Operation Perch
Each of the turns is named after the corresponding major offensive operation conducted by the Aliies. This is done for flavour and does not have to have any bearing on your plans. Turn two is the first proper turn and you roll a D3 (on a six-sided die 1 - 2 = 1, 3 - 4 = 2 and 5 - 6 = 3) and add 2 to the dice roll. We rolled 2 so there are only three battles to resolve but there is a special rule regarding Bayeux and Villers Bocage that can add another game to the total. The main reason that turn two has fewer battles than the rest is that on the 19 June severe storms interrupted the landings for several days and the Germans where still rushing troops forward to oppose the landings.
Note that for initiative the Allies win on all ties throughout the game and for turn two they have a +1 bonus to the roll.
|
Battle Number
|
Intitiative Roll:
Allies First
|
Area Attacked:
From - Into |
Firestorm Unit &
Bonuses
|
Dice Roll:
Attacker First
|
Total
|
Result
|
| 1 |
6 (+1) / 2
|
A2 - A1
|
Allies: Tank Div +3; Artillery +2.
German: Defence Firestorm Troop (DFT) +1. |
2 / 5
|
7 / 6 |
Allies capture A1.
|
|
Artillery is missing from the list and should be airborne infantry. All Axis areas are considered to have a Defence Firestorm Troop (or DFT) and on a die roll of 1 - 4 it adds +1 to the defence but on 5 - 6 it adds +2. Note that this is different from how they work in the normal game where a 4 or 5 is the same result but it has the same overall effect. Since the Allies Captured Bayeux then the special rule on page 16 comes into effect and the next battle is special. The Allies now capture B1 and place the 7th Armoured Division in area D1, Villers Bocage while the Germans receive 101. Schwere SS-Panzerabteilung to oppose them.
|
Villers Bocage Special Battle
|
Battle Number
|
Intitiative Roll:
Allies First
|
Area Attacked:
From - Into |
Firestorm Unit &
Bonuses
|
Dice Roll:
Attacker First
|
Total
|
Result
|
| Special |
N / A
|
B1 - D1
|
Allies: Tank Div +2.
German: Tiger I E +2; Bocage +1. |
1 / 3
|
3 / 6 |
Allies lose the Tank Division which is returned to the reinforcement pool.
|
|
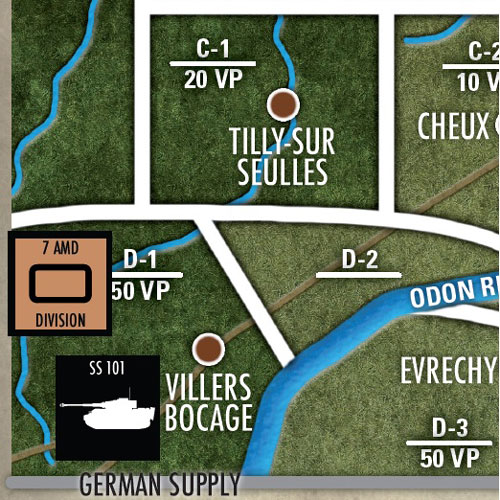 |
The 7th Armoured was destroyed on a roll of 5+. This means it must reequip before returning to battle making it very difficult for the Allies to bring in all their new Firestorm Troops to bear this turn.
Left: The Battle of Villers Bocage.
|
Battle Number
|
Intitiative Roll:
Allies First
|
Area Attacked:
From - Into |
Firestorm Unit &
Bonuses
|
Dice Roll:
Attacker First
|
Total
|
Result
|
| 2 |
4 (+1) / 5
Allies win on tie.
|
B3 - A4
|
Allies: Tank Brig +2; Air +2.
German: DFT +1; Pz IV (12. SS) +3. |
1 / 5
|
5 / 9 |
Allies capture A4 and the 12. SS is destroyed.
|
|
Here the Germans decide to add their Tactical reserve but fail to hold the area. The 12. SS is then destroyed on a 5+. The Allies have two Air Sorties available for the turn and use one. Each can be used once to aid in a battle.
|
Battle Number
|
Intitiative Roll:
Allies First
|
Area Attacked:
From - Into |
Firestorm Unit &
Bonuses
|
Dice Roll:
Attacker First
|
Total
|
Result
|
3
|
2 (+1) / 4
|
C6 - B5
|
Allies: Airborne +2; Air +2.
German: FlaK Korps +3. |
5 / 3
|
9 / 6
|
No effect.
|
|
The last battle is an attack on the British Drop Zones but the British hold them off and there is no further effect.
The Strategic Phase follows and the Allies are unable to move all their reinforcements onto the beaches since they only have room for eight and there are nine waiting to come ashore and two that were destroyed. Meanwhile, the Germans get five more Panzer units putting them a strong postition for turn three. In fact turn three is the high watermark for the Germans.
|
Turn Three: Operation Epsom
|
Below: The campaign map at the beginning of turn three.
|
At this point things look a lot better for the Germans than the Allies, but remember that the Allies still have a strong lead in initiative and air power. In turn three seven battles need to be resolved.
|
Battle Number
|
Intitiative Roll:
Allies First
|
Area Attacked:
From - Into |
Firestorm Unit &
Bonuses
|
Dice Roll:
Attacker First
|
Total
|
Result
|
| 1 |
1 (+1) / 1 |
A2 - B2
|
Allies: 2x Inf +4.
German: Panther +2; DFT +1; Bocage +1. |
3 / 6
|
7 / 10 |
Allies lose one infantry unit.
|
|
Allies start by attacking an open area but the Germans deploy one of their reserves and roll a 6 to destroy one of the Allied infantry unit.
|
Battle Number
|
Intitiative Roll:
Allies First
|
Area Attacked:
From - Into |
Firestorm Unit &
Bonuses
|
Dice Roll:
Attacker First
|
Total
|
Result
|
2
|
2 (+1) / 6 |
B6 - B5
|
Allies: Tank Div +3; Air +2.
German: Panther +3; StuG +3. |
6 / 2
|
11 / 8 |
Germans lose a Panther unit.
|
|
Again the Germans attack the Drop Zone and again the Allies beat them off but the situation is precarious. They may not be so lucky next time.
|
Battle Number
|
Intitiative Roll:
Allies First
|
Area Attacked:
From - Into |
Firestorm Unit &
Bonuses
|
Dice Roll:
Attacker First
|
Total
|
Result
|
3
|
3 (+1) / 4 |
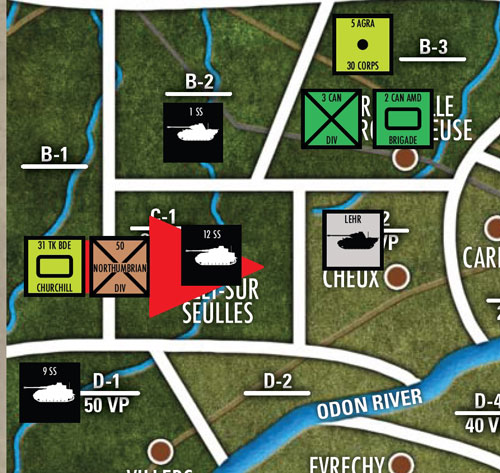
B1 - C1
|
Allies: Churchill +2; Infantry +2.
German: Panzer IV +2; DFT +2; Bocage +1. |
2 / 6
|
6 / 10 |
Allies lose Churchill unit.
|
|
In an attempt to cut the Panthers off in area B2 the Allied attack fails to capture Tilly.
Right: Battle Three of Turn Three.
|
 |
Battle Number
|
Intitiative Roll:
Allies First
|
Area Attacked:
From - Into |
Firestorm Unit &
Bonuses
|
Dice Roll:
Attacker First
|
Total
|
Result
|
4
|
6 (+1) / 6 |
B5 - A6
|
Allies: Tank Div +3; Air +2.
German: Tiger I E +3; DFT +1. |
5 / 2
|
10 / 6 |
Allies capture A6.
|
|
The Germans commit their final reserve but lose the area and the Tiger retreats to B6. Now the Allies have secured two areas over the Orne.
|
Battle Number
|
Intitiative Roll:
Allies First
|
Area Attacked:
From - Into |
Firestorm Unit &
Bonuses
|
Dice Roll:
Attacker First
|
Total
|
Result
|
5
|
2 (+1) / 1 |
B3 - B4
|
Allies: 2x Inf +4.
German: Panzer IV +2; DFT +2; Bocage +1.
|
2 / 4
|
6 / 9 |
N/A
|
|
The Bocage proves hard going and the Allied attack stalls.
|
Battle Number
|
Intitiative Roll:
Allies First
|
Area Attacked:
From - Into |
Firestorm Unit &
Bonuses
|
Dice Roll:
Attacker First
|
Total
|
Result
|
6
|
4 (+1) / 1 |
A4 - B4
|
Allies: Inf +2; Tank Div +2.
German: Tiger I E +2; Beute StuG +2; Bocage +1.
|
6 / 4
|
10 / 9 |
Allies capture B4.
|
|
Since only the defender can lose areas it makes sense to attack even with the odds against you and this time it payed off and the area north of Caen is captured. Both German units retreat to Caen.
|
Battle Seven
|
Battle Number
|
Intitiative Roll:
Allies First
|
Area Attacked:
From - Into |
Firestorm Unit &
Bonuses
|
Dice Roll:
Attacker First
|
Total
|
Result
|
7
|
3 (+1) / 5 |
C4 - B4
|
Allies: Inf +2; Tank Div +2; Bocage +1.
German: Tiger I E +2; Beute StuG +2. |
1 / 2
|
6 / 6 |
Allies lose Tank Division.
|
|
The final attack of turn three is an attempt by the Germans to recapture the area north of Caen. This time the Bocage bonus goes to the Allies who win on a draw but lose their Tank Division. Had it been earlier it would have had a greater effect but since this is the end of the turn it has little effect.
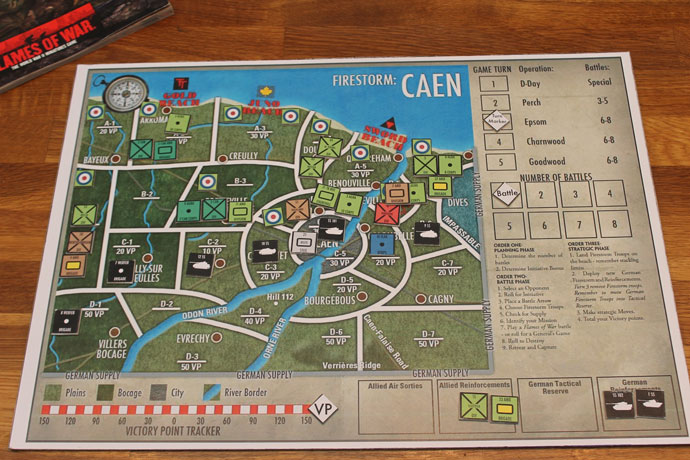
The bad news for the Germans is that at the end of the turn they must now withdraw Panzer Lehr, 2. Panzerdivision and the 2. SS-Panzerdivision as these units got transfered to fight the Americans at St Lo.
The Victory Points at the end of turn three are Allies 110 versus the Germans 440. But the campaign is far from over. Be sure to join us in part two as we conclude the General‘s Game.
~ Jökull and Brjánn.
|
| Below: The campaign map at the end of turn three. |
 |
Last Updated On Thursday, August 8, 2013 by Blake at Battlefront
|
|
|