|
|
|
|
Products mentioned in this Article
--None--
|
|
|
|
|
|
|
|
|
 |
|
|
") |
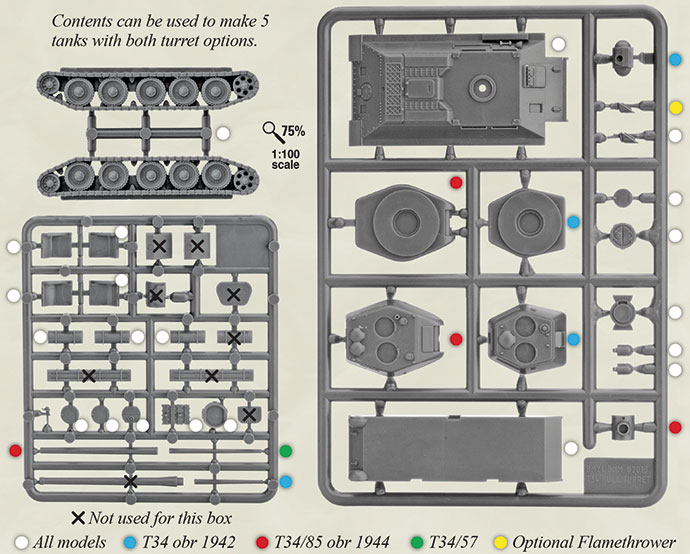
T-34 Tankovy Company (SBX30)
Includes five plastic T-34 tanks with 76mm and 85mm turrets, one plastic tank commander sprue & one decal sheet.
The T-34 was the most-produced tank of World War II. When the German Wehrmacht first encountered it in battle in 1941, German tank generals von Kleist and Guderian called it "the deadliest tank in the world."
Battlefront's first all-plastic World War II tank has been designed with high-precision computer-aided design technology.
This product is no longer currently available for sale...
|
Beasts Of War: What's In The Box
Flames Of War Plastic T-34 Kit
Battlefront's own Gareth Richards joins Warren as they unboxed the new plastic T-34 Tankovy Company box set. |
Model Dads Review:
Plastic T-34 Tankovy Company
Model Dads provides their thoughts on the new plastic T-34 Tankovy Company box set. |
|
|
|
T-34/76 obr 1942
The fast-moving T-34 tank was the mainstay of the Red Army's tank force throughout the war. Entering battle in 1943, the improved 1942 model fought in every major engagement for the rest of the war. Despite improvements in enemy equipment, its 76mm gun was still adequate to deal with German medium tanks like the Panzer IV, especially as the T-34 outnumbered them two or three to one.
This product is no longer currently available for sale...
|
")
|
|
")
|
T-34/85 obr 1944
After encountering the Tiger and Panther tanks at Kursk, it was decided that the T-34 needed to be upgraded. This was done by creating a new turret that allowed an extra crew member to be added and replaced the 76mm gun with an 85mm gun, creating one of the most successful tanks of the war.
With a three-man turret, the commander was free to command the tank, leaving the operation of the gun to his gunner and loader.
|
|
")
|
")
|
The T-34/85 was still not a one-on-one match for a Panther, but the Soviets always had numbers on their side. The T-34/85 remained the standard Soviet medium tank, with uninterrupted production until the end of the war.
Designed by Will Jayne
Painted by James Brown |
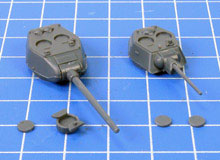
Interchangeable turrets
You can easily swap the interchangeable turrets between battles, allowing you to field your T-34 tanks either as the 76mm T-34 obr 1942 or the more powerful up-gunned T-34/85 obr 1944 - two tanks for the price of one! |
|
")
|
")
|
| Assembling the plastic T-34 with 76mm and 85mm turrets |
|
|
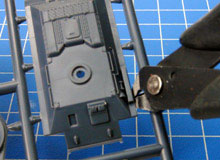
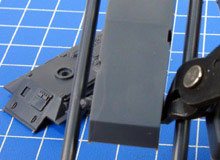
| Below: Carefully cut the hull top from the sprue using clippers... |
|
Below: ...and the hull bottom. |
|
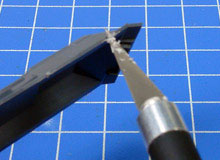
Below: Use a craft knife to gently scrape away any excess plastic. |
 |
|
 |
|
 |
| Tip: When referring to left or right-hand side in regards to a Flames Of War miniature, the orientation is determined as if looking at the vehicle from the rear. |
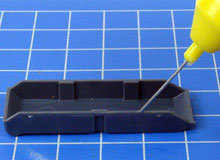
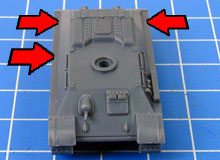
| Below: Run a line of plastic cement around the top of the hull bottom piece. |
|
Below: The hull top piece has raised lines to help ensure correct placement. |
|
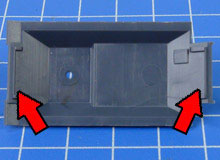
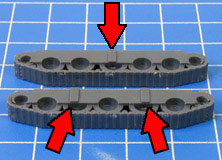
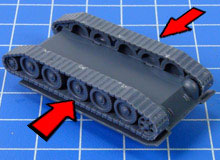
Below: Press the hull top and bottom pieces together. Note the two locator slots for the left-hand track... |
 |
|
 |
|
 |
| Below: ...and the single locator slot for the right-hand track. |
|
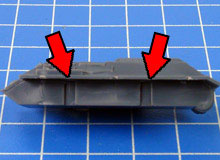
Below: The tracks have corresponding tabs, so you can't put the tracks on the wrong sides. |
|
Below: Glue both tracks in place using plastic cement. |
 |
|
 |
|
 |
| Below: Clip off the top and bottom pieces for both turrets. |
|
Below: The 85mm turret will probably be left with nubs of excess plastic feed from the sprue. |
|
Below: Carefully trim these away with your craft knife. |
 |
|
 |
|
 |
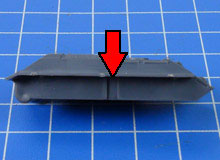
| Below: Don't worry if the edges of the turret top pieces are a little messy; real T-34s had a prominent weld bead along this line. |
|
Below: Apply plastic glue around the top edge of the 85mm turret bottom piece... |
|
Below: ...and press the pieces together. Again, don't worry if this join is a little messy. |
 |
|
 |
|
 |
| Below: And repeat for the 76mm turret. |
|
Below: Select the appropriate mudguards... |
|
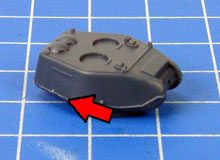
Below: The rounded mudguards were common on 76mm models and 85mm variants up to late 1944. |
 |
|
 |
|
 |
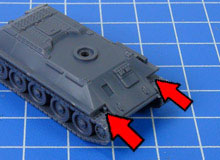
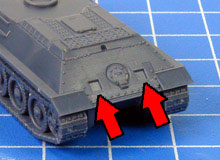
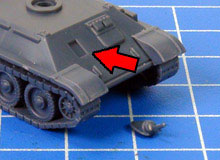
| Below: Glue the mudguards in place, taking care to ensure they are straight. |
|
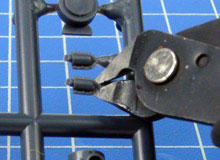
Below: Carefully clip off the exhaust pieces. |
|
Below: Apply a small amount of plastic cement to each locating hole... |
 |
|
 |
|
 |
| Below: ...and press the exhausts into place; you may want to use tweezers for this. |
|
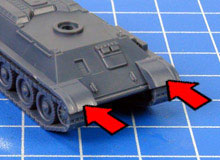
Below: Clip off the bow MG. The stubbier piece next to it is for the flamethrower variant. |
|
Below: Apply a small amount of plastic cement to the locating hole... |
 |
|
 |
|
 |
| Below: ...and press the MG into place. |
|
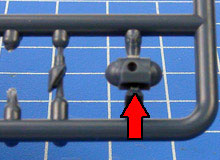
Below: Clip off the 76mm gun mantlet... |
|
Below: ...and glue it into place on the front of the 76mm turret. |
 |
|
 |
|
 |
| Below: The 76mm gun is the smallest gun on the sprue. |
|
Below: Slide it into the hole in the mantlet, with a little plastic cement. |
|
Below: Repeat for the 85mm mantlet. |
 |
|
 |
|
 |
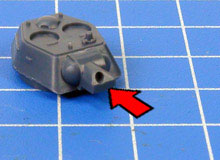
| Below: This piece has a small locator plug on the back to make it harder to glue it on upside down. |
|
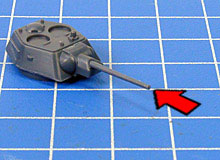
Below: The 85mm gun is the second-largest on the sprue. |
|
Below: Slide it into the hole in the mantlet, with a little plastic cement. |
 |
|
 |
|
 |
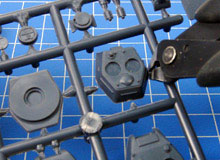
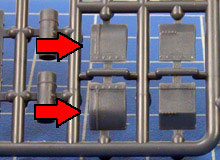
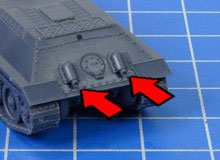
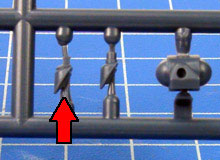
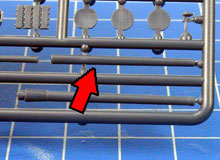
| Below: Clip three fuel drums off the sprue. |
|
Below: The standard arrangement was one drum on the left-hand side (facing the front) and two on the right-hand side. |
|
Below: Because plastic cement takes a while to cure, you can take your time and make sure the drums are lined up straight. |
 |
|
 |
|
 |
| Attaching the turret |
|
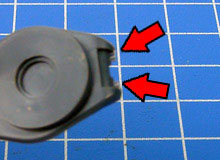
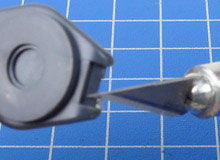
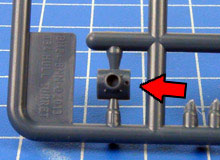
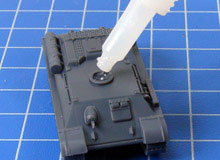
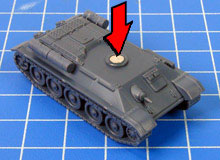
| Below: Finally, glue the turret peg into the hole in the bottom of your turret |
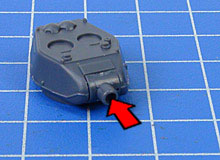
Below: It fits into the hole in the tank's turret ring (don't glue this!) allowing the turret to rotate to shoot at targets in any direction. |
") |
") |
|
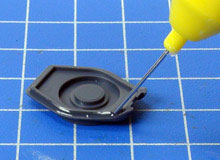
Alternatively, you may prefer to glue rare earth magnets into the recess in the hull and to the bottom of the turret. Magnets are a quick and secure way of fixing your turrets to the hulls, but they are a small added expense, which is why the turret peg is provided, leaving the choice up to you.
Rare Earth Magnets (XX105) are available through the online store here...
These 1mm x 5mm magnets fit perfectly into the round spaces in the hull and turret.
|
") |
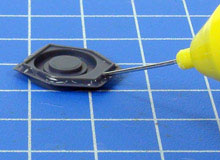
| Below: Plastic cement only works for plastic-to-plastic joins. For the magnets, you will need to use cyanoacrylate Super Glue. |
|
Below: Make sure they polarity of the magnets is correct... |
|
Below: ...or the turrets will pop off. Give the glue enough time to cure properly. |
 |
|
 |
|
 |
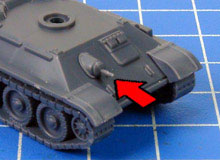
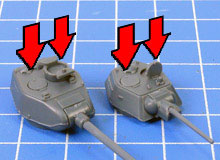
| Below: Decide whether to model open or closed hatches, and whether you want a commander's cupola on your 76mm turret. |
|
Below: Later production T-34/76 variants had a cupola; all T-34/85 variants did. Glue the hatches and/or cupolas in place. |
|
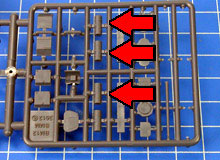
Below: Since both turrets have an open hatch, choose a commander from the sprue. |
 |
|
 |
|
") |
Last Updated On Monday, February 25, 2019
|
|
|