|
|
|
|
Products mentioned in this Article
--None--
|
|
|
|
|
|
|
|
|
 |
|
|
") |
7th Armored Division (USAB03)
includes one Creighton Abrams with Thunderbolt VII, three M4A2E2 Jumbos, four M4A3 (Late), four M4A3 (76mm), three M7 Priest, one Sherman OP tank, one Command team, one Staff team, one Easy Eight Objective Marker, one Chaffee Objective Marker, three Tank Commanders sprues, three Tank stowage sprues, one US Armored token set, one US dice set, twenty six Rare-earth magnets, five Decal sheets, one Small three-hole base & one Medium four-hole base.
|
| This product is no longer available |
Blood, Guts, & Glory
It’s September 1944 and the Allies have stormed across France all
along the front lines from Belgium to the French region of the Lorraine.
Blood, Guts, & Glory covers the tanks battles in the Lorraine
between September 1944 and January 1945.
Learn more about Blood, Guts, & Glory here...
|
 |
") |
The 7th Armored Division fought from Normandy to the Lorraine in the summer of 1944. After a hard fight around the German fortress-city of Metz, they fought in the soggy battlefields of Holland. After a rest and refit with the new M4A3 Sherman models, the Lucky Seventh was back in action during the Battle of the Bulge, where it successfully fought German spearheads around St. Vith to a standstill.
Designed by Evan Allan & James Brown
Painted by James Brown, Blake Coster, Mark Hazell & Ruben Torregrosa. |
| Lt. Col. Creighton Abrams and Thunderbolt VII |
") |
") |
| Thunderbolt VII in Flames Of War |
| |
|
|
Armour
|
|
|
Name
|
Mobility
|
Front
|
Side
|
Top
|
Equipment and Notes
|
Weapon
|
Range
|
ROF
|
Anti-tank
|
Firepower
|
|
| M4A3E8 "Thunderbolt VII" |
Standard Tank
|
8
|
5
|
1
|
Co-ax MG, Hull MG, AA MG, .50 cal AA MG, Protected ammo, Smooth Ride, Tank telephone, Wide tracks. |
M1 76mm gun (late)
|
32"/80cm
|
2
|
13
|
3+
|
Stabiliser. |
|
The M4A3E2 Jumbo in Flames Of War
|
| |
|
|
Armour
|
|
|
Name
|
Mobility
|
Front
|
Side
|
Top
|
Equipment and Notes
|
Weapon
|
Range
|
ROF
|
Anti-tank
|
Firepower
|
|
M4A3E2 Jumbo
|
Slow Tank
|
12
|
8
|
1
|
Co-ax MG, Hull MG, .50 cal AA MG,
Jumbo Lead the Way, Tank telephone.
|
M3 75mm gun
|
32"/80cm
|
2
|
10
|
3+
|
Smoke, Stabiliser. |
|
| The M4A3 (Late) in Flames Of War |
| |
|
|
Armour
|
|
|
| Name |
Mobility
|
Front
|
Side
|
Top
|
Equipment and Notes
|
Weapon
|
Range
|
ROF
|
Anti-tank
|
Firepower
|
|
M4A3 Sherman (late)
|
Standard Tank
|
7
|
4
|
1
|
Co-ax MG, Hull MG, .50 cal AA MG, Detroit's Finest, Protected ammo, Tank telephone.
|
M3 75mm gun
|
32"/80cm
|
2
|
10
|
3+
|
Smoke, Stabiliser |
|
| The M4A3 (76mm) in Flames Of War |
| |
|
|
Armour
|
|
|
Name
|
Mobility
|
Front
|
Side
|
Top
|
Equipment and Notes
|
Weapon
|
Range
|
ROF
|
Anti-tank
|
Firepower
|
|
| M4A3 (76mm) Sherman |
Standard Tank
|
7
|
4
|
1
|
Co-ax MG, Hull MG, .50 cal AA MG,
Protected ammo, Tank telephone. |
M1 76mm gun (late)
|
32"/80cm
|
2
|
13
|
3+
|
Stabiliser. |
|
| Below: The one variation of the M7 Priest HMC. |
Below: The second variation of the M7 Priest HMC. |
") |
") |
The M7 Priest HMC in Flames Of War
|
| |
|
|
Armour
|
|
|
Name
|
Mobility
|
Front
|
Side
|
Top
|
Equipment and Notes
|
Weapon
|
Range
|
ROF
|
Anti-tank
|
Firepower
|
|
| M7 Priest HMC |
Standard Tank
|
1
|
0
|
0
|
.50 cal AA MG. |
M2A1 105mm howitzer
|
24"/60cm
|
1
|
9
|
2+
|
Breakthrough gun, Hull mounted, Smoke. |
Firing bombardments
|
72"/180cm
|
-
|
4
|
4+
|
Smoke bombardment.
|
|
| Below: The third variation of the M7 Priest HMC. |
Below: The M4 Sherman OP. |
") |
") |
The M4 Sherman OP in Flames Of War
|
| |
|
|
Armour
|
|
|
Name
|
Mobility
|
Front
|
Side
|
Top
|
Equipment and Notes
|
Weapon
|
Range
|
ROF
|
Anti-tank
|
Firepower
|
|
| M4 Sherman OP |
Standard Tank
|
6
|
4
|
1
|
Co-ax MG, Hull MG, .50 cal AA MG.
|
M3 75mm gun
|
32"/80cm
|
1
|
10
|
3+
|
Smoke. |
|
Below: The Command Team.
|
Below: The Staff Team.
|
") |
") |
| "An artillery platoon with a Staff team can repeat an
artillery bombardment in subsequent turns once it has ranged in on an
aiming point. You do not need to roll again to range in, nor is there
any penalty to the score needed to hit if your artillery Ranged In on
the second or third attempts." |
| The Sherman Stowage Sprues |
| The Chaffee Objective Marker |
| The Easy Eight Objective Marker |
The US Armored Token Set
The US Armoured token set contains 30 full-colour gaming tokens including:
|
| 4x Bailed Out tokens; 4x Bogged Down tokens; 4x Dug In tokens; 4x Gone To Ground tokens; 4x Pinned Down tokens; 2x Ranged In tokens; 2x Reorganising tokens; 2x At The Double tokens; 2x Non-Assaulting Team tokens. |
The US Dice Set
Includes 16 full-colour themed dice.
|
The Lucky Seventh Push Forward
|
| The Contents of the 7th Armored Division Box Set |
| Description of Components |
|
a. 1x Hatch sprue.
b. Abrams tank commander figure.
c. 1x .50 cal AA MG.
d. 1x .30 cal AA MG.
e. 1x hull MG.
|
f. 1x Right track.
g. 1x Left track.
h. 1x 76mm gun barrel.
i. 1x Thunderbolt VII resin turret.
j. 1x Thunderbolt VII resin hull. |
| Assembling Thunderbolt VII |
Step 1. Begin assembly by attaching the tracks to the hull of Thunderbolt VII.
Note: Each track has a number of lugs on the back that corresponds with the recesses in the hull to aid in correct orientation.
|
| Below: The correct alignment for the left-hand side track. |
Below: The correct alignment for the right-hand side track. |
Below: The left-hand side track attached to the hull. |
") |
") |
")
|
| Below: The right-hand side track attached to the hull. |
Step 2. Next, attach the hull MG. |
Step 3. Followed by the 76mm main gun. |
") |
") |
") |
Step 4. Other fixtures on the turret include the loader's hatch.
|
Step 5. The .30 cal AA MG.
|
Step 6. And the .50 cal AA MG. |
Step 7. Finally, fix Abrams into position. |
Step 8. With Abrams in place, Thunderbolt VII is now ready for painting.
|
") |
") |
") |
") |
") |
The M4A3E2 Jumbo
|
") |
| Description of Components |
a. 1x Hull MG sprue.
b. 3x .50 cal AA MGs
c. 3x 75mm main guns.
d. 3x Turret hatch sprues. |
e. 3x Right-hand side tracks.
f. 3x Left-hand side tracks.
g. 3x Resin M4A3E2 Jumbo turrets and hulls.
|
Assembling the M4A3E2 Jumbo
Step 1. Begin assembly by attaching the tracks to the hull of the M4A3E2 Jumbo.
Note:
Each track is marked with a letter L or R has been keyed to align to the corresponding left and right-hand side of the hull. The letter J indicates that the track is intended to be used with the M4A3E2 Jumbo. |
| Below: Examples of the orientation markings on the M4A3E2 Jumbo tracks. |
Below: The correct alignment for the left-hand side track. |
") |
") |
") |
| Below: The correct alignment for the right-hand side track. |
Below: The right-hand side track attached to the hull. |
Below: The left-hand side track attached to the hull. |
") |
") |
") |
Step 2. Next, attach the hull MG.
|
Step 3. Followed by the 75mm main gun.
|
") |
") |
") |
") |
Step 4. Next, attach the commander's hatch.
|
Step 5. Followed by the loader's hatch.
|
") |
") |
") |
") |
Step 6. Finally attach the .50 cal AA MG to the turret mount.
|
With the .50 cal AA MG in place, the M4A3E2 Jumbo is fully-assembled and ready for painting. |
") |
") |
") |
|
M4A3 (Late) Sherman
Description of Components
a. 1x Hull MG sprue.
b. 4x M4A3 (Late) resin hull & turrets.
c. 4x Plastic Sherman sprues.
|
") |
")
|
The Plastic Sherman Sprue
The parts of the plastic Sherman sprue that are used when assembling the M4A3 (Late) Sherman are highlighted in green.
Left: The highlighted parts of the plastic Sherman sprue used in the construction the M4A3 (Late) Sherman.
|
Assembling The M4A3 (Late) Sherman
Step 1. Begin assembly by attaching the tracks to the hull of the M4A3 (Late) Sherman.
Note:
Each track has a number of lugs on the back that corresponds with the recesses in the hull to aid in correct orientation. |
| Below: The correct alignment for the left-hand side track. |
Below: The correct alignment for the right-hand side track. |
Below: The left-hand side track attached to the hull. |
") |
") |
") |
| Below: The right-hand side track attached to the hull. |
Optional Step 2. To add the hull MG, snip off the ball mount from the metal MG using a pair of hobby cutters. |
") |
") |
") |
| Step 3. Attach the hull MG to the hull. |
Step 4. Next, add the 75mm main gun. |
Step 5. Attach the commander's hatch to the top of the turret. |
") |
") |
") |
Step 6. Then the loader's hatch.
|
Step 7. Next, add the .50 cal AA MG. |
Step 8. With the .50 cal AA MG in place, the M4A3 (late) Sherman is now ready for painting. |
") |
") |
")
|
| Adding Tank Commanders |
Step 1. Attach the commander's hatch to the turret in the open position.
|
Step 2. Add the tank commander figure of your choice. |
") |
") |
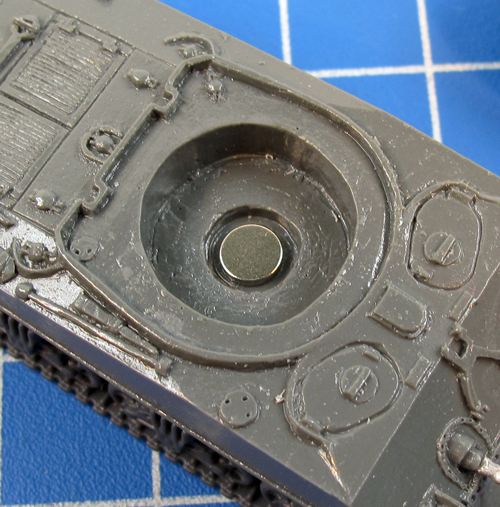
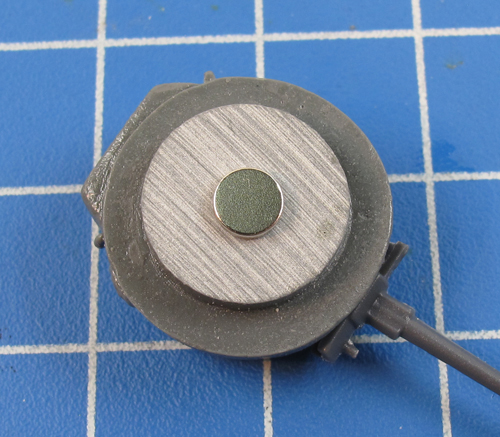
| Adding Rare-earth Magnets To Your Miniatures |
| Below: The magnet recess complete with magnet. |
Below: Simply glue a rare
earth magnet to the bottom of the turret and you have a safe and secure
way of attaching the turret to the hull. |
 |
 |
") |
M4A3 (76mm) Sherman
Description of Components
a. 1x Hull MG sprue.
b. 4x M4A3 (76mm) turrets.
c. 4x M4A3 (76mm) hulls.
d. 4x Plastic Sherman sprues.
|
|
The Plastic Sherman Sprue
The parts of the plastic Sherman sprue that are used when assembling the M4A3 (76mm) Sherman are highlighted in green.
Right: The highlighted parts of the plastic Sherman sprue used in the construction the M4A3 (76mm) Sherman.
|
") |
Assembling the M4A3 (76mm) Sherman
|
Step 1. Begin assembly by attaching the tracks to the hull of the M4A3 Sherman.
Note: Each track has a number of lugs on the back that corresponds with the recesses in the hull to aid in correct orientation. |
| Below: The correct alignment for the left-hand side track. |
Below: The correct alignment for the right-hand side track. |
Below: The left-hand side track attached to the hull. |
") |
")
|
") |
| Below: The right-hand side track attached to the hull. |
Optional Step 2. To add the hull MG, snip off the ball mount from the metal MG using a pair of hobby cutters. |
") |
") |
") |
| Step 3. Attach the hull MG to the hull. |
Step 4. Next, add the 76mm main gun. |
Step 5. Attach the loader's hatch to the top of the turret. |
") |
") |
") |
| Step 6. Followed by the commander's hatch. |
Step 7. Next, add the .50 cal AA MG. |
Step 8. With the .50 cal AA MG in place, the M4A3 (76mm) Sherman is now ready for painting. |
") |
") |
") |
| Description of Components |
a. 1x Plastic Sherman sprue.
b. 1x 75mm main gun.
|
c. 1x OP Sherman tank commander.
d. 1x OP Shermna resin hull and turret.
|
") |
The Plastic Sherman Sprue
The parts of the plastic Sherman sprue that are used when assembling the OP Sherman are highlighted in green.
Right: The highlighted parts of the plastic Sherman sprue used in the construction the OP Sherman.
|
Assembling the OP Sherman
|
Step 1. Begin assembly by attaching the tracks to the hull of the OP Sherman.
Note: Each track has a number of lugs on the back that corresponds with the recesses in the hull to aid in correct orientation. |
| Below: The correct alignment for the left-hand side track. |
Below: The correct alignment for the right-hand side track. |
Below: The right-hand side track attached to the hull. |
") |
") |
") |
| Below: The left-hand side track attached to the hull. |
Step 2. Next, attach the 75mm main gun.
|
") |
") |
") |
Step 3. Finally, add the tank commander to the turret.
Note: The turret and cupola have been keyed to fit together so not to be used on another model.
|
With the tank commander in place, the OP Sherman is fully assembled and ready for painting.
|
") |
") |
")
|
") |
| Description of Components |
a. 3x Crew figures with hands on hips.
b. 3x Crew figures with hand out.
c. 3x Crew figures holding shell.
d. 3x MG ring.
e. 3x 105mm main gun.
|
f. 3x Plastic Sherman sprues.
g. 1x Resin M7 Priest Type B.
h. 1x Resin M7 Priest Type C.
i. 1x Resin M7 Priest Type D. |
|
The Plastic Sherman Sprue
The parts of the plastic Sherman sprue that are used when assembling the M7 Priest are highlighted in green.
Right: The highlighted parts of the plastic Sherman sprue used in the construction the M7 Priest.
|
") |
| Note: On the lower half of the hull on the left-hand side, each hull is marked with either the letter B, C or D. |
") |
")
|
") |
Assembling the M7 Priest
|
Step 1. Begin assembly by attaching the tracks to the hull of the M7 Priest.
Note: Each track has a number of lugs on the back that corresponds with the recesses in the hull to aid in correct orientation. |
| Below: The correct alignment for the left-hand side track. |
Below: The correct alignment for the right-hand side track. |
Below: The right-hand side track attached to the hull. |
") |
") |
") |
| Below: The left-hand side track attached to the hull. |
Step 2. Next, attach the 105mm main gun. The hull has two small notch in the gun cradle where the gun barrel rests.
|
") |
") |
") |
Below: The 105mm main gun in place.
|
Step 3. Time to attach the MG ring; this attached to the hull on the front right-hand side of the hull. |
Step 4. Next, attached the .50 cal AA MG to the MG ring.
|
") |
") |
") |
") |
Step 5. Finally, add the crew to the fighting compartment of the M7 Priest.
|
With the crew in place, the M7 Priest to ready for painting.
|
") |
") |
") |
Command Team
Description of Components
a. 1x Officier figure pointing.
b. 1x Standing Rifleman figure.
c. 1x Rifleman figure with hand on hip.
d. 1x Small three-hole base.
Assembling the Command Team
Simply arrange one of figure A along with figure B and one of figure C to taste on the small three-hole
base provided.
|
| Description of Components |
a. 1x Table leg sprue.
b. 1x Tabletop.
c. 1x Stool.
d. 1x Seated Radioman figure. |
e. 1x Standing Rifleman figure.
f. 1x Rifleman figure with hand on hip.
g. 1x Officier figure pointing.
h. 1x Medium four-hole base.
|
Assembling the Staff Team
On the medium four-hole base provided, arrange figures D, E, F and G around the Staff team table.
|
Last Updated On Sunday, January 17, 2016 by James at Battlefront
|
|
|