|
|
|
|
Products mentioned in this Article
--None--
|
|
|
|
|
|
|
|
|
 |
|
|
 |
The Battle for Pegasus Bridge
By Jason Moffatt
The British coup-de-main force swoops from the skies upon the bridges over the Caen Canal and Orne River. Can they capture the bridges and, reinforced by Paras, hold them?
D-1, 2256 hours: Following months of intensive training, Major John Howard’s coup-de-main force - six platoons from the 2nd Oxfordshire and Buckinghamshire Light Infantry - is towed into the night sky aboard six Horsa gliders. Their target: two small but strategically vital bridges on the eastern flank of the invasion beaches.
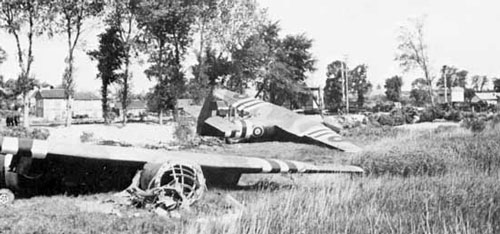
At approximately 0015 hours on D-Day, in spite of strong winds and low cloud, the glider pilots succeed in crash-landing all but one of the six gliders within a few hundred metres of their targets.
|
|
At the westernmost bridge across the Caen Canal (later dubbed Pegasus Bridge by the victorious Allies) the defenders, osttruppen of 736. Grenadierregiment, are taken completely by surprise and Howard’s men quickly overwhelm them. British sappers speedily clear the bridge of explosives and the coup-de-main force establish a bridgehead on the western bank in readiness for the inevitable German counterattacks.
Meanwhile a mere half-kilometre away, at the easternmost bridge across the Orne River (later dubbed Horsa Bridge), the other half of the coup-de-main force encounter even lighter resistance. The bridge is quickly secured and at 0026 hours Howard transmits the codewords “Ham and Jam” to signal that their mission has been a success. Now he must anxiously await reinforcement.
|
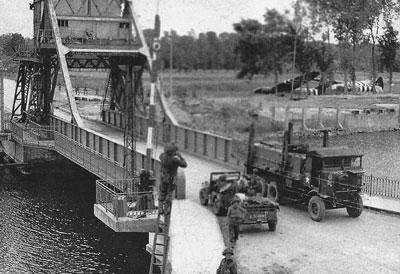
Pegasus Bridge a few days after the battle.
|
| At 0050 hours, the 7th (Light Infantry) Parachute Battalion, under Lieutenant-Colonel R.G. Pine-Coffin, drop by parachute east of the Orne River. Although their drop is badly scattered, by 0130 hours Pine-Coffin has collected approximately half of his force and sets off for the bridges. |
 |
Once there, A Company move into Benouville village, B Company into the neighbouring hamlet of le Port and parts of C Company occupy the Chateau de Benouville in the south, others are held in reserve. The understrength Paras are bereft of heavy weapons and have only PIATs and Gammon bombs with which to counter enemy armour. |
| As dawn breaks on D-Day the German counterattacks begin in earnest. In le Port, B Company are severely harassed by snipers operating from the local church tower until a carefully aimed PIAT bomb silences them. At 0900 hours, two Kriegsmarine gunboats approach Pegasus Bridge from the north but a well-aimed PIAT round puts one out of action and the other to flight. Most hard pressed of all is A Company in Benouville. Throughout the day, in spite of mounting casualties, they hold off repeated German counterattacks some including armoured vehicles. Increasingly isolated, the paratroopers only avoid complete encirclement by mounting numerous fighting patrols. |
|
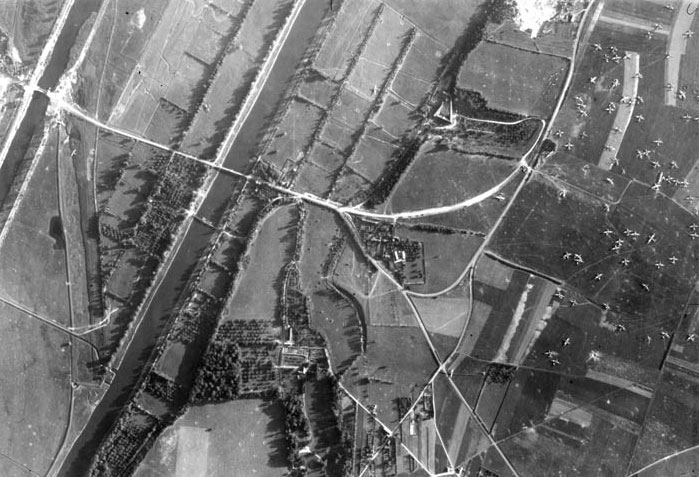
A photograph taken by an aircraft a few days later, the Orne (Horsa) Bridge in the centre left, with Pegasus bridge further
to the left photograph edge.
|
|
The first sign of relief for the beleaguered Paras is the arrival of the commandos of Lord Lovat’s 1 Special Service Brigade around 1300 hours. Unfortunately the commando’s objectives lie east of the river meaning they are unable to reinforce 7th Battalion.
Finally, at 2115 the 2nd Battalion, The Royal Warwickshire Regiment, part of the 3rd Infantry Division that had come ashore on Sword Beach, launch an attack to relieve Pine-Coffin’s men.
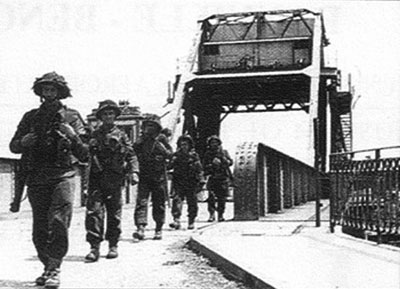
By this time A Company has been reduced by continuous fighting to only 20 men. These few fight on valiantly as the Warwicks gradually move into position along the bridgehead perimeter and it is not until 0100 hours on D+1 that the last of the exhausted Paras withdraw across Pegasus Bridge.
|
 |
|
Through a combination of incredible daring, fighting prowess and endurance their difficult mission had been a success.
Refighting Pegasus Bridge
You can refight the Battle for Pegasus Bridge using the Seize and Hold mission from D-Day: British. Play the mission using the table layout and force composition shown below. In order to encompass this battalion-sized operation we’ve scaled the forces involved upwards so that each Flames Of War platoon represents a real-life company. To reflect the special circumstances of the Battle for Pegasus Bridge, the following special rule applies:
Between Two Bridges
The Caen Canal and Orne River are both too wide and deep to be fordable hence the importance of the two bridges. The narrow strip of land between them is just wide enough to permit gliders to land but otherwise there is no way to land troops there.
The Caen Canal and Orne River are impassable, no platoons may move onto the table via the strip of land between them.
|
|
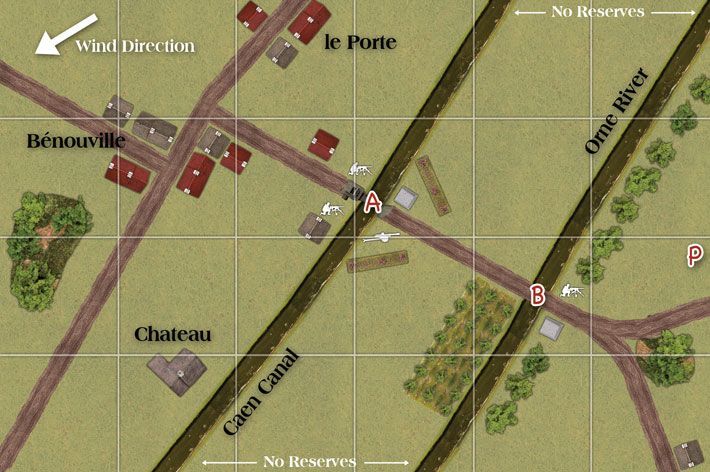
Pegasus Bridge, 6 June 1944
|
 |
The Bridge Defences
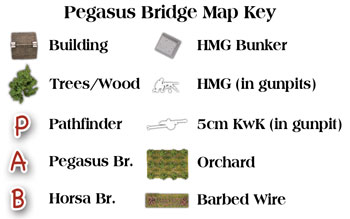
The German defences are strongest around the Benouville (Pegasus) Bridge. At the western end of the bridge the road is flanked by dug-in sMG34 machine-guns. At the eastern end is a small machine-gun bunker on one side of the road and a 5cm KwK anti-tank gun in an open emplacement on the other side (See D-Day: American for these teams).
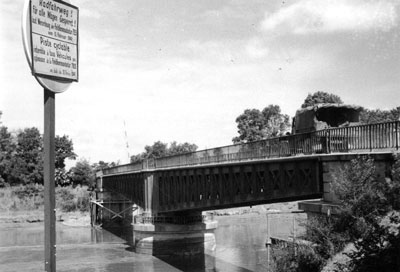
The Ranville (Horsa) Bridge is guarded at the eastern end by another small machine-gun bunker and an entrenched sMG34 machine-gun on either side of the road.
|
| BRITISH 6th AIRBORNE DIVISION |
|
Actual
Coup-de-main force
Reinforced D Company, 2nd Battalion Oxfordshire and Buckinghamshire Light Infantry
No. 1 Platoon
No. 2 Platoon
No. 3 Platoon
No. 4 Platoon
No. 5 Platoon
No. 6 Platoon
|
Game
Coup-de-main force
Airlanding Company HQ
Airlanding Platoon
Airlanding Platoon
|
|
Consolidation force
Pathfinders of 22 Independent
Parachute Company
A Company, 7th (Light Infantry) Parachute Battalion
B Company, 7th (Light Infantry) Parachute Battalion
C Company, 7th (Light Infantry) Parachute Battalion
|
Consolidation force
Parachute Company HQ
D-Day: British Command Card: Richard Pine-Coffin
Parachute Platoon
Parachute Platoon
Parachute Platoon
|
|
Major Howard’s coup-de-main force that led the attack on the bridges consisted of D Company, 2nd Ox and Bucks Light Infantry reinforced for the dangerous mission by two further platoons from B Company, 2nd Ox and Bucks Light Infantry and 30 sappers from 249. Field Company, Royal Engineers.
The consolidation force (guided to their drop zone by pathfinders from 22. Independent Parachute Company) was Lieutenant-Colonel Pine-Coffin’s 7th (Light Infantry) Parachute Battalion.
Right: Orne (Horsa) Bridge.
|
 |
| GERMAN 716. INFANTERIEDIVISION |
Actual
Bridge Garrison
1./642 Ost Bataillon, 736. Grenadierregiment
2./642 Ost Bataillon, 736. Grenadierregiment
1. Maschinegewehrzug 3./736 Grenadierregiment |
Game
Bridge Garrison
At A:
Beach Defence Grenadier Company HQ,
Beach Defence Grenadier Platoon (Osttruppen ) at full strength with: 2 Machine-Gun Sections attached (disposition shown on Map) |
|
Reserves
1. Kompanie, 220. Panzerpionier Battailon
1. Panzerjager Kompanie, 716. Grenadierregiment
8. Kompanie, 192. Panzergrenadierregiment
9. Kompanie, 192. Panzergrenadierregiment
10. Kompanie, 192. Panzergrenadierregiment
|
Reserves
Armoured Pioneer Platoon (at full strength) (D-Day: German command card)
Marder Tank Hunter Platoon (4x Marder) (Fortress Europe)
Armoured 8cm Mortar Platoon
1x Marder (7.62cm)
1x Sd Kfz 10/5 (2cm)
Artillery Battery (6x 15cm (sf) Lorraine Schlepper)
Mortar Platoon (4x 8cm mortar) |
|
The bridge garrison consisted of the ill-prepared ostruppen of 642. Ost Batallion. Once the bridges fell, several counterattacks were launched to regain them using whatever forces were at hand: pioneers from 220. Panzerpioneer Batallion, antiquated Marder I’s from the tank-hunter company of 716. Grenadierregiment, and an odd-assortment of converted French armoured vehicles from 192. Panzergrenadierregiment.
Axis of Attack: The Breville Gap
The capture of Pegasus and Horsa Bridges is of course imperitive to enable the amphibiously landed British forces from Sword Beach to linkup with the British Airborne forces east of the Orne River. If the airborne mission is a failure it could spell doom for the men of the 6th Airborne Division.
If both players agree, they may play the Battle for Pegasus Bridge prior to beginning the Axis of Attack campaign: The Breville Gap – The Campaign for Normandy. The victory points each player wins in the battle will be added to their starting victory point total for the campaign. Additionally, if the British player loses the mission, the movement of reinforcements from the beach to the Orne Bridgehead is delayed. For the first mission of the campaign only, they must remove a single platoon, chosen at random, from their force for the duration of the battle.
This is an old campaign.
Download the Brevill Gap campaign...
|
Last Updated On Monday, April 20, 2020 by Wayne at Battlefront
|
|
|