|
|
|
|
Products mentioned in this Article
|
|
|
|
|
|
|
|
|
 |
|
|
 |
Israeli Decals Deciphered:
A Guide To Using The Israeli Decal Set
with Blake Coster feat. Miniatures Painted by Chris Townley.
The Suez
Crisis was the Israeli’s first experience of large-scale tank operations and it
was quickly realised that if markings were not legible under normal conditions
they were sure to be missed in the heat of combat. By the time of the
Six-Day War broke out in June 1967, the Israeli Defence Force had significantly
increased the size of vehicle markings in an attempt to make them more
recognisable to friendly units.
|
Fate Of A Nation
The fate of a nation hangs in the balance. Israel cannot lose even a
single battle. One defeat would mean the destruction of the tiny Jewish
state. Not waiting to be attacked by the Arab forces massing on its
borders, Israel strikes first.
Learn more about Fate Of A Nation here... |
 |
However, to the untrained eye many of the decals may in fact be unrecognisable. But never fear, in this article I intend to explain what each decal represents and where it needs to go on the various Israeli vehicles featured in Fate Of A Nation.
|
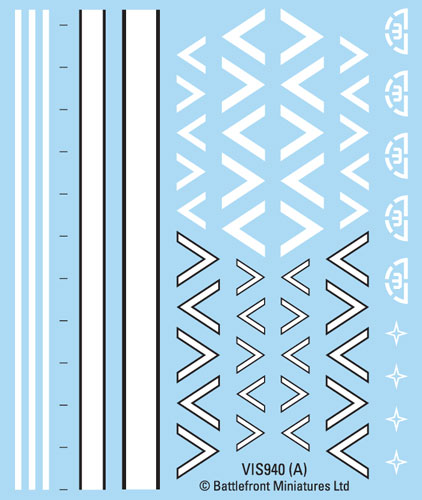
| Below: Israeli decal sheet A. |
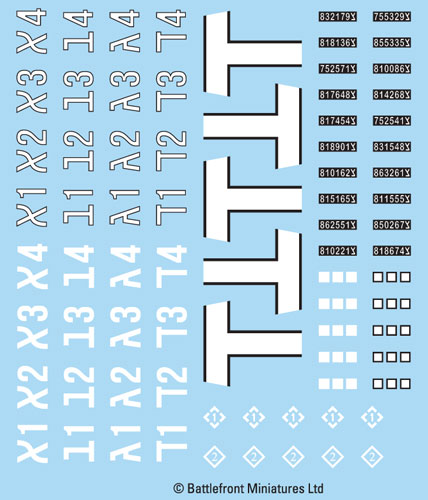
Below: Israeli decal sheet B.
|
 |
 |
Battalion Markings
Determining which tank belonged to which battalion in the Israeli Defence Force (IDF) was indicated by the
number of stripes present on the tank’s gun barrel. One stripe meant the
tank belonged to the first battalion; two stripes the second battalion
and so on.
|
Below: The Battalion stripe section of the decal sheet.
|
 |
| Below: An M50 Sherman from the 3rd Battalion. |
Below: A M51 Isherman from the 2nd Battalion. |
 |
 |
Applying The Battalion Markings
Applying the decal is quite simple; cutting the decal to length is the tricky part. Luckily we’ve made it easy for you by adding some length guides; the small black dashes that can be seen next to the barrel stripes. Using these guides and a sharp hobby knife, cut the decal to length then remove the any unnecessary stripes depending on the battalion you wish to represent.
Next, apply the decal around the barrel and position the decal in the desired location with a moist brush. Some overlap is desirable and with a little care and patience you should be able to align both ends of the decal correctly.
|
| Tip: Applying a thin coat of gross varnish to the location where the decal is intended to be place will reduce the occurrence of silvering. Silvering occurs when the transparent film of the decal becomes visible, ruining the painted-on effect. |
 |
Company Markings
Which company the tank belonged to was indicated by the direction a chevron (the V-shaped symbol on the decal sheet) was pointing. The chevron is pointing down indicates the tank belonged to the the first company; pointing forward the second company and pointing up indicates the third company.
|
Below: The Company chevron section of the decal sheet.
|
 |
Below: A Magach 2 from the 3rd Company; 3rd battalion.
|
Below: A Magach 3 from the 2nd Company; 2nd Battalion. |
 |
 |
Applying The Company Markings
The company markings can be applied to any suitable flat surface on the tank; either the side of a turret as commonly seen on the Patton or the side skirts as commonly seen on the Centurion. For the Patton and the Centurion use the larger-sized chevrons; the smaller-sized chevrons are useful for fitting the company markings onto vehicles that lack the flat real estate such as M50 Sherman seen in the example below.
If the chevron decal overlaps any detail on the turret like can be seen in the examples above, simply cut the decal in half and realign both halves when applying them to the model. If you’re feeling confident in your decaling abilities, you might want to try removing the section of the decal that would be hidden from view as can be seen in the Magach examples above. This will give your model that little bit of extra realism.
|
Tip: The plain white chevron was more commonly seen in 1967 while the chevron with the black outline was more common in 1973.
|
| Below: The 2nd Company chevron of the side skirt of a Centurion. |
Below: The smaller chevron of the 2nd Company on a M50 Sherman. |
 |
 |
Platoon Markings
On the decal sheet, platoon markings consist of the combination of numbers i.e. 1, 2, 3, 4 and the first four letters of the Hebrew alphabet aleph (א), bet (ב) gimel (ג) and dalet (ד). The number indicates the platoon; while the Hebrew letter indicates each individual tank within that platoon.
|
| Below: The Platoon markings section of the decal sheet. |
| Below: An example of the first tank from first platoon. |
Below: An example of the first tank from second platoon. |
 |
 |
The platoon commander may have occupied the aleph vehicle or just the unadorned platoon number i.e. the platoon number by itself.
When applying the platoon markings, the ideal place is on the sides of the turret. |
Right: An example of a platoon commander featuring just the platoon number marking.
|
Tip: The plain white platoon markings was more commonly seen in 1967 while the platoon markings with the black outline was more common in 1973.
|
|
 |
Air Recognition Markings
Israeli air recognition markings consisted of a wide white stripe outlined in black. The stripe ran vertically along the engine deck and often down the rear plate; it was also common to carry on across the top of the turret.
|
| Below: The air recognition section on the decal sheet. |
 |
| Below: An example of the air recognition stripe on a Magach. |
Below: An example of the air recognition stripe on the rear of a half-track. |
|
 |
Air recognition marking for Israeli half-tracks and jeeps consisted of a T shape stripe that ran wheel-to-wheel across the front of the vehicle and then running back to the passenger compartment and often down the rear of the vehicle.
|
Tip: Since the air recognition markings take up a large surface area, it is inevitable that they will overlap panel lines and other raised detail on your model. Once the decal is in place, using decal softener is a must in these circumstances. Decal softener does what it name implies; it softens the decal, causing it to conform to the shape of the model such as sunken panel lines or around raised detail. For example, the engine decks of tanks is one place that decal softener is well worth considering.
|
| Below: The air recognition stripes for half-tracks and jeeps. |
Below: An example of the T air recognition stripe on the front of a half-track. |
 |

|
Battalion / Brigade Markings
Numerous
Israeli vehicle featured battalion or brigade marking on the front
left-hand side mudguard. However, the actual meaning of these marking
remains unknown.
|
| Below: The first Battalion / Brigade decal section. |
Below: An example of a Battalion / Brigade marking on a Magach. |

|

|
| Below: The second Battalion / Brigade decal section. |
 |
Applying The Battalion / Brigade Markings
With the Battalion / Brigade marking you can take a few liberties; the location of the decal is much more important in this case rather than the exact marking you decide to use.
|
| Tip: When referring to
left or right-hand side in regards to a Flames Of War miniature, the
orientation is determined as if looking at the vehicle from the rear. |
 |
Identification Plates
IDF tanks had a unique set of markings used just for identification purposes if the tank was knocked-out in combat; allowing the Israeli to keep accurate record on combat losses.
Left: The Identification plate section of the decal sheet.
Applying The Identification Plates
Identification plates can be applied to the front, side and rear of Israeli vehicles. On tanks, they can also be applied to the turret in addition to the hull as the IDF considered each as assists so the identification plates often didn’t match i.e. the hull plates differed from the turret place.
By following Chris' examples that can be seen in the examples below as well as in each of the product spotlights for the Israeli vehicle you'll find plenty of inspiration of where to place the identification plates.
Gain quick, easy access to everything Fate Of A Nation related including all of the Israeli product spotlights here…
|
| Below: Examples of some of Chris' identification plates on his various Israeli tanks. |

|

|
 |
Tip: If you’re lacking inspiration on where to place the identification plates or any of the other Israeli decals for that matter, a quick image search using the Internet can help. Using the terms “Israeli Tanks Six-Day War” or “Israeli Tanks 1967” should net you some plenty of reference images.
|
Below: Some reference images of Israeli tank featuring identifcation plates found using an common Internet search engine.
|
 |
 |
M113 Markings
The final section of the Israeli decal sheet features markings for the M113. By the time of the breakout of the Yom Kippur War (also known as the October War) in 1973, Israeli was now backed by the United States of America. In attempt to demonstrate their lasting commitment to Israel, the United States supplied the IDF with military hardware. Amongst equipment supplied was the F-16 to replace the Mirage; Phantoms to replace the Skyhawk and M60 Patton tabks and M113 APCs (Armoured Personnel Carriers) to replace the Shermans and M3 half-tracks.
Applying The M113 Marking
In 1967, the IDF had no M113s so this section of the decal sheet is redundant for now.
~ Blake.
|
 |
Last Updated On Wednesday, December 3, 2014 by Blake at Battlefront
|
|
|