|
|
|
|
Products mentioned in this Article
--None--
|
|
|
|
|
|
|
|
|
 |
|
|
 |
51st Highland Division in Normandy
The 51st Highland Division first made a name for itself as a high quality formation during the First World War. They were formed in 1908 as a Territorial division after the Haldane reforms of the British Army. It was during the First World War that they adopted their "HD" unit symbol that they were to leave so famously painted on the roads of Normandy in 1944.
In 1939 they we once more mobilised for war, now made up of a mix of Regular and Territorial soldiers, they were again sent to France.
|
|
During the 1940 campaign they fought under French command (10th Army), fighting a number rear guard actions against the German advance. They were finally cut off and surrounded at Saint-Valéry-en-Caux. However, the 154th Brigade had been detached and withdrawn earlier and only the 152nd and 153rd Brigades were captured when the Division was forced to surrender on 12 June 1940.
The 51st Highland Division was reconstructed in Britain from the surviving 154th Brigade and the 9th (Highland) Division, a second line Territorial copy of the 51st Division. The new division underwent intense training during 1941-42 and in June 1942 was once more sent to the front, this time taking part in the North African campaign.
They gained a reputation for good organisation, morale, fighting prowess and staff work, which was especially appreciated by Montgomery. They fought alongside the Australians and New Zealanders during Operation Lightfoot and were instrumental in clearing minefields during Operation Supercharge. After the Battle of El Alamein they took part in the ragged pursuit of the Afrika Korps across North Africa to Tunisia. In Tunisia they took part in the assault on the Afrika Korps positions at Wadi Akarit. They also took part in the battles for Mareth and Medenine. Next they were part of the 30th Corps during the Sicily invasion, finally returning to Britain after the conquest of the island.
|
Normandy
Once again they underwent intense training in preparation for the invasion of Normandy. There was also a change the command of the Division just before Sicily, Major-General Douglas Neil Wimberley, who had lead them through their campaigns in North Africa, was replaced by Major-General C.Bullen-Smith.
The Division began to land in Normandy on 6 June with the 153 Brigade under Lt.-Col. ³Chick² Thomson. They landed after the leading divisions had taken Juno and Sword beaches. Initially Thomson offered the support of his brigade to the 3rd Canadian Division, but their commander assured him that all was under control.
The following morning the 51st Division¹s commander Maj.-Gen. Bullen-Smith sent a battalion towards the Radar Station at Douvres under Corps orders. The 5th Black Watch, with two Churchill AVRE tanks attached, advanced on the wood to the east of Douvres. Unfortunately the wood was occupied by Canadians, who were mistaken by the Scots for Germans and fired on. |
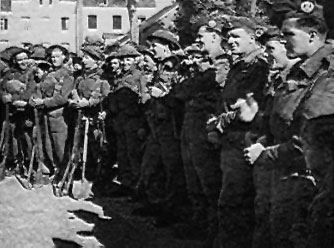
Highlanders in the station square at St Valery-en-Caux,
1 September 1944. Photo kindly supplied by Richard
Sands from www.keep-em-moving.com whos Grandfather
can be seen second from the left.
|
|
The mistake was quickly realised and the Scots pushed beyond the wood towards the Radar Station across some open fields.
The Station was covered by a 7.5 or 8.8cm gun from the village of Douvres. The gun opened fire as the battalion advanced from the wood and took out both of the Royal Engineers¹ Churchill AVRE tanks. The Scots become pinned down before the open ground and Thomson requested additional troops. Instead the attack was called off and orders were received to bypass the position while the Navy shelled the Radar Station until resistance ceased. However, the Radar Station wasn¹t eventually taken until it was stormed by commandos.
153 Brigade was next directed towards Pegasus Bridge on the Caen Canal, while the 5th Cameron¹s (now landed and attached to the 153 Brigade) stayed to cover the Radar Station. 152 Brigade arrived 7 June. 5th Seaforth commander Lt.-Col. Walford took command of the Brigade and they were dispatched on 9 June to cross the Pegasus Bridge and lend support to the 6th Airborne Division. They were supported by 4th Armoured Brigade. 154 Brigade didn¹t arrive at the beachhead until 10 June (D+4) and were immediately placed in the Corps reserve where they remained until 13 June.
|
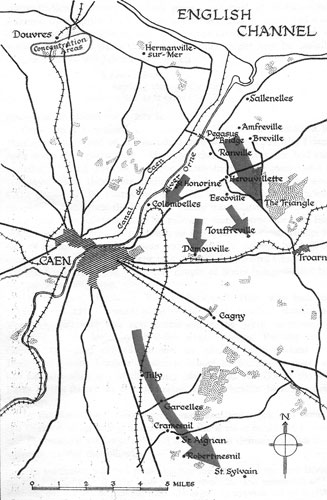 |
Once across the Orne 153 Brigade became embroiled in heavy fighting for various villages. The 5th Black Watch, under command of the 6th Airborne Division, headed to towards Breville along the road from Ranville. They quickly ran into stiff resistance along the road as German troops opened fire on them from the ditches and adjacent fields. OA¹ Company was practically wiped out. Hardest hit was the leading platoon, which lost every man to the initial ambush. The battalion retreated and took up positions in the Chateau de Breville south of the village. The Germans launched a counter-attack on the Chateau. They came at the highlanders frontally, but the Black Watch held their ground and repelled the German attack with heavy casualties.
The 5/7th Gordons pushed towards Touffreville and took it without opposition but had to repel a counter-attack by the Germans. The 1st Gordons pushed towards what would later become the OThe Triangle¹ and were yet to meet heavy resistance.
In the meantime the 152 Brigade (less the 5th Seaforth attached to the 153 Brigade) began operation ³Smock² to take the villages of St Honorine la Chardonnerette and Demouville. The 5th Camerons were to take the former and the 2nd Seaforth the latter. The Camerons concentrated around Ranville and attacked on the morning of 13 June. The Germans reacted quickly and dropped a heavy artillery bombardment on the Scots¹ start line causing the attack to be delayed. They attacked was joined by an Armoured Platoon (4th Armoured Brigade), three of the tank initially heading west before joining the attack and the forth joined them for the final assault.
|
|
They took positions in and around the village, but continued to by harried by heavily German artillery fire. The Bombardment was followed by a German counter-attack supported by Panzers.
The Cameron¹s anti-tank guns were able to give a good account of themselves, Sergeant A. Mackenzie taking out three Panzers from one column alone with his 6 pdr. By 10.00 hours the pressure on the Camerons' positions had become too much and the order was given to withdraw. However, the order did not reach C Company, and they remained in position for some time before the order to withdraw was received. The battalion retreated and reformed on Longueval on the Orne River.
Due to the failure of the attack on St. Honorine forced the 2nd Seaforth Highlanders to call off their attack on Demouville. They instead took up defensive positions on the high ground north of St. Honorine. They were joined by the 5th Seaforth battalion back from the 153 Brigade who were positioned between the other two battalions.
|
On 22 June the attack by the Camerons on St. Honorine was resumed. This time the Tanks were ready with the Scots at the assembly point. The attack was launched before dawn and the village was captured by sun-up. Mopping up continued until 10.00 hours, with the Camerons having to fight off several determined counter-attacks. They held the village for the rest of the day and were relieved during the night by detachments of the 2nd Seaforth. They were in turn relieved by the 5th battalion of the Seaforth Highlanders.
The division¹s third brigade (154 Brigade) was placed under the command of the 6th Airborne Division and cross the Orne and took up positions defending the bridges. They fought for and held the Orne bridgehead from Longueval in the south to Sallenelles in the north near the mouth of the Orne. The bridgehead extended east of Herouvillette to ³The Triangle². The Triangle was faced on two sides by German forces, while one flank was left exposed until St. Honorine was taken on 22 June. |
 |
|
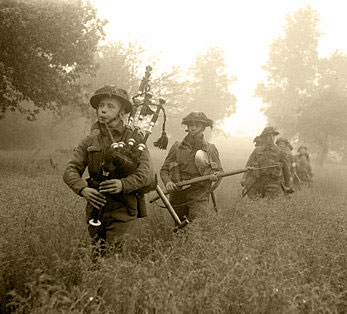
The men of the 154 Brigade striking east were harried by continual artillery and mortar shelling by a wily and unseen enemy. During this period the whole division¹s morale plummeted as the continuous bombardments and slow progress took its toll. This was further impacted by the division¹s role as a reserve for other division, the brigades and battalions often being split from the division to support and relieve various other British and Canadian forces.
It came all to ahead at the village of Colombelles. The village, about a mile east of Caen, was dominated by a large factory with its large chimneys towering into the sky. The factory was an ideal position for German observers, giving them a wide view of the surrounding countryside. The 153 Brigade was tasked with attacking the position at night. They were reinforced with the 7th Black Watch (154 Brigade). The plan called for the 1st Gordons to take the village of Colombelles from Longueval, the 5th Black Watch was to seize the crossroads at the northeast corner of the factory and the 7th Black Watch would pass through the 1st Gordons and take the Factory area. Royal Engineers would then destroy the chimneys then all troops would withdraw. It was estimated the operation would take no more than a day.
The operation was launched on 11 July at 01.00 hours. The 1st Gordons immediately ran into trouble taking the village. Two companies penetrated the western corner of Colombelles, but the other two companies were stalled by heavy artillery, mortar and small arms fire. The 5th Black Watch took the crossroads and took up positions in the houses around the area. By 04.00 hours it was decided to withdraw the two companies in the village and assemble the 1st Gordons for another attempt to take the village at dawn. Unfortunately the Germans detected the Gordons¹ withdrawal. They put up flares and withdrawing companies of the 1st Gordons suffered severely. The 5th Black Watch were now isolated at the crossroads, their only protection being the few building they occupied as the ground proved too hard to dig-in. They were under direct observation by the still German occupied factory and they came under heavy artillery and mortar bombardment. Their right flank was also exposed to the enemy fire. The highlanders still had the support of the 4th Armoured Brigade¹s Sherman tanks, but they were about meet some devastating opponents.
At 06.30 three Tiger Ie (503. Schwere Panzerabteilung) and two Panzer IV H tanks (21. Panzerdivision) emerged from the southern end of the factory.
|
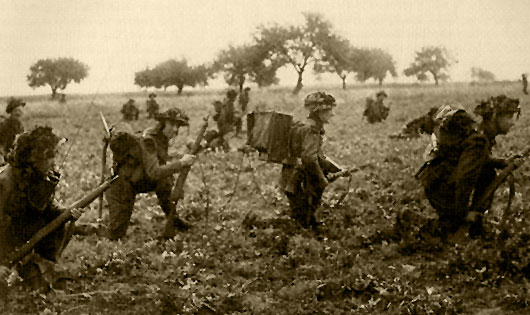 |
Of the eleven Shermans and Firefly tanks supporting the 5th Black Watch ten were destroyed by the German panzers. The 5th Black Watch was forced to withdraw without sufficient anti-tank support. They too took heavy casualties withdrawing. By 09.30 the withdrawal was completed, and the operations to clear the factory has failed. The operation had taken a heavy toll on 153 Brigade, who withdrew back to Longueval. |
|
The division continued to contribute to the fighting to expand the bridgehead. The 5th Seaforth (152 Brigade) was positioned on the edge of ³The Triangle² by 9 July. ³The Triangle² was shaped as it was named with the point facing south, it was heavily wooded and the Germans held southern and eastern edges with a mixture of regular troops and auxiliary Osttruppen. With the opening of Operation Goodwood (18 July) the 5th Seaforth were assigned the role of taking ³The Triangle². Heavy bombing followed by a heavy artillery barrage cleared the way and the highlanders took the troublesome area aided by Churchill Crocodile flame-throwing tanks. Once taken the 2nd Seaforth and 5th Camerons push through ³The Triangle² down the Troarn road. The 5th Camerons grimly held their new positions for ten days under intense artillery fire before being relieved by the 7th Black Watch. The 153 Brigade relieved the whole 152 Brigade shortly afterward.
The 51st Division also contributed to Operation Goodwood by clearing mines for the armoured units of the 1st Corps to advance. After Goodwood the division¹s reputation had been somewhat tarnished, they had not preformed up to their own high expectations and had meet many set backs during their fighting thus far. Fellow Infantry Divisions without the fine reputation of the highlanders, like the 50th and 3rd Divisions, had performed much better. In particular the 50th Division, who had shared many of the 51st Division¹s experiences in North Africa and Sicily, had adapted to the challenges of the bocage and close terrain more confidently than their northern brothers. The high command had also noted the highlanders struggles and changes in the command were made.
|
Operation Totalise
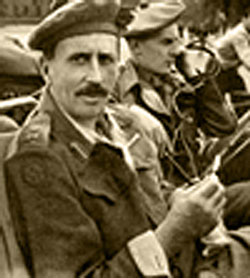
The 51st Division¹s new commander was a familiar face, Major-General T.G. Rennie. He had been with the Division in France and been captured, before escaping and returning to Britain to command a battalion then a brigade of the reformed division. He was later appointed commander of the 3rd Division who he had commanded from the D-Day landings until he was wounded. Now mostly recovered, though is arm was still in a sling, he arrived to take the command of the division.
The 51st Highland Division was placed under the command of the 2nd Canadian Corps for Operation Totalise. The Corps had been tasked with breaking out of the Normandy bridgehead towards Falaise along the Caen-Falaise main road. The Corps would advance in a two brigade front, with a Canadian brigade on the right and the 51st Highland Division¹s 154 Brigade on the left. |
 |
For the operation the 33rd Armoured Brigade was attached to the division, which was to be the beginning of a long and fruitful relationship between the two formations. The operation called for the 154 Brigade to drive straight through the German lines and occupy the area around Cramesnil, St. Aignan, and Garcelles-Secqueville. They would be followed by the 152 and 153 Brigades to increase the salient and allow two Armoured Divisions to fan out through their positions and push on to Falaise. The 154 Brigade would advance in two columns with the 7th Argylls and 144th RAC pushing towards Cramesnil followed by the 7th Black Watch and the 148th RAC (to seize Garcelles-Secqueville). To their left the 1st Black Watch and the Northamptonshire Yeomanry were to head for St. Aignan. The terrain was mostly flat, but divided by strips of woodland into fields with standing crops of corn and wheat. The roads were sunken and lined by embankments and poplar hedges. Small villages surrounded by orchards and hedges regularly broke the terrain.
This operations was seen as chance for the division to redeem itself, to restore its 8th Army reputation and to prove it worth to the high command. Planning and preparations were made with care and key parts of the operation were practiced in mock attacks. |
 |
After intense preparations, including rousing messages from Rennie and Montgomery summoning up the memories of past glories, the operation kicked off on 7 August at 02.30 hours under the cover of darkness. The direction of the advance was guided by Bofors gun fire on the flanks and searchlights were reflected off the clouds to provide artificial moonlight. Even green smoke from the artillery was dropped on the objectives, nothing was left to chance.
|
|
Each column was lead by four tanks, or flail tanks when mines needed to be cleared. Following behind were the Highlanders mounted in Defrocked Priests nicknamed Kangaroos.
These were made by removing the gun from Priest self-propelled artillery vehicles to make them into armoured personnel carriers. These had been developed by the Canadians and were attached to the division for the operation.
The 7th Argylls came under some fire during their advance to the objective, but after some delay at the railway were able to achieve their objectives by 04.00 hours. The 1st Black Watch has some trouble with the sunken roads and embankments, but only came under fire from some self-propelled guns, which knocked out two Kangaroos. Once they hit the debus point, they dismounted, formed up and immediately attacked their objective. The fighting was hard but they eventually took all their objectives and the battalion had dug-in by 06.00 hours.
The 7th Black Watch also came under fire from a concealed German anti-tank gun. They were able to reach their debus point in time despite the delay. They were able to gain their objectives after some heavy fighting, though the sun was rising by the time they had take them. They then had to dig-in during the early morning light and were caught in several mortar barrages.
It wasn¹t long before the Germans counter-attack came, and it was the 1st Black Watch who bore the brunt of the attack. The Germans were supported by artillery and mortar fire and some US Airforce bombers that mistakenly drop bombs in the highlanders¹ area. The German attack was accompanied by a number of Tiger and Panzer IV tanks. The 1st Black Watch is supported by the Northamptonshire Yeomanry who ably defend their infantry comrades from the German armour. They knockout several Tiger and Panzers IV tanks. This action, and excellent artillery support, brought the German offensive to a halt. This allowed the 1st Polish Armoured Division to pass though the positions to start the second phase of the operation. The Poles ran into stiff oppositions and so returned to take up positions behind the 154 Brigade.
|
|
Following the 154 Brigade was the 152 Brigade who¹s task was to mop up the broken through German front line. This didn¹t prove as an easy task as first thought, rather they retreating because of the forces behind them many German units stayed to fight. The village of Tilly-la-Campagne prove a hard nut to crack. Initially the 2nd Seaforth was sent to take it, but after encountering stiff resistance they were reinforced with a company from the 5th Seaforth. It wasn¹t until a unit of tanks arrived from the 154 Brigade to the rear of the village that the defenders were captured and the village taken. The 5th Camerons advanced though wheat fields towards the village of Lorquichon, which they captured with light casualties. They then advanced through a wood to Poussy where they dug-in.
The 153 Brigade provided the last mop-up force of the operation. On 8 August they advanced mounted in Kangaroos to the Garcelles-Secqueville area where the dismounted and attacked Sequeville-la-Campagne. The 1st Gordons successfully took the village capturing 92 prisoners.
|
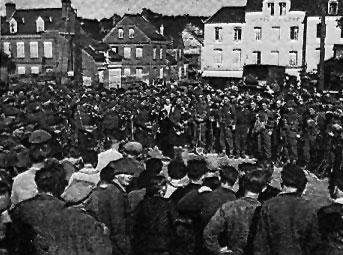
Highlanders in the station square at St Valery-en-Caux,
1 September 1944. Photo kindly supplied by Richard
Sands from www.keep-em-moving.com
|
|
The 5/7th Gordons attacked through the wood to the west Conteville, while the 5th Black Watch occupied the village of Soliers. By 9 August all the division¹s objectives had been taken. However the woods around St. Sylvain were still occupied by Germans and the 7th Argylls and 1st Black Watch were tasked with clearing the area. They attacked at night after moving through the positions of the 7th Black Watch in the village, where they came under some machine-gun fire before they pushed into the woods. The were hit with several counter-attacks which they ably fought off. They came under further pressure when the 1st Polish Armoured Division fail to fan out east and were pushed back by German counter-attacks. The situation was finally eased when the 7th Black Watch relieved the 7th Argylls and the 5/7th Gordons were able to clear a ridge to the front left of the woods.
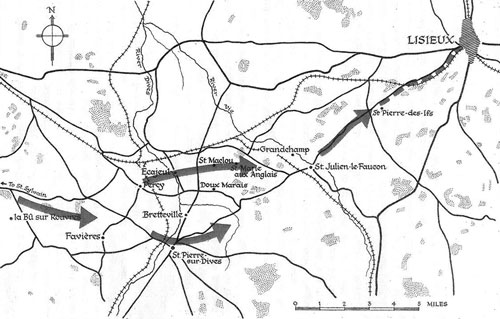
In the following week the advance continued with the 1st Gordons capturing Doux Marais and the chateau at St. Marie-aux-Anglais. To their left fought the 5/7th battalion through the St. Sylvain woods and they then combined with the 5th Black Watch to successfully cross the River Dives. On 14 August the 5th Black Watch attacked La Bû-sur-Rouvres, taking about 200 prisoners. During the fighting they were aided by some Canadian infantry and tanks that had become separated from their own division. They then moved on to Percy then and St. Pierre before crossing the Dives to join the 154 Brigade bridgehead across the river. They moved north to take up positions next to the 1st Gordons at Ecajeul.
On the night of 16-17 August the 1st Gordons attacked the village of St. Maclou catching the defenders completely by surprise taking the village and many prisoners. Because the Germans hadn¹t evacuated the civilians of St. Maclou this was the Highlanders first encounter since landing in Normandy of a welcoming by the liberated French people.
|
 |
On 18 August the 5/7th Gordons attacked Grandchamp on the bank of the Vie River. They were joined by the 5th Black Watch for the operation to cross the river and create a bridgehead on the other side. The 5/7th Gordons would cross and allow the destroyed bridge to be repaired which the 5th Black Watch would then cross. The first part of the operation succeeds and a bridgehead is formed. The bridge was repaired under fire to a standard that allowed the 5th Black Watch to cross on foot during the night. They made for the high ground. During their advance their battalion HQ back behind the river was hit by artillery, most of the command and signallers were killed. Despite this the 5th Black Watch continued forward, the first two companies pushing forward with the second two companies following behind and crossing the repaired bridge in trucks. |
|
The leading companies fought their way on to a ridge on the horseshoe shaped feature that was the objective by first light. The horseshoe¹s defence is established with the arrival of 1st Gordons on the 5th Black Watch¹s left. German counter-attacks we repulsed during the day.
Lisieux was taken on 33 August by 5/7th Gordons against strong opposition. The fighting was intense with each street, square and house contested by the Germans and much hand-to-hand fighting was seen by the Highlanders. The 5th Black Watch relieved the 5/7th Gordons.
In the meantime the 1st Gordons took the village of La Forge Vallée on 21 August. By 23 August they had entered Lisieux where they were ordered to pass through and take the high ground beyond the town. They then moved to the southeast.
The 152 Brigade advanced on Lisienx from 14 August. The 5th Seaforth meet resistance at Faviéres. After a struggle they took the positions a 21.00 hours on 15 August. They were finally able to continue their advance on to St. Pierre-sur-Dives the following day, which had already been taken by the 5th Camerons. The Brigade moved towards the River Vie. They came under attack by Allied aircraft during their advance. The 5th Seaforth crossed the river at St. Julien-le-Fauçon, and after much fighting against determined German resistance they reached Lisieux on 22 August. The 5th Camerons advanced from St. Pierre-sur-Dives to the crossing at St. Julien-le-Fauçon where they were supported by the East Riding Yeomanry. They crossed the Vie on 20 August and attacked south towards the main Lisieux road. By nightfall they were digging in around St. Fressard-le-Chère. The next day they moved to St. Pierre-des-Ifs southwest of Lisieux where they stopped until 26 August. The 152 Brigade¹s third battalion, 2nd Seaforth Highlanders (also known at the 78th), advanced on the 5th Camerons left and by 28 August were positioned on some high ground overlooking Lisieux.
The 154 Brigade advanced from La Bû-sur-Rouvres, one battalion leading on foot with the other two following behind in transport. The 7th Black Watch led up to St. Pierre-sur-Dives and once across the river attacked the high ground at Le Godet supported by the 1st Squadron Northamptonshire Yeomanry.
|
| The initial attack in daylight was repelled with the loss of ten tanks. A night attack by the infantry was also fought off. The 7th Black Watch finally succeeded the following morning, though not without high casualties to the Scots. It was now the 7th Argylls turn to lead the advance and they pushed through the 7th Black Watch¹s positions and continued on. Their objective was the crossroads a mile short of St. Julien. As they approached they came under mortar fire, which burst among the trees causing several casualties. They pushed on and finally reach their objective, but only after having to cross open ground and taking more casualties. The were relieved by the 1st Black Watch who¹s target was St. Julien itself. They took the village against light resistance and remained there until 21 August when the lead of the advance once more fell to the 7th Black Watch. The 7th Black Watch advanced beyond the La Corne crossroads without casualties. |
 |
|
Some mopping up operations we conducted around Lisieux until 23 August, but the taking of the town brought to an end a long period of continuous fighting by the 51st Highland Division. They had fought for 17 days non-stop against a determined enemy during which the division had taken over 1600 prisoners.
|
 |
After Totalise
The division was still attached to the Canadian Corps during operations to take Le Harve and capture St. Valéry-en-Caux (site of the division¹s surrender in 1940). They were next involved in the Ardennes offensive in December 1944 to January 1944. They also took part in the Reichwald fighting in January and the Rhine Crossing in March.
15th Scottish Division...
Fielding the 51st Highland Division in Flames Of War
You can field formations from the 51st Highland Division with D-Day: British using either a Rifle Company or a Desert Rats Rifle Company. You can further give them the Highland feel with the Bag Pipes Command Card from the D-Day: British Command Cards pack.
|
|
51st Highland Division Order Of Battle
Division commanders: Major-General C. Bullen-Smith
Major-General T. G. Rennie (from 26 August 1944) KIA 24 March 1945
Major-General G.H.A. MacMillan (from 24 March 1945)
152nd Infantry Brigade: Brigadiers D.H. Haugh, A.J.H. Cassel (from 24 June 1944)
2nd Seaforth Highlanders
5th Seaforth Highlanders
5th Cameron Highlanders
153rd Infantry Brigade: Brigadiers H. Murray, J.R. Sinclair (from 19 August 1944)
5th Black Watch
1st Gordon Highlanders
5/7th Gordon Highlanders
154th Infantry Brigade: Brigadier J. A. Oliver
1st Black Watch
7th Argylle & Sutherland Highlanders
7th Black Watch
Royal Artillery
126th Field Rgt Royal Artillery (3 bttys of 8-25 pdrs in two troops)
127th Field Rgt Royal Artillery (3 bttys of 8-25 pdrs in two troops)
128th Field Rgt Royal Artillery (3 bttys of 8-25 pdrs in two troops)
61st Anti-Tank Rgt Royal Artillery (4 bttys each with 1 troop towed 6pdr, 2 troops towed 17 pdrs).
40th Light AA Rgt Royal Artillery (3 bttys of 18 40mm AA guns in 3 troops each)
Machine-gun Battalion
1/7th Battalion The Middlesex Regiment, "The Die-Hards", (HQ company and 4 companies machine guns)
Royal Engineers
51st Engineer Rgt: 274th Field Coy, 275th Field Coy, 276th Field Coy, 239th Field Park Coy.
16th Bridging Platoon
Reconnaisance Regiment
2nd Derbyshire Yeomanry RAC
Attached units:
79th Medium Regiment RA (The Scottish Horse)
June-July
4th Armoured Brigade
79th Armoured Division Churchill Crocodile Platoon
Totalize (from 7 August 44)
33rd Armoured Brigade
Northamptonshire Yeomanry
144th RAC Rgt
148th RAC Rgt
|
Last Updated On Monday, April 20, 2020 by Wayne at Battlefront
|
|
|