
|
| |
|
|
|
|
 |
|
|
Point 195
 |
Operations Totalize and Tractable Scenarios
Scenario 2: Point 195
(Operation Totalize, 10 August)
By Stuart Elle
Point 195 is an area of raised open ground that looks towards Potigny – one of the Division’s objectives towards Falaise. During the night of August 8, the British Columbia Regiment and Algonquin Regiment got lost in the darkness on their way to Point 195 and were quickly destroyed by a 12. SS-Panzer Division counterattack. This time the route is carefully laid out through the darkness with scouts along the way to help units find their objective.
|
|
|
As dawn breaks, the German commanders find a regiment each of Canadian tanks and infantry deployed around Point 195. The attack to dislodge them must begin immediately.
This battle is designed to allow 2 to 4 players to have a game with a larger number of points than normal. So get together with some friends and have a blast.
This mission uses Delayed Reserves and Immediate Reserves.
Your Orders
Canadian Forces
You must hold this terrain feature so that the remainder of the division can continue the attack towards Potigny.
German Forces
Your defences must hold the line to prevent an breakthrough toward Potigny.
Your Forces
Canadians
Argyll and Sutherland Highlanders Regiment of Canada
Rifle Company from page 30 of D-Day: British. is rated Confident Trained.
Rifle Company HQ
Upgrade to Canadian Rifle Company with the Relentless Command Card for a Rally 3+.
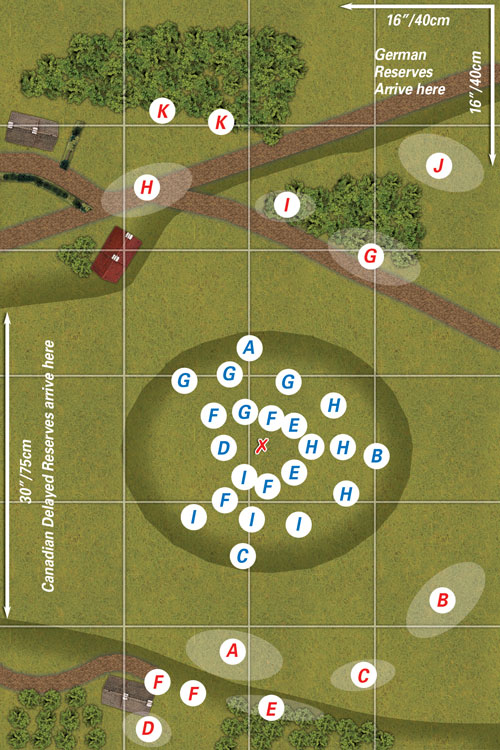
Rifle Platoon [Deploy Blue “A”]
Full Strength
Rifle Platoon [Deploy Blue “B”]
Full Strength
|
 |
 |
Rifle Platoon [Deploy Blue “C”]
Full Strength
Weapons Platoon
3-inch Mortar Platoon [Deploy Blue “D”]
6x 3-inch mortar
Vickers Machine-gun Platoon [Deploy Blue “E”]
4x Vickers HMG
Support Platoons
17 pdr Anti-tank Troop [Deploy Blue “F”]
4x 17 pdr gun
25 pdr Field Troop
4x 25 pdr gun
|
|
25 pdr Field Troop
4x 25 pdr gun
The 25 pdr guns are off table. They measure ranges and spot for targets from the centre point of the long table edge the Reserves arrive from.
22nd Armoured Regiment (Canadian Grenadier Guards)
The Canadian Sherman Armoured Squadron is taken form D-Day: British with the Determination command car applied to give them Remount 3+.
Sherman Armoured Squadron HQ
3x Sherman (75mm)
Sherman Armoured Troop [Deploy Blue “G”]
3x Sherman (75mm)
1x Firefly (17 pdr)
|
 |
 |
Sherman Armoured Troop [Deploy Blue “H”]
3x Sherman (75mm)
1x Firefly (17 pdr)
Sherman Armoured Troop [Deploy Blue “H”]
3x Sherman (75mm)
1x Firefly (17 pdr)
Typhoon Fighter-bomber Flight
2x Typhoon
Reserves – 21st Armoured Regiment (Governor General’s Foot Guards)
Sherman Armoured Troop [Deploy Blue “H”]
3x Sherman (75mm)
1x Firefly (17 pdr)
Sherman Armoured Troop [Deploy Blue “H”]
3x Sherman (75mm)
1x Firefly (17 pdr)
|
|
Germans
1055/1056. Grenadierregiment/89. Infanterie-Division
These are fielded as a Beach Grenadier Company from page 18 of D-Day: German.
Beach Grenadier Company HQ
2x MP-40 SMG team with Panzerfaust
Beach Grenadier Platoon [Deploy Blue “A”]
7x MG42 & K98 rifle team with Panzerfaust
2x Panzerschreck team
Beach Grenadier Platoon [Deploy Blue “B”]
7x MG42 & K98 rifle team with Panzerfaust
2x Panzerschreck team
Beach Defence sMG34 Machine-gun Platoon
[Deploy Blue “C”]
4x sMG34 HMG team
Beach Defence 8cm Mortar Platoon [Deploy Blue “D”]
4x 8cm mortar
Beach Defence 7.5cm Tank-hunter Platoon
[Deploy Blue “E”]
3x 7.5cm gun
Support
8.8cm Heavy AA Platoon [Deploy Blue “F”]
2x 8.8cm AA gun
15cm Nebelwerfer Battery
6x 15cm Nebelwerfer
|
25/26. SS-Panzergrenadierregiment/12. SS-Panzerdivision
SS Panzergrenadier Company can be found on page 42 of D-Day: Waffen-SS.
SS Panzergrenadier Company HQ
2x MP-40 SMG team with Panzerfaust
SS Panzergrenadier Platoon [Deploy Red “G”]
7x MG42 team with Panzerfaust
1x Panzerschreck team
SS Panzergrenadier Platoon [Deploy Red “H”]
7x MG42 team with Panzerfaust
1x Panzerschreck team
sMG42 SS Machine-gun Platoon [Deploy Red “I”]
4x sMG42 HMG team
8cm SS Mortar Platoon [Deploy Red “J”]
4x 8cm mortar
Support
8.8cm SS Heavy AA Platoon [Deploy Red “K”]
2x 8.8cm AA gun
10.5cm SS Artillery Battery
4x 10.5cm howitzer
Reserves – 12. SS-Panzerdivision
Panzer IV SS Tank Platoon
4x Panzer IV (7.5cm)
Tiger SS Tank Platoon (Villers-bocage)
1x Tiger (8.8cm)
|
|
Campaign Play
If you are playing this as a follow up to Mission 1: Route Nationale No.158 then the following rules are used.
German Victory – The additional time it takes to secure the towns leading to Point 195 means the Canadians must now attack in the daylight. The Canadian infantry has made it into position, but the tanks of the Canadian Grenadier Guards must make the dash through open terrain to Point 195. The tanks enter from the reserve deployment zone along the edge of the table instead of setting up around the objective.
Canadian Victory – The success of the initial attacks has allowed the medium artillery units to move forward more quickly than anticipated. The Canadian player may conduct a Preliminary Bombardment against German units deployed along the wooded areas facing Point 195.
Preparing for battle
1. Set up the table as shown in Map above. The table is 4’/120cm by 6’/180cm. Place the objective on Point 195 as indicated.
2. All 25 pdr Field Troops and 10.5cm SS Artillery Batteries are deployed off table.
The Canadians measure ranges and spot for targets from the area of the long table edge the Reserves arrive from. The Germans measure and spot from the table corner area defined where their reserves arrive from.
3. Both players now deploy their forces as indicated.
4. The Governor General’s Foot Guards platoons are held off the table as Delayed Reserves.
5. The German Panzer IV and Tiger tanks are held off the table as Reserves.
Beginning the Battle
1. All Canadian and German units begin the game in Foxholes and Gone to Ground.
2. The German players take the first turn.
Ending the Battle
The battle ends when either:
1. The Canadians start any of their turns on or after Turn six with no German Tank, Infantry, or Gun team within 8"/20cm of the Objective, or
2. The Germans if they end they end a turn on or after Turn six Holding the Objective.
Deciding who won
The Canadians win if they still control the objective on Point 195 when the game ends.
Otherwise the Germans win and the Canadians must continue the advance toward Potigny another day.
Point 195 Terrain
Rolling Ground
The gently rolling terrain of the open Normandy fields makes it very hard to hide a tank in the open, but there are some small rises that can allow a tank to achieve some measure of protection in a hull down position.
Roll a die for each Canadian tank deployed in the open ground around Point 195 before the battle starts. On a roll of 1 place a counter next to the tank to indicate it has found some small rise to protect it. Count the tank as Concealed for any attack against its Front Armour.
Elevation
As the ground rises towards the crest of Point 195 some teams can see over those situated below them and vice versa. A team can shoot over a friendly team on a lower contour at an enemy team not in contact with the friendly team. A team on a lower contour can shoot over the top of a friendly team on the same contour at an enemy team on a higher contour.
Scenario 1: Route Nationale No. 158 (Operation Totalize, 8-9 August)...
Scenario 3: Assault on Epancy (Operation Tractable, 15 August)... |
Last Updated On Friday, October 14, 2022 by Wayne at Battlefront
|
|
|