|
|
|
|
Products mentioned in this Article
--None--
|
|
|
|
|
|
|
|
|
 |
|
|
 |
Flames Of War Third Edition:
The Missions
With the arrival of the Third Edition of Flames Of War rules set, a number of missions have been added to the main rulebook. Some first featured in past Flames Of War Intelligence books such as Dust Up or Witch's Cauldron (now known simply as Cauldron in Third Edition) from the Early-war book Hellfire and Back, covering the campaign in North Africa during 1940-41. There are even a number of brand new missions for you to sink your teeth into such as Surrounded and Counterattack plus a few tweaks to a few old favourites.
Download the Third Edition Mission Pack (.pdf format; 2.86MB) here...
Included are the following missions:
|
|
Free-For-All (Fair Fight)
In highly-mobile engagements it is not uncommon for forces to suddenly find themselves in contact with the enemy. The freewheeling battles that result are little more than all-in brawls.
Mission Special Rules
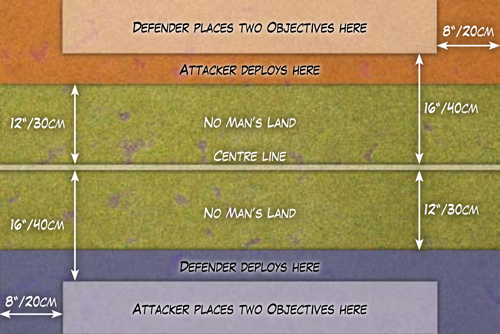
Free-for-All uses the Meeting Engagement (page 264) special rule.
Right: The Free-For-All mission deployment map
|
 |
Your Orders
|
The Attacker
Your forces have broken through the enemy front line. The enemy must be
ruthlessly crushed before they can occupy proper defences! You must
seize one of your objectives before the enemy seizes one of theirs. |
The Defender
The enemy has broken through. Your company must occupy and defend
critical objectives before the enemy secures them. Capture one of your
objectives before the enemy takes one of theirs. |
|
 |
Encounter (Fair Fight)
On the open flanks of the main battle, a small force can encounter a lot of trouble very easily. Having found it, they call for support and the action escalates.
Mission Special Rules
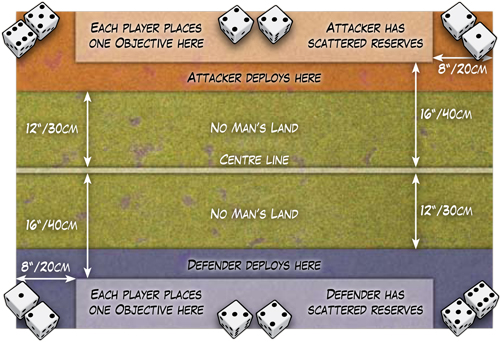
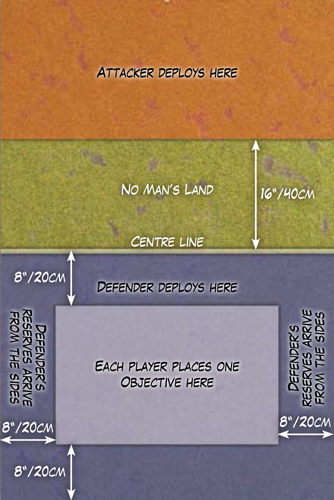
Encounter uses the Delayed Reserves (page 269), Meeting Engagement (page 264), and Scattered Reserves (page 269) special rules.
Left: The Encounter mission deployment map.
|
The Attacker
You have encountered strong opposition and called for assistance, but so has the enemy. You must attack now
while they are still weak and seize one of your objectives before the enemy captures one of theirs.
|
The Defender
A section of the line has crumbled and it’s fallen upon your shoulders
to repel the enemy advance. Act aggressively until assistance arrives,
then capture one of your objectives before the enemy captures one of
theirs
|
|
Dust up (Fair Fight)
Two advancing forces clash, each determined to get through to their objectives. Soon a whirling battle
develops as reserves arrive on the flanks and are thrown into the fray.
Mission Special Rules
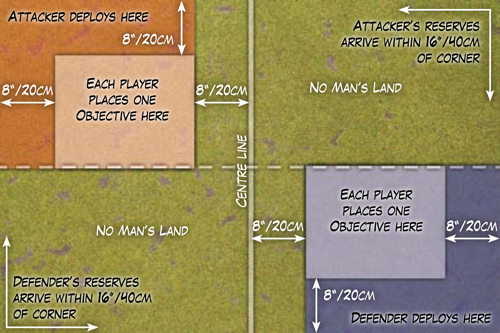
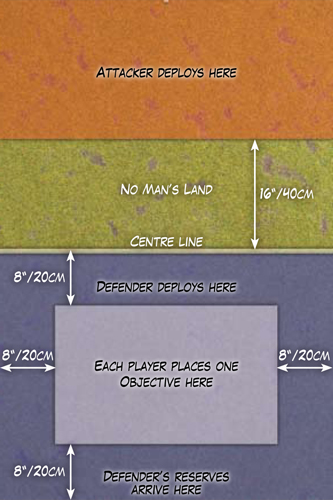
Dust Up uses the Delayed Reserves (page 269) and Meeting Engagement (page 264) special rules.
Right: The Dust Up mission deployment map. |
 |
The Attacker
Seize the initiative and thrust your forces into the enemy’s defences and secure a key objective. He who hesitates is lost. You must capture one of your objectives before the enemy captures one of theirs.
|
The Defender
Parry your opponents thrust and manoeuvre your forces to take and hold a key position behind their lines. Be ready to attack when the time is right. Strike hard and fast to take an objective before the enemy does so.
|
|
 |
No Retreat (Defensive Battle)
There comes a time in every conflict when a force must dig in and prepare to repel a massive assault from the enemy. Often the deciding battles of their campaigns, these desperate defences can turn the tides and determine the momentum of entire wars.
Mission Special Rules
No Retreat uses the Ambush (page 266), Reserves (page 268), and Prepared Positions (page 264) special rules.
Your Orders
The Attacker
The enemy has fallen back to defend a single choke point of your advance. Their lines disorganized, their reserves in tatters, you must crush their resistance and open a path to victory! You must assault and capture one of your objectives.
The Defender
The situation is desperate and your path is grim, but if you can mount a heroic defence against their coming advance you could turn the tide of this war. Reinforcements are coming, and your superiors have promised you support: until they arrive, you are on your own. There can be no retreat. You must hold the objectives and push the enemy back.
Left: The No Retreat mission deployment map.
|
|
Hold the Line (Defensive Battle)
Surprise is paramount in any military operation, and never more so than in defence. When significantly outnumbered with no hope of immediate reinforcement, a defender has to rely even more on intangibles like surprise to even the odds.
Mission Special Rules
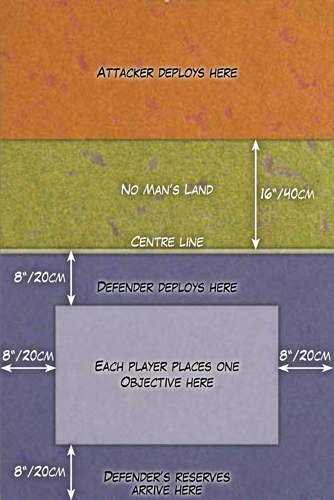
Hold the Line uses the Ambush (page 266), Delayed Reserves (page 269), and Prepared Positions (page 264) special rules.
Your Orders
The Attacker
Your opponent is weak and isolated, ripe for destruction. Attack immediately, smash them quickly and seize your objectives.
The Defender
You have been assigned a near impossible task. Only your ability to misdirect the enemy into thinking that you are weaker than you are can save you. Use surprise well. Ambush the enemy and prevent them from taking their objectives, then push them back when help arrives.
Right: The Hold The Line mission deployment map. |
 |
|
|
Pincer (Defensive Battle)
The Germans developed a clever technique for pinching off Soviet penetrations. The front-line troops did their best to limit the penetration, then the reserves struck the flanks of the penetration to cut it off and destroy it.
Mission Special Rules
Pincer uses the Ambush (page 266), Delayed Reserves (page 269), and Prepared Positions (page 264) special rules.
Your Orders
The Attacker
You have found a weak point in the enemy defences. Punch through the front line to create a jumping off point for the exploitation force following behind. You must break into the enemy position to capture one of your objectives.
The Defender
You do not have the strength to prevent the enemy from breaking into your lines somewhere, so you must rely on a well-planned counterattack to regain your defences. You must hold the objectives and push the enemy back.
Left: The Pincer mission deployment map. |
|
Surrounded (Defensive Battle)
After a successful attack trapped the defenders in a pocket, only one slender corridor remains linking them to the outside world. Recognising the importance of this lifeline, both sides throw everything they have into the battle.
Mission Special Rules
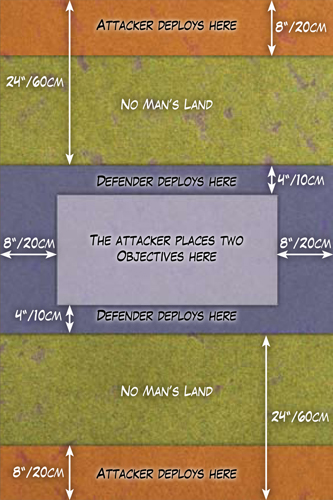
Surrounded uses the Immediate Ambush (page 265) and Prepared Positions (page 264) special rules.
Your Orders
The Attacker
You have the enemy on the ropes. One more strong blow will crush them. Cut the corridor and the surrounded enemy pocket will fall. You must seize one of the objectives, breaking the enemy’s lifeline.
The Defender
You are the only thing standing between your army and disaster. While you hold the corridor open, the pocket will hold out, and a counterattack can be launched to relieve it. If you fail, the whole pocket will be captured. You must prevent the enemy from attaining their objectives.
Right: The Surrounded mission deployment map. |
|
|
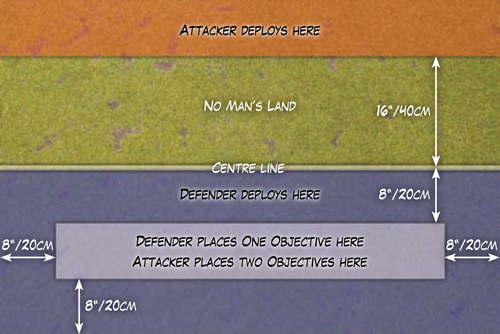 |
Fighting Withdrawal (Defensive Battle)
A fighting withdrawal allows defeated commanders to preserve the bulk of their forces while falling back to a more defensible location.
Mission Special Rules
Fighting Withdrawal uses the Ambush (page 266), Prepared Positions (page 264), and Strategic Withdrawal (page 270) special rules.
Left: The Fighting Withdrawal mission deployment map. |
The Attacker
To exploit an earlier victory you must smash the enemy rearguard and
turn their retreat into a rout. Break through the enemy line and capture
one of the objectives before it is too late. |
The Defender
You must cover your withdrawal as the army falls back to the next
defensible position. The enemy is moving around your flanks so you
cannot stay too long. Hold the objectives until the rest of the army
gets clear.
|
|
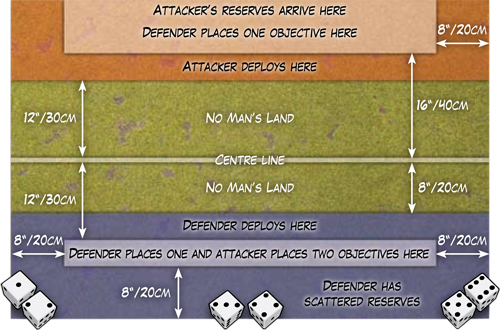
Hasty Attack (Mobile Battle)
While most commanders faced with a prepared defence seek to build up the maximum forces for the attack, sometimes they do not have the time and must attack immediately with whatever is on hand.
Mission Special Rules
Hasty Attack uses the Delayed Reserves (page 269), Immediate Ambush (page 267), Reserves (page 268), Scattered Reserves (page 269), and Prepared Positions (page 264) special rules.
Right: The Hasty Attack mission deployment map.
|
 |
The Attacker
Find a weak point in the enemy line and punch through. You must seize one of your objectives before the enemy rallies and pushes you back.
|
The Defender
Hold the initial assault, then force the enemy back when your reserves arrive. You must prevent the enemy from taking their objectives, then counterattack and take your own.
|
|
 |
Cauldron (Mobile Battle)
When night falls on the battlefield both sides traditionally exercise a tacit truce and rebuild their forces, resupply, and tend to the wounded.
Mission Special Rules
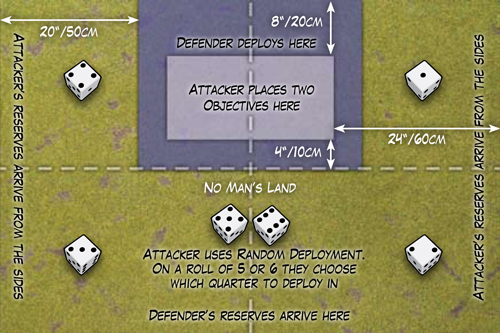
Cauldron uses the Immediate Ambush (page 267), Prepared Positions (page 264), Reserves (page 268), Delayed Reserves (page 269), and Random Deployment (page 261) special rules.
Left: The Cauldron mission deployment map.
|
The Attacker
A massive enemy offensive has punched through the front line, taking up positions amongst yours during the night. You must attack immediately to restore the situation.
|
The Defender
You have pushed through the front lines during the night and taken vital ground from the enemy. Now, with dawn breaking, you must form a solid defence against the inevitable counterattack and hold your gains.
|
|
Breakthrough (Mobile Battle)
A widely-stretched front has forced the defenders into a hedgehog defence. The attacker has sent a flanking force through the gaps between the defended positions while launching a frontal assault to pin the enemy.
Mission Special Rules
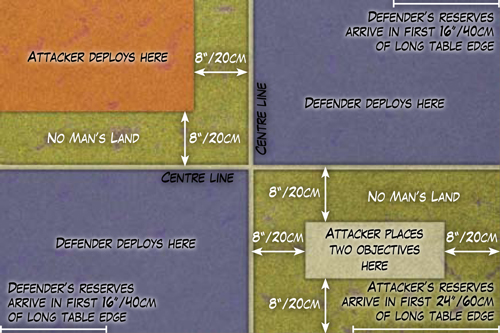
Breakthrough uses the Delayed Reserves (page 269), Mobile Reserves (page 269), and Prepared Positions (page 264) special rules.
Right: The Breakthrough mission deployment map.
|
 |
| Your Orders |
The Attackers
The enemy does not have sufficient strength to cover the entire front.
You must seize one of the objectives, either by direct assault, or with a
cunning flank attack.
|
The Defenders
Your reconnaissance troops report a strong attack force moving around your flank while another strong force is massing for a frontal attack. You must secure the objectives and drive the enemy back.
|
|
|
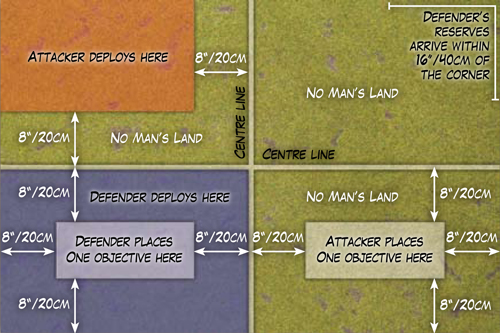
Counterattack (Mobile Battle)
The enemy is making a counterattack to relieve their cut-off comrades. Complete the encirclement and ensure the destruction of the trapped enemy troops.
Mission Special Rules
Counterattack uses the Ambush (page 266), Mobile Reserves (page 269), Prepared Positions (page 264), and Reserves (page 268) special rules.
Left: The Counterattack mission deployment map.
|
The Attacker
The enemy have found a weak point in your encirclement. They are launching a counterattack to link up with their surrounded comrades. You must close the gap before they can make the link up.
|
The Defender
You are expecting a relieving force at any moment. You must exploit the weakness in the enemy encirclement
and link up with them. Prevent the enemy from taking their objectives and completing the encirclement.
|
|
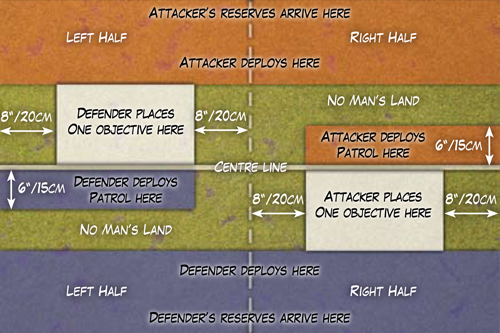
No Man’s Land (Trench Warfare)
All is quiet in your fortified sector of the line. It seems like a good time to send out a patrol and see what the enemy is up to.
Mission Special Rules
No Man’s Land uses the Darkness (page 273), Delayed Reserves (page 269), No Man’s Land Patrol (page 271), and Over the Wire (page 271) special rules.
Right: The No Man's Land mission deployment map.
|
 |
Last Updated On Tuesday, February 28, 2012 by Blake at Battlefront
|
|
|